DRAPER 10.8v OSCILLATING MULTI-TOOL es C€ Tess Instructions accompanying the product ars the original Instructions. This document Is part of the product, keep it for the [ila of the product passing it on to any subsequent holder of the product. Rear al these instructions before assembling, operating or maintaining this product.
1. TITLE PAGE 1.1 INTRODUCTION: USER MANUAL FOR: 10.8V Oscillating Multi-Tool Stock No: 08853 Part No: OMT108 1.2 REVISIONS: Date first published January 2022. As our user manuals are continually updated, users should make sure that they use the very latest version. Downloads are available from: com/manuals Draper Tools Limited Draper Tools Limited Hurley Road Nude Graft 8 Chandler's Ford 6002 NL Castlereagh WEER Hampshire Netherlands 8053 1YF UK Website: drapertools.
2. CONTENTS 21 TABLE OF CONTENTS 1. TITLE PAGE 1.1 INTRODUCTION: 2 12 2 1.3 UNDERSTANDING THIS MANUALS SAFETY CONTENT: 2 14 COPYRIGHT @ 2 2. CONTENTS 21 TABLE OF CONTENTS 3. WARRANTY 31 4. INTRODUCTION 41 42 SPECIFICATION. 43 HANDLING AND STORAGE. 5. HEALTH AND SAFETY INFORMATION 51 GENERAL SAFETY INSTRUCTIONS FOR POWER TOOL USE... 52 ADDITIONAL SAFETY INSTRUCTIONS FOR CORDLESS MULTI-TOOL. 53 RESIDUAL RISK 6. TECHNICAL DESCRIPTION 6.1 IDENTIFICATION 7. UNPACKING AND CHECKING 71 PACKAGING . 72 DRAPER 10.
3. WARRANTY 3.1 WARRANTY Draper tools have been carefully tested and Inspected before shipment and are guaranteed to be free from defective materials and workmanship. Should the tool develop a fault, please rectum the complete tel to your nearest distributor or contact: Draper Tools Limited, Chandler's Ford, Castlereagh, Hampshire, S053 1YF. England. Telephone Sales Desk: +44 (0) 8049 4333 or Product Help Line +44 (0) 23 8049 4344. A proof of purchase must be provided with the tool.
4. INTRODUCTION 41 SCOPE The tool Is Intended for sawing and cutting wood, plastic, gypsum, non-ferrous metals, and fastening elements (8. g. unhardened balls and staples). It Is also Intended for working soft wall tiles, as well as dry sanding and scraping of small surfaces. It is especially for working clods to edge and flush cutting. Any application other than that it was designed for is considered misuse. 4.2 SPECIFICATION Stock No. Part No. Voltage Speed (no load) Speed settings ..
5. HEALTH AND SAFETY INFORMATION 5.1 GENERAL SAFETY INSTRUCTIONS FOR POWER TOOL USE When using any type of power tool thees are steps that should be taken to aka sure that you, as the user, remain safe. Common sense and a respect for the tool will help reduce the risk of Injury. Read the Instruction manual fully. Do not attempt any operation until you have read and understood this manual. Most important you must know how to safely start and stop this machine, especially in an emergency.
5. HEALTH AND SAFETY INFORMATION Remove and check setting tools. Some machinery requires the use of additional tools or keys to set, load or adjust the power tool. Before starting the power tool always check to make certain they have been removed and are safely away from the machine. Prevent unintentional starting. Before plugging any machine in to the power supply, make sure the switch is in the OFF position.
5. HEALTH AND SAFETY INFORMATION Be sure that there are no cracks or breakage on the pad before use. Cracks or breakage may cause a personal injury. Do not use accessories which are not specifically designed and recommended by the tool manufacturer. Just because the accessory can be attached to your power tool, it does not assure safe operation. ‘Wear personal protective equipment. Depending on application, use face shield, safety goggles or safely glasses.
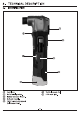
6. TECHNICAL DESCRIPTION 6.1 IDENTIFICATION Lock lever. On/off sliding switch. Battery indicator lamps. Soft grip handle. 10.8V Li-ion battery pack (sold separateness. (® Variable speed dial.
7. UNPACKING AND CHECKING 7.1 PACKAGING Carefully remove the product from the packaging and examine It for any sign of damage that may have happens during shipping. Lay the contents out and check them against the parts shown below. If any part is damaged or missing, please contact the Draper Help Line (the telephone number appears on the Title page) and do not attempt to use the product.
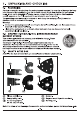
8. PREPARING THE MULTI-TOOL 8.1 FITTING ACCESSORIES FIGS.1-3 ‘Warning! Always make sure the tool Is switched off and the battery cartridge Is removed before carrying out any adjustments, to prevent accidental starting resulting in damage or personal injury. To install an accessory: — Open the lock lever (D fully. — Put the accessory onto the tool flange so that the protrusions of the tool flange fit the holes in the accessory. — Re tum the lock lever (D) to its original position to lock Into place.
9. OPERATION 9.1 ON/OFF SWITCH FIG. 5 Important: Before Installing the battery cartridge Into the tool, always sack to see that the tool Is switched off. To start the tool slide the switch (@ up to the “I {on)" position. To stop the tool, slide the switch (2) down to the “O {off)” position. 9.2 VARIABLE SPEED DIAL FIG. 6 The speed of this tool is variable at 6 different speeds using the dial (8. The higher the number the quicker the stroke rate is. Preset the dial to the number suitable for your work piece.
9. OPERATION ‘Warning! Before starting the tool and during operation be sure to keep your hand and face away from the tool accessory/blade. ‘Warning! Do not apply excessive load fo the tool which may cause motor lock and stop the tool. 9.5 CUTTING, SAWING & SCRAPING ‘Warning! Do not nova the tool forcibly in the direction of the non-cutting edge of the accessory being used. It may damage the tool. Make sure to hold the tool firmly.
10. MAINTENANCE AND TROUBLESHOOTING 10.1 MAINTENANCE Regular Inspection and cleaning reduces the necessity for maintenance operations and will cheap your tool In good working condition. The motor must be correctly ventilated during tool operation. Av old blocking the alr Inlets and vacuum the ventilation slots regularly. 10.2 TROUBLESHOOTING GUIDE Problem Possible Cause Remedy Motor does not start. 1. Battery pack no charge. 1. Re-charge battery. 2. Battery faulty or damaged. | 2. Replace battery.
11. EXPLANATION OF SYMBOLS 11.1 EXPLANATION OF SYMBOLS > : Read the instruction manual. Wear face mask and safety glasses. Wear ear defenders. Wear protective gloves. Do not abandon into the environment. Keep out of the reach of children. Warning! Rated voltage. WERE — Waste Electrical & Electronic Equipment. Do not disposes of Waste Clericalism & Electron Equipment In with domestic rubbish.
12. DISPOSAL 12.1 DISPOSAL At the end of the machine's world life, or when It can no longer be repaired, ensure that It Is disposed of according to national regulations. Contact your local authority for details of collection schemes In your area. In all circumstances: = Do not dispose of power tools with domestic waste. = Do not Incinerate. * Do not dispose of WERE" as unsorted municipal waste. X | * Waste Electrical & Electronic Equipment.
CONTACTS Draper Tools Limited UK: Hurley Road, Chandler's Ford, Castlereagh, Hampshire. S053 1YF, UK. EU: Nude Graft 8 6002 NL Weer (NL) Help Line: (023) 8049 4344 Sales Desk: (023) 8049 4333 Interment: drapertools.com E-mail: sales @drapertools.com General Inquiries: (023) 8026 6355 Service/Warranty Repair Agent: For after sales servicing or warranty repairs, please contact the Draper Tools Help Line for details of an agent in your local area.