
Operating instructions


CONTACT US AT www.DRpower.com 17
Changing and Adjusting Belts (When Tensioner adjustment no
longer prevents Belts from slipping excessively)
Note: Both Belts must be replaced at the same time due to stretching of the old
Belts.
Tools and Supplies needed:
Two 7/16" Wrenches
Two 9/16" Wrenches
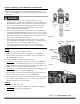
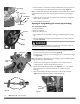
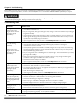
1. Remove one Bolt and Locknut on the left side of the Belt Guard with two
7/16" Wrenches (Figure 32).
2. Remove the two lower sets of Bolts and Locknuts at the front of the Belt
Guard with two 7/16" Wrenches.
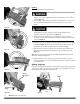
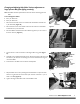
3. Move the Belt Guard forward and lift it off the alignment pins to remove it
from the machine (Figure 33).
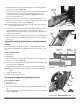
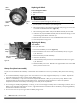
4. Loosen the four Locknuts that secure the Engine Mounting plate (Figure
34).
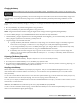
5. Hold the Tensioner Bolt head with a 9/16" Wrench and loosen the Tensioner
Nut with a 9/16" Wrench until the Engine can be moved forward enough to
remove the Belts.
6. Install the two new Belts onto the Clutch and Flywheel.
7. Adjust the Belt Tensioner by holding the Bolt head with one 9/16" Wrench
while turning the Locknut with another 9/16" Wrench until there is 1/2" of
slack in the Belt (Figure 35).
8. Tighten the Engine Plate Nuts and install the Belt Guard.
A
lignment
Pins
Figure 33
A
lignment
Holes
Front of
Belt Cover
Front
Hardware
Figure 32
Side
Hardware
Belt Guard
A
djuster
Nut
Figure 34
A
djuster
Bolt
Engine Plate Nuts
Belts
Figure 35
Approx.
1/2"