
Operating instructions
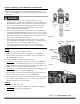


14 DR
®
RAPIDFIRE™ LOG SPLITTER
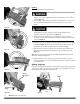
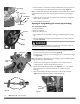
3. Grease the Rack Teeth with All Purpose Grease (Figure 20).
4. Push the Carriage assembly back into starting position, reconnect both
Return Springs and cut the strings off.
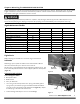
Changing Engine Oil
One of the easiest methods to remove oil from this Engine is to use a siphon
style Oil Extractor. If you do not have one you can purchase it from us at
www.DRpower.com.
Tools and Supplies needed:
Oil Extractor
Clean Container for used Oil
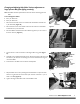
1. Remove the Oil Fill/Dipstick (Figure 21).
2. Siphon the Oil as described in the Oil Extractor instructions.
3. Add oil as described in “Adding Oil and Gasoline” in Chapter 2.
Rail Maintenance
Between each use of the LOG SPLITTER, we recommend applying a rust
preventative (Fluid Film or equivalent) to any bare metal areas on the top of the
rail (Figure 20). This will assure the longest possible service life of the Wear
Plate.
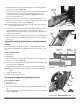
Carriage Adjustment
If there is too much free-play between the Carriage hold downs and the Frame, it
creates additional stress to the Carriage assembly and an adjustment is
necessary. To check this, manually pull the Ram out all the way towards the
Wedge. If the Tail of the Ram has more than 1/2" side-to-side play, perform the
following procedure:
Tools and Supplies needed:
9/16" Socket with Ratchet
Torque Wrench
1. Remove the Return Springs as described in step 1 of “Greasing The Rack
and Pinion” on page 13 (Figure 19).
2. Pull the Carriage assembly out about half way to the Wedge.
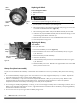
3. Loosen the three side Bolts on each side of Carriage assembly (Figure 22).
4. Insert a single thickness of writing paper 3/8" wide by 6" long between the Hold Down and edge of Frame on one side only.
5. Manually squeeze both Hold Downs towards each other against the paper and retighten Bolts to 55 foot pounds with a Torque
Wrench. The high torque on these Bolts is important.
6. Make sure that the Carriage assembly moves freely on the Rail. If it doesn’t move freely, try the above adjustment using
something thicker such as Cereal Box Cardboard (but no thicker than this). Remove the paper/cardboard when finished.
7. Push the Carriage assembly back, reconnect the Return Springs and cut the strings.
Carriage Wear Plate Replacement (Change Wear Plate when thickness is more than half way worn through)
Tools and Supplies needed:
9/16" Socket with Ratchet
Torque Wrench
String
Carriage
Hold Downs
Figure 22
Bolts and
Locknuts
Gaps Between
Frame and
Hold Downs
Grease
on Teeth
Figure 20
Rai
l
Oil
Check/Fill
Figure 21