
Operating instructions


10 DR
®
RAPIDFIRE™ LOG SPLITTER
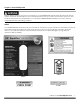
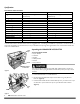
Gas Cap
Figure 7
6. Remove the Gas Fill Cap and fill the Gas Tank with fresh, unleaded gas (with
a minimum of 85 Octane) to approximately 1" to 1-1/2" below the top of the
fill neck to allow for fuel expansion (Figure 7). Be careful not to overfill.
Install the Gas Fill Cap before starting the engine. See your Engine Owner’s
Manual for more detailed information.
NOTE: To refill the gas tank, turn the engine OFF and let the engine cool at least
five minutes before removing the gas fill cap.
Check the Tire Pressure
Tools Needed:
Tire Pressure Gauge
Air Compressor
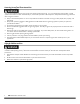
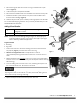
1. Remove the Valve Stem Protective Cap (Figure 8) and check the tire pressure
with a Tire Pressure Gauge.
2. Check what the manufacturers recommended pressure is that is stamped on
the side of the Tire.
3. If the pressure is too low, add air through the Valve Stem with an air hose.
4. Replace the Valve Stem Protective Cap when finished.
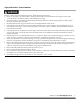
Connect the Battery (electric start models)
1. Connect the Black Negative Terminal onto the negative Battery Lug (Figure
9).
Battery
Figure 9
Negative
Terminal
Valve Stem
Protective Cap
Figure 8
Do not over inflate the tires. Inflate to the manufacturers recommended
pressure found on the tires.
We highly recommend the use of fuel treatments such as STABUL in your fuel
to prevent Carburetor fouling.