
User Guide


Copyright © 2013, Dr Robot Inc. All Rights Reserved.
www.DrRobot.com
V.03.09.13
- 10 -
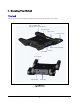
III. Operation of Jaguar Robot
End user could develop his own Jaguar control program using the supplied development API and tools. Here, we
will show you how to control the robot using the included “Jaguar Control Program” (You need to install Google
Earth program first).
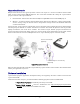
Turn on/off the Platform
Please follow the below steps to turn on the robot.
1. Turn the main switch to "ON" position.
2. Press the start button for a while (around 1 second) then release.
If you see the green LED on the start button is on, the system is powered up.
If not, please check the battery to make sure it is fully charged.
Turn the main switch to "OFF" position, the system will shut down.
Using Dr Robot Jaguar Control Program
This program will demonstrate how to control and navigate the Jaguar, move the arm-tracks and how to interpret,
process, display and log multi-sensor information. This program is provided with source code (c#).
updates motor encoder reading, motor temperature, board voltage and battery voltage measured
at 10Hz;
reads and displays IMU and Laser Range sensor data;
displays GPS readings on the Google Earth;
displays and controls Axis camera.
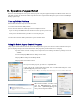
Once you start this program, you will see a “Login Window”
It will read all the configuration information from “outdoorrobotconfig.xml” under
c:\DrRobotAppFile\. Select the com port.
* If your computer has not a COM port, the warning window should popup. You need to install a USB-2-Serial
adapter.
When “Connect Robot” is clicked, it will
start the WiRobotGateway program
(also under c:\DrRobotAppFile\) and
will try connecting to the Robot.