
Instructions / Assembly
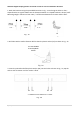
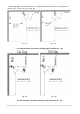


Table Of Contents

10 | P a g e
OPERATING
Operating unit with built-button
1. Apply power to the heater. The heater will be on standby mode display (- -) on the LED screen.
2. Press the button on the unit to cycle through the functions, heat levels (L1 - L2), standby, and
off.
Remote Control Instructions
POWER BUTTON: Turn the heater off.
UP BUTTON: Increase timer or heat level.
DOWN BUTTON: Decrease timer or heat level.
HEAT LEVEL BUTTON: Use to initiate the heat levels change. Press the Heat Level button then use
the up and down buttons (buttons 2 and 3) to increase or decrease the heating level.
TIMER BUTTON: To set the timer, press the timer button. Use the UP/DOWN button to set a
count-down timer. The timer range is 0H – 24H, every increment is 1 hour. The heater will turn
off when the timer expires. Set time to 0H to disable the timer.
PUSH BUTTON: The heater can be manually operated without the remote control. Use the
button on the left side of the heater to cycle to operation modes, Standby, Heat Level (L1, L2).
POWER BUTTON
UP BUTTON
DOWN BUTTON
TIMER BUTTON
HEAT LEVEL BUTTON
PUSH BUTTON
Standby (- -)
Heat Level (L1)
1 2
Heat Level (L2)
Standby (- -)
3 4