
Installation Guide
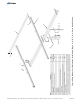


Step 3: Install the Cross-Bars to the Strongback
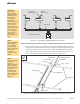
Cross-Bars run in an E-W direction and are secured to the mounting angles (
using 3/8” square flat washers along with 3/8” x 3-1/4” bolts and
hardware.
There are two types of Cross-Bars, the difference being the width of the Module
Rail mounting tabs welded to the Cross-Bars. These tabs are either 2” long or
3-1/2” long. The Cross-Bars with the 3-1/2” wide tabs are used where Module Rails
are butt spliced. This Cross-Bar is located at the center N-S position of the
Strongback. Cross-Bars with 2” wide tabs are used to the north and south of the
center-most Cross-Bar. (S
Cross-Bars are mounted to the outside of the Strongback mounting angles (these are
welded to the Strongback). They are not nested into the Mounting Angles. (See
Figure 3-2)
welded
to the Strongback)
ee Figure 3-1)
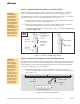
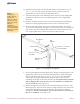
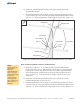
Figure 2-3: Securing Support Bar to Mounting Sleeve
Figure 2-4: Tighten and Torque the Pivot Bolt
CAUTION:
This is a two
person activity.
Cross-Bars are
long and unstable
before they are
fully secured to the
Strongback. Cross-
Bars must be held
in place by one
person while the
second person
aligns and secures
them to the
Strongback. Failure
to do so could lead
to serious personal
injury.
5 of 13
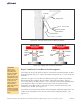
3/8” or 1 Bolt/2” x 1-3/4”
Flat Washer
Pivot Tab
Flat Washer
Lock Washer
Support Bar
3/8” or 1/2” Hex Nut
Strongback
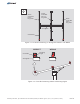
Towers
No Gaps
No Gaps
Pivot
Bolt
Strongback
Towers
Visible
Gaps
Visible
Gaps
Pivot
Bolt
WRONG
CORRECT
Assembly Instructions, Top-of-Pole Mount for 10 Modules (TPM10) For Module Types C, D, E, F, & G, (Version 2, Rev E)