
Installation Guide


Step 4: Installing PV Modules to Module Rails
Step 5: Return and tighten mounting hardware.
Step 6: Adjust the Tilt Angle of the Rack
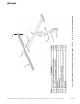
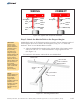
PV Modules are secured to the Module Rails using 1/4” x 3/4” bolts and hardware.
A. Place the PV Module on the Module Rails. Align the mounting holes and
secure with 1/4” x 3/4” bolts and hardware. Each Module has four
attachment points. Finger-tighten for now. (See Figure 4-1)
B. Continue in this manner and install the second PV Module.
A. Return and tighten each set of the 3/8” mounting hardware, securing the
Module Rails to the Support Angles.
B. Return and tighten each set of 1/4” mounting hardware, securing the PV
Modules to the Module rails.
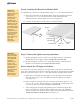
Adjust the tilt angle by loosening the Pivot Bolt
hardware and removing the 5/16” x 1” Lock Bolt from the Strongback Pivot Plate.
A. While one person holds the south edge of rack, the other loosens the Pivot
Bolt and removes the 5/16” Lock Bolt from the Strongback Pivot Plate.
(see Figure 6-1)
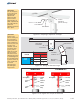
B. Refer to Figure 6-2 and tilt the rack to the desired elevation angle (5 15°,
25°, 35°, 45°, or 55°). Re-insert the 5/16” Lock Bolt in the appropriate hole
to match the desired elevation.
C. After changing the tilt angle and tightening the Lock Bolt, the Pivot Bolt
must be re-tightened. The Pivot Bolt cannot be left loose - the Mounting
Sleeve Vertical Tower must be firmly clamped to the Strongback Pivot Plate.
Torque all at 32-34 ft.-lbs.
Torque all at 6-8 ft.-lbs.
Torque to 12-14 ft.-lbs.
Use great care as it can be dangerous if the procedure is not done as described and
done with a minimum of two people.
°,
(see Figure 6-3)Torque Pivot Bolt to 75-85 ft.-lbs.
6 of 7
CAUTION:
This is a two
person activity. PV
Modules are
heavy and
unstable before
they are fully
secured to the
Module Rails. PV
Modules must be
held in place by
one person while
the second person
aligns and
secures them to
the Module Rails.
Failure to do so
could lead to
serious personal
injury and
damaged
components.
CAUTION:
Be certain to go
back and tighten
all Module Rail
and PV Module
mounting
hardware and
torque to the
specified values.
Failure to do so
could lead to
structural failure,
damaged
components
and/or serious
personal injury.
Figure 4-1: Installing PV Modules to Module Rails
1/4” x 3/4”
Bolt
Lock Washer
Flat Washer
Flat Washer
1/4” Nut
Module
Module
Rail
Assembly Instructions, Top-of-Pole Mount for 1 Module (TPM1) For Module Types A, B, C, D, E, F, & G (Version 2, Rev D)