
Sense Smoke Control Kit Instructions


General
1 These instructions apply to the Dovre Sense prod-
ucts listed when fitted with a Smoke Control kit.
NOTE: These appliances have been independently
tested to PD6434 and have been exempt from the
controls that generally apply in smoke control areas
hence are considered suitable for use in Smoke
Control Area when burning wood and ONLY when fit-
ted with the relevant Smoke Control kit detailed below.
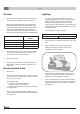
Appliance Smoke control kit
Part No.
Dovre Sense 100 DV-SENSESZKIT
Dovre Sense 103 DV-SENSESZKIT
Dovre Sense 200 DV-SENSESZKIT
Dovre Sense 203 DV-SENSESZKIT
2 To meet the Smoke Control requirement this appli-
ance must be operated correctly in order to mini-
mise the amount of smoke produced.
3 Burn dry wood only.
4 These instructions must be left with the user and
kept with the original instructions which they now
supersede.
Recommended Fuels
1 Wood Logs:
Burn only seasoned timber with a moisture content
of less than 20%. To ensure this, allow cut wood to
dry for 12 to 18 months.
Poor quality timber:
— Causes low combustion efficiency.
— Produces harmful condensation.
— Reduces effectiveness of the air control and life
of the appliance.
Do not burn construction timber, painted, impreg-
nated / treated wood, manufactured board products
or pallet wood.
Lighting
1 You can check whether the flue has enough
draught by lighting a ball of paper above the baffle
plate. A cold flue often does not have enough
draught and consequently, some smoke may
escape into the room instead of up the chimney. By
lighting the fire in the way described here, you can
avoid this problem.
2. Stack two layers of logs crosswise.
Recommended Log Size
Max. Length 33cm x 10cm diameter
3. Stack two layers of kindling crosswise on top of the
logs.
4. Place a firelighter cube in the lower layer of
kindling and light the cube according to the
instructions on the packaging.
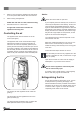
5. Close the door of the appliance and open the pri-
mary air inlet and the secondary air inlet of the
appliance; see the diagrams over page.
6. Let this fire develop into a good blaze until there is
glowing bed of charcoal. You can then add fuel and
adjust the appliance, see the notes on refuelling
the appliance.
2
Use