
250 with Smoke Control Installation & User Instructions

21
Installation Instructions
To install the Smoke Control kit:
2.1 Remove the Log Guard, see Pre-Installation Section 2.
2.2 Remove the Baffle, see Pre-Installation, Section 4.
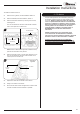
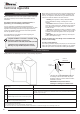
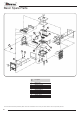
2.3 Remove the Airwash chamber by removing the 2 screws,
see Diagram 9.
The nuts are located on the back of the Airwash chamber.
Use a 10mm spanner to hold the nuts.
Airwash chamber
M6 Screws
Air slider Screws
9
Note: If the kit is fitted before appliance installation the top
plate can be removed for easy access.
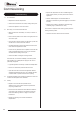
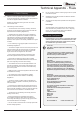
2.4 Remove the 2 M6 screws on the Air slider, Diagram 9 & 10.
The nuts are located on the back of the Air slider. Use a
10mm spanner to hold the nuts.
Inside View of
Appliance
Air slider
Air slider
Screws
10
2.5 Replace Air slider with the Smoke Control version.
2.6 Fitting is the reverse of the above.
2.7 Ensure the Air slider screws are tightened to a tension that
ensures movement when the Airwash is operated.
3. CO Alarms
All open flued appliances can be affected by temporary
atmospheric conditions which may allow fumes to enter
the house. Building regulations require that whenever
a new or replacement fixed solid fuel or wood/biomass
appliance is installed in a dwelling a carbon monoxide
alarm must be fitted in the same room as the appliance.
Further guidance on the installation of the carbon
monoxide alarm is available in the latest edition of
BS EN50292 and from the alarm manufacturer's
instructions.
HETAS recommend the unit is permanently fixed
in accordance with the manufacturer's installation
instructions or with the guidance contained in Approved
Document J where no other information is available.
Provision of an alarm must not be considered a
substitute for either installing the appliance correctly
or ensuring regular servicing and maintenance of the
appliance and chimney system.