
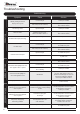
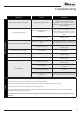
250 with Smoke Control Installation & User Instructions


20
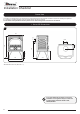
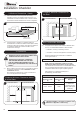
The flue must be installed in accordance with
manufacturers instructions.
Self tapping
screw at rear
Flue Pipe 915mm (3ft)
Size Part No.
*5" 4502
6" 4602
Seal flue collar with
Fire Cement
5
600mm min
1000mm max
unsupported
Elbow with access cover
Size Part No.
5" 4512
6" 4612
Flue Pipe 915mm (3ft)
Size Part No.
5" 4502
6" 4602
To chimney connection as
detailed in building regulations
6
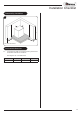
1.3 Rear flue pipe installation
— Insert a tee into the flue collar.
The tee piece is used as cleaning access.
— Lift appliance into position.
Take care not to damage the hearth finish.
— Level using adjustable bolts, see Diagram 1.
— Connect tee to the chimney using flue pipe.
— Secure with self tapping screw.
—Seal the connecting joints with fire cement.
Donotusea90˚elbowtomakethisconnection.
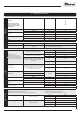
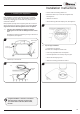
Installation Instructions
The flue must be installed in accordance with manufacturers
instructions.
Seal Collar with Fire Cement
Self Tapping Screw
Tee
Size Part No.
5" 4516
6" 4616
Cap
7
600mm min
1000mm max
unsupported
Elbow with access cover
Size Part No.
5" 4512
6" 4612
Flue Pipe 915mm (3ft)
Size Part No.
5" 4502
6" 4602
To chimney connection as
detailed in building regulations
8
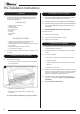
2. Fitting the Smoke Control Kit
This appliance has been independently tested to PD6434
and is exempt from the controls that generally apply in
smoke control areas hence is considered suitable for use in
Smoke Control Area when burning wood and ONLY when
fitted with the relevant Smoke Control kit.
To make this appliance exempt from the controls that govern
smoke control areas the Airwash Control Slider must be
replaced with the Smoke Control Air Slider supplied in the kit.
Product Code Appliance
DV250SCKIT Dovre 250