User Manual T-708 Model: Model:T Android 4.
CONTENTS 1. Welcome 3 2. Important notices 3 3. Keys and functions 4 4. Getting started 4.1. Connect to your computer 4.2. Turn on / off 4.2.1.Turn on 4.2.2. Turn off 4.3. Lock / unlock the screen (sleep mode) 5 5 5 5 5. Your homescreen 5.1. Change wallpaper for homescreen 5.2. Add / delete applications from the homescreen 5.3. Add widgets from the homescherm 6 7 7 7 6. Network connection 6.1. Wi-fi 6.1.1. Turn on Wi-fi 6.1.2. Turn off Wi-fi 6.1.3. Add a Wi-fi network manually 6.2.
1. WELCOME Thank you for purchasing the DOPO tablet. This tablet offers total convenience for your business (supports Word, Excel, send & receive e-mails...) and personal entertainment needs (chatting, movie playback, e-books etc.). Running on Android 4.0 and with a highly responsive capacitive touch screen, it will bring you a wonderful user experience. Before you begin, please read this User Manual carefully. 2.
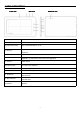
3. KEYS AND FUNCTIONS Front view Side view Backside view 1. Vol+key Press to increase the volume 2. Vol- key Press to decrease the volume 3. Power and lock key Key to switch the tablet on or off 4. ESC key Tap to return to the previous screen/page. If the keyboard is in use, close the keyboard. 5. Home key Tap to return the home menu. 6. Menu key Tap to view the option menu.. Note: When you tap the Menu key from within an application, you will see the sub- menu for the application. 7.
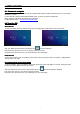
4. GETTING STARTED 4.1. Connect to computer Connect your tablet to your computer with the supplied USB cable to transfer media files when you are running Windows 7 or Vista. For Windows XP, please install Windows Media Player 11 before you transfer media files. Earlier versions of Windows require the MTP Porting Kit. For Mac please refer to: www.android.com/filetransfer. 4.2 Turn On / Off 4.2.1. Turn on To start your tablet, press and hold the power key at the right side of your tablet for about 5 seconds.
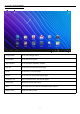
5. YOUR HOME SCREEN a d b e c f g a. Google search Tap to enter a Google search b. Voice search Tap to start a voice search c. Apps Launcher Tap to view all the applications installed d. ESC key Tap to return to the previous screen/page e. Home Tap to return to your home page f. Recent Tap to view your most recently opened apps g. Connect to PC When connected to a PC, this icon will appear. h. System time Displays the current system time i.
Click once on the time on the home screen to open the status screen and view the Wi-Fi, battery status and the current time and date. If you click again on the time in the status screen a menu will appear enabling a quick way of adjusting the settings of your tablet. 5.1. Change wallpaper for home screen: Tap and hold your finger in an empty space on the home screen, you will then see a pop-up screen; you can choose to select a wallpaper from the Gallery or a pre installed Wallpaper or Live Wallpaper. 5.
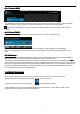
6.1.1. Turn on Wi-Fi Within the App Panel, tap “Settings”, “Wireless & networks” and then “Wi-Fi” to turn it on. Your tablet will list all the networks it finds within range. Tap a network to connect. If necessary, enter the Wireless password, and tap “Connect”. When your tablet is connected to the network, the wireless indicator appears in the status bar. The number of grey/blue waves indicates the connection strength of the wireless network. 6.1.2.
The browser will display the following buttons by default: Bookmarks: Open and manage bookmarks Menu: Here you will find the other Browser options (including “Settings”) New tab sheet: Open a new tab sheet Refresh: Refresh the page Search: Search in Google Set bookmark: Create a new bookmark for the page that you are currently viewing Next page: Continue to the next page Previous page: Return to the previous page Press the Menu button to select the other options including: New tab sheet: Open a new
8. INSTALL AND MANAGE APPS 8.1. Install Apps The ApkInstaller allows you to install an .apk file from the internal memory or an SD card. The ApkInstaller can be found in the applications overview. Select "Install" to install a program. After you have selected this option, select the medium on which the .apk file is stored: the Internal Memory or an SD card (TF card). Open the .apk file and follow the steps on the screen to install the application. Note: Make sure the .apk file is workable on android 4.
8.3 Market The Market app allows you to download and install all the available apps for your tablet. To use the Market app open the “Settings” application, go to “Apps” and click on “Show Google Apps in Launcher”. You will now find the Market in the Apps Launcher. If you wish to use the Android Market, you must use your current Google Account or register a new account.
9.2. Video 9.2.1. Video Player You can play videos stored on your tablet or SD card. To play, tap the Video icon to launch the video player: Tap the video you would like to play. To playback, fast forward or pause your video tap the screen to display the toolbar. You can also add bookmarks, adjust the brightness, or set the screen ratio. Below is an example of the toolbar: 9.2.2.
9.3. Gallery You can view and edit your digital pictures on the tablet’s full color, high-resolution display. After placing images on your tablet, tap Gallery to display your pictures: Tab the picture you want to display and slide right or left to show the next or previous picture. Tap the Menu icon to edit, rotate, crop, or set the image as a wallpaper. 9.4. Camera Tap the icon to open the camera app. You can take a photo, or record a video with the front camera.
9.5. E-book reader The tablet supports many e-book formats like PDF, Text, E-Pub, FB2. Tap the “e-book” icon to open the e-bookshelves. Tap an e-book to open the book and read. You can go to the next or previous page by sliding your finger right or left. Tap on the Menu button to check the sub-menus. You can change the font size, Go To Page, check your bookmarks, set the auto flip time, etc.
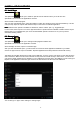
9.6 E-mail To use email on your tablet, use the E-Mail application in the App Launcher. If you want to use Gmail, instead of using the E-mail app use the GMail designed for GMail, Google mail. application which is specially To set up an email account on your tablet, you will need the incoming and outgoing server settings of your email account for the configuration. Open the E-mail application, which will display the screen below. Enter your email address and password and select “Volgende” (Next).
Depending on the type of account, details of the incoming server settings will be requested; enter all the details of the incoming server settings for your email account. The E-mail app will automatically enter the most common default settings however they should be checked for correctness. After entering the settings, click on “Volgende”. If the settings are correct, you will proceed to the next step. If this is not the case, the tablet will indicate which details have not been correctly entered.
After the incoming and outgoing mail server settings have been correctly entered, the tablet will ask which mail account data requires to be synchronized and the interval for downloading emails. Finally, you will be asked under which name the account should be added and which sender address should be displayed on emails sent by you..
After entering the required information, mail from your account will be downloaded onto the tablet and will appear on the screen within a few minutes.
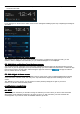
10. SETTINGS Tap the “Settings” icon in the app launcher to go to the settings menu. In the “Settings” menu you will find the following categories and subcategories: 10.1. Wireless and networks: Wi-Fi: Connect to or manage your wireless networks Data usage: View and limit the data usage of a mobile (3G) connection 10.2. Device: Sound: Set volume levels and turn sounds on/off. Display: Set all display options including brightness and sleep mode.
11. EXPLORER In Explorer , you can manage all your files. You can copy, delete, paste, or rename your files in your Micro SD Card, Internal Memory and USB disk. For example, to copy files from "Internal Memory" to Micro "SD Card": 1. Open "Explorer", you will see the above interface 2. Tap "Internal Memory" to see all the files that are on your tablet 3. Tap "Multi" icon and then select all the files you want to edit 4. Tap "Editor" icon, you will see a pop-up menu, select "copy" 5.
12. BATTERY Low battery Full battery Battery charging The icon indicates that the battery is full. When the battery level becomes too low, a prompt comes up to notify you to charge your tablet. While charging, you can check the charging status in the lock screen: It takes approximately 5 hours to charge your tablet to full battery. Please only use the 5V/2.0A adaptor included in the package to charge the tablet. 13. TROUBLESHOOTING Cannot turn on the tablet 13.1 13.
FCC STATEMENT 14 14.FCC TATEMENT:: This device complies with Part 15 of the FCC Rules. Operation is subject to the following two conditions: (1) This device may not cause harmful interference, and (2) This device must accept any interference received, including interference that may cause undesired operation. Note: This equipment has been tested and found to comply with the limits for Class B digital devices, pursuant to Part 15 of the FCC rules.
15. Safety Check: Upon completion of any service or repairs to this product, ask the service technician to perform safety checks to ensure that the product is in proper operating condition. 16. Heat: The product should be situated away from heat sources such as radiators, heat registers, stoves, or other products (including amplifiers) that produce heat. WARRANTY 16 16.WARRANTY 16.
SERVICE CENTER 1845 S.Vineyard Ave.Ste.4 Ontario,CA 91761 Tel: 909-974-2859 Fax: 909-974-2865 Hours:8:30AM-5:00PM PST TO OBTAIN WARRANTY SERVICE contact DOPO Technical Suport email: TechSupport@doublepowertech.com phone: 800.838.3315 from 8:30AM to 5:00PM Monday through Friday Pacific Time. Pre-authorization must be obtained before sending any product to the Service Center.Proof of purchase in the form of a purchase receipt or copy there of is required to show that a product is within the warranty period.