PhoneEasy 410gsm
20 21 17 18
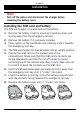
English 1. 2. 3. 4. 5. 6. 7. 8. 9. 10. 11. 12. Loudspeaker Display Left soft key Call key 1 / Voice mail Numeric keypad Microphone # / Silent mode End call/Power on/off Arrow keys Right soft key For lanyard attaching 13. Charging contacts, for use with charging stand (not included) 14. Led light (new message/ missed call) 15. Led light (battery level low) 16. Emergency call key 17. Charging socket 18. Headset socket 19. Battery cover 20. Side key + 21. Side key - Español 1. 2. 3. 4. 5. 6. 7. 8. 9. 10.
English Contents Installation . . . . . . . . . . . . . . . . . . . . . . . . . . . . . . . . . . . . . 3 Installing the SIM card and battery. . . . . . . . . . . . . . . . . . . 3 Charging . . . . . . . . . . . . . . . . . . . . . . . . . . . . . . . . . . . . . 4 Operation. . . . . . . . . . . . . . . . . . . . . . . . . . . . . . . . . . . . . . . 5 Activating the phone. . . . . . . . . . . . . . . . . . . . . . . . . . . . .
English Settings. . . . . . . . . . . . . . . . . . . . . . . . . . . . . . . . . . . . . . . Time and date. . . . . . . . . . . . . . . . . . . . . . . . . . . . . . . . . User setup. . . . . . . . . . . . . . . . . . . . . . . . . . . . . . . . . . . Tone settings (rings & tones) . . . . . . . . . . . . . . . . . . . . . . Silent. . . . . . . . . . . . . . . . . . . . . . . . . . . . . . . . . . . . . . . Bluetooth settings. . . . . . . . . . . . . . . . . . . . . . .
English Installation Note! Turn off the phone and disconnect the charger before removing the battery cover. Installing the SIM card and battery The SIM card holder is located behind the battery. 1 . Remove the battery cover by pressing it carefully down and sliding away from the emergency call key. 2 . Remove the battery if it is already installed. 3 . Press lightly on the cardholder and carefully slide it towards the emergency call key. 4 . The SIM card holder can now be folded into an upright position.
English Charging Warning! Only use batteries, charger and accessories that have been approved for use with this particular model. Connecting other accessories may be dangerous and may invalidate the phone’s type approval and guarantee. When the battery is running low, is displayed and a warning signal is heard. To charge the battery, connect the mains adapter to a wall socket and to the charging socket y. is displayed briefly when the charger is connected to the phone, and when it is disconnected.
English Operation Activating the phone Press and hold the red button on the phone to turn it on/off. It takes several seconds so keep holding until you hear the sound. The following messages may be displayed: SIM card missing or incorrectly inserted. SIM card damaged or not valid. If the SIM card is valid but protected with a PIN code (Personal Identification Number), PIN: is displayed. Enter the PIN code and press OK ( upper left corner of keypad). Delete with Clear ( upper right corner of keypad).
English Making a call 1 . Enter the phone number. Delete with Clear. 2 . Press q to dial. Press Cancel to cancel dialing. 3 . Press L to end the call. Note! When making international calls, press * twice for the international prefix "+". Always ������� use ���� ”+” ���� before ������������������� the country code (instead of 00 or similar) for best operation. Making a call from the Phonebook 1 . Press Name to open the Phonebook. 2 .
English Display Symbols Signal strength Headset connected Ring only Bluetooth on Vib & ring Bluetooth connected Vib only Battery level Alarm active New message Silent SIM card missing Charger connected SIM card error Charger disconnected Mute Headset connected New message Headset disconnected SOS calls only Handsfree on OK (confirmed) Handsfree off Query Warning Battery level low Error Calling Charging (animated) Incoming call Call ended Searching Missed call Progressing (a
English Additional Functions Call options During a call the soft keys give access to additional functions: Options (left soft key) A menu with the following options is displayed: Hold single call Hold the current call End single call End the current call (same as L) New call Call another number (three-party call) Phonebook Search the Phonebook Msg center Write or read SMS messages.
English Call waiting An alert tone will be heard if there is an incoming call while talking. To put the current call on hold and answer the incoming call, press Options. This service must be activated, see Settings/Call setup. Call information During a call, the called or calling phone number and the elapsed call time is displayed. If the identity of the caller is withheld, Unknown is displayed. Call log Answered, missed, and outgoing calls are saved in a combined call log.
English Phonebook The Phonebook can store 100 entries with 3 phone numbers in each entry. Creating a Phonebook entry 1 . 2 . 3 . 4 . Press Menu, scroll to and press OK. Select -New contact- and press Add. Enter a name for the contact, see Text input. Delete with Clear. Use / to select� Mobile, Home number or Office number, and enter the phone number(s), then press Save. 5 . Press L to return to standby mode.
English Delete Press OK to delete the selected Phonebook entry. Press Yes to confirm or No to abort. Delete all Select From SIM or From Phone and press OK to delete all Phonebook entries from the SIM card or phone memory. Enter the SIM-/phone code and press OK to confirm. Copy all Select From SIM and press OK to copy all Phonebook entries from the SIM card to the phone memory. Press Yes to confirm or No to abort.
English Headset When a headset is connected, the internal microphone in the phone is automatically disconnected. When receiving a call you can use the answer key on the headset cable (if it has one) to answer and end calls. Warning! Using a headset at high volume can damage your hearing. Adjust the sound volume carefully when using a headset. SOS calls Warning! Mobile phones such as this unit use radio signals, the mobile phone network, the terrestrial network and userprogrammed functions.
English Emergency Call key The Emergency Call key allows you easy access to contact a predetermined number should you need help. The number will normally be a family member or a friend. To use the Emergency Call key, you must first activate the function and store the emergency number you wish to call in Set number (see Settings on page 28). Once activated, to make an emergency call you will follow the instructions for the option you selected: Off Emergency call key disabled.
English Alarm 1 . 2 . 3 . 4 . 5 . 6 . Press Menu, scroll to and press OK. Select On and press OK. Enter the alarm time using the keypad, then press OK. Select am or pm and press OK. For a single occurrence, select Single and press Save. For a repeated alarm, select Repeated and press OK. Scroll through the list of weekdays and press On/Off to enable/disable the alarm for each weekday, then press Save. 7 . To edit an alarm, press Edit, then press OK. 8 . To stop the alarm, press Off.
English Calendar 1 . Press Menu, scroll to and press OK. 2 . Select Options. 3 . Select one of the following options and press OK. View tasks Show tasks for the selected date. Add task 1 . Enter a date for the task, then press . 2 . Enter a time for the task. 3 . Select Options to reach the screen where you can switch between am and pm, then press OK. 4 . Press . 5 . Press Edit, enter a description for the task (see Text input), then press Done. 6 . Press Save to save the task.
English FM radio The FM radio has a frequency range from 87.5 to 108.0 MHz and 9 preset channels. Note! The FM Radio and its settings are only available when a headset is connected. The headset also works as a radio antenna. Turning the radio on 1 . Connect the headset to the headset socket . 2 . Press Menu, scroll to and press OK. The radio is now turned on. The currently tuned frequency is displayed. Use the side keys +/– to adjust the volume. 3 . Press L to return to standby mode.
English Editing the channel list 1 . 2 . 3 . 4 . 5 . Press Menu, scroll to and press OK. Select Options. Select Channel list and press OK. Select the channel you wish to edit and press Options. Select one of the following options and press OK. Play Play the selected channel. Delete Delete the channel. Press Yes to confirm or No to return to the channel list. Edit Press Edit to edit the channel name, then press Done. Press to edit the frequency, use # to enter the decimal point. Press Save.
English Text input Text is entered by pressing the numerical keys repeatedly to select characters. When writing SMS messages in some languages you can use the Smart ABC (eZiType™) input method which uses a dictionary to suggest words. See Settings on how to change input method. Entering text Press the key repeatedly until the desired character is shown. Wait a few seconds before entering the next character. Press * for a list of special characters. Select the desired character and press OK to enter it.
English SMS Messaging Creating and sending SMS 1 . 2 . 3 . 4 . Press Menu, scroll to and press OK. Select Write message and press OK. Type your message (see Text input) then press Done. Select one of the sending options below and press OK to confirm. Send only Send the message without saving Save and send Send the message and save it in the Outbox Send to many Add more recipients for the message If Send to many was selected, do the following: 1 . Select Recipients and press OK. 2 .
English Outgoing SMS (Outbox) 1 . Press Menu, scroll to and press OK. 2 . Select Outbox and press OK. 3 . Select a message and press OK. Use / message up/down. 4 . Press Options. to scroll the Send (Outbox) Select one of the sending options and press OK to confirm, (see ����� Creating and sending SMS). Reply (Inbox) Type your reply, then press Done. The message is sent immediately. Call Press OK to call the contact. Delete Press Yes to delete the message, or No to return to the menu.
English Use number Displays all phone numbers contained in the message as well as the number of the sender. 1 . Use the arrow keys to select one of the displayed numbers. 2 . Press Options. 3 . Select one of the following options and press OK.
English Settings Note! The settings described in this chapter are carried out in standby mode. Time and date Setting the time and date 1 . Press Menu, scroll to and press OK. 2 . Select Time & date and press OK. 3 . Select Set time and press OK. 4 . Enter the time (HH:MM), then press OK. 5 . Select am or pm and press OK. 6 . Select Set date and press OK. 7 . Enter the date (MM/DD/YYYY), then press OK. Setting the time/date format 1 . Press Menu, scroll to and press OK. 2 .
English User setup Wallpaper You can select from 8 different display backgrounds. 1 . Press Menu, scroll to and press OK. 2 . Select User setup and press OK. 3 . Select Wallpaper and press OK. 4 . Scroll up/down to display the available wallpapers. 5 . Press OK to confirm or Back to discard changes. Idle display In standby mode the display can present date, time, and the connected network, or just the time. 1 . Press Menu, scroll to and press OK. 2 . Select User setup and press OK. 3 .
English HAC mode (Hearing aid compatibility mode) 1 . Press Menu, scroll to and press OK. 2 . Select User setup and press OK. 3 . Select HAC mode and press OK. 4 . Select On/Off and press OK. Language The default language for the phone menus, messages, etc. is English. You can change this to any other language supported by the phone. 1 . 2 . 3 . 4 . Press Menu, scroll to and press OK. Select User setup and press OK. Select Language and press OK. Scroll up/down to select a language, then press OK.
English Tone settings (rings & tones) Tone setup 1 . 2 . 3 . 4 . 5 . Press Menu, scroll to and press OK. Select Tone settings and press OK. Select Tone setup and press OK. Select Ring Tone and press OK. Select one of the available tones, the tone will be played. Press OK to confirm, or press Back to discard changes. 6 . Set up the Alarm, Opening tone, Closing tone, Message tone and Keypad tone in the same way. Ringtone Volume 1 . 2 . 3 . 4 . Press Menu, scroll to and press OK.
English Warning and error tones Warning and error tones are used to alert the user of low battery power, phone and SIM card errors, etc. 1 . 2 . 3 . 4 . 5 . 6 . Press Menu, scroll to and press OK. Select Tone settings and press OK. Select Extra tone and press OK. Select Warning and press On/Off to enable/disable it. Select Error and press On/Off to enable/disable it. Press Done to save.
English Bluetooth settings You can connect wirelessly to other Bluetooth®-compatible devices such as headsets. 1 . Press Menu, scroll to and press OK. 2 . Select Bluetooth and press OK for the following settings: Search device Lists saved devices and enables you to add new devices. Select the device from the list and press Options. Search new Connect Disconnect Select Rename Delete Delete all Search new Bluetooth device Connect the selected device. Select the required profile, usually the Headset.
English Blocking functions You can disable some functions to simplify use of the phone. 1 . Press Menu, scroll to and press OK. 2 . Select Block function and press OK. 3 . Select each function you want to disable and press On. 4 . Press Done to confirm. Emergency Settings for the Emergency Call key function. See also Operation/Emergency call on page 13. 1 . Press Menu, scroll to and press OK. 2 . Select Emergency and press OK. 3 .
English Voice mail 1 . 2 . 3 . 4 . Press Menu, scroll to and press OK. Select Voice mail and press OK. Select and press Options. Select Phonebook if you want to add a contact from the Phonebook. Alternatively press Manual to add new. See Phonebook on how to add names/numbers. 5 . Press Save to confirm. Connect to Voice mail 1 . Select Options and press OK. 2 . Select Connect and press OK to call the voice mailbox. Alternatively press and hold 1 to call the voice mailbox.
English Speed dial The numerical keys 0 and 2 –9 can be used for speed dialing. Adding speed dial numbers 1 . Press Menu, scroll to and press OK. 2 . Select Speed dial and press OK. 3 . Select 0 and press Add. 4 . Select an entry from the Phonebook and press OK. 5 . Repeat to add speed dial entries for keys 2 –9. To speed dial an entry, press and hold the corresponding number key. To edit an existing entry, select it and press Options, then select Edit or Delete and press OK. Call setup 1 .
English Call divert Set up which calls should be diverted. Select a condition and press OK, then select Activate, Deactivate or Query status (see Call waiting above) for each. Div. voice calls Diverts all voice calls. Div. unreach Diverts incoming calls if the phone is turned �������������� off or out of range. Div. no reply Diverts incoming calls if unanswered. Divert if busy Diverts incoming calls if the line is busy.
English Messages SMS settings 1 . Press Menu, scroll to and press OK. 2 . Select SMS settings and press OK for the following settings: Profile set This number is needed to use the SMS function. The number can be obtained from the network operator. 1 . Add/edit the message service phone number. Use the side keys to move the cursor. Press Clear to erase. 2 . Press Save to save the new number. Memory status Displays the percentage of memory space used on the SIM card and phone memory. Pref. storage 1 .
English Broadcast message You can receive messages on various topics from your service provider, such as weather or traffic conditions in a particular region. For available channels and relevant channel settings, contact your service provider. Cell broadcast messages cannot be received when the device is Roaming. 1 . Press Menu, scroll to and press OK. 2 . Select SMS settings and press OK. 3 .
English Security settings 1 . Press Menu, scroll to and press OK. 2 . Select Security and press OK. SIM lock The SIM card is protected with a PIN code (Personal Identification Number). The phone can be set to ask for the PIN code on startup. Select On/Off and press OK to enable/disable SIM card lock. Note! You need to input the current PIN code to disable/enable SIM lock. Phone lock Select On/Off and press OK to enable/disable the Phone lock.
English Master Reset Resets the phone to the factory settings. Master Reset can be done with SIM-card in the phone or without SIM-card. Reset with SIM-card inserted 1 . Press Menu, scroll to and press OK. 2 . Select Master Reset and press OK. 3 . Enter the current code (default code 1234), confirm with OK. 4 . Confirm by pressing Yes. Reset without SIM-card inserted 1 . Press Options, scroll to Settings and press OK. 2 . Select Master Reset and press OK. 3 .
English Master Clear Resets the phone to the factory settings and deletes all stored information in the phone. Master Clear can be done with SIM-card in the phone or without SIM-card. Reset with SIM-card inserted 1 . Press Menu, scroll to and press OK. 2 . Select Master Clear and press OK. 3 . Enter the current code (default code 1234), confirm with OK. 4 . Confirm by pressing Yes. Reset without SIM-card inserted 1 . Press Options, scroll to Settings and press OK. 2 . Select Master Clear and press OK. 3 .
English Troubleshooting Phone cannot be switched on Battery charge low Connect the power adapter and charge the battery for hours. Battery incorrectly installed Check the installation of the battery. Failure to charge the battery Battery or charger damaged Check the battery and charger. Charger incorrectly connected to phone or power socket Check the charger connections. Standby time decreases Battery charge capacity too low Install a new battery.
English SIM card error SIM card damaged Check the condition of the SIM card. If it is damaged, contact the network operator. SIM card incorrectly installed Check the installation of the SIM card. Remove the card and reinstall it. SIM card dirty or damp Wipe the contact surfaces of the SIM card with a clean cloth. Failure to connect to network SIM card invalid Contact the network operator. No coverage of GSM service Contact the network operator. Signal too weak See Weak signal below.
English Safety Instructions Warning! The unit and the accessories can contain small parts. Keep all of the equipment out of the reach of small children. Operating environment Follow the rules and laws that apply wherever you are, and always turn off the unit whenever its use is prohibited or can cause interference or hazards. Only use the unit in its normal user position.
English Areas with explosion risk Always turn off the unit when you are in an area where there is a risk of explosion. Follow all signs and instructions. There is a risk of explosion in places that include areas where you are normally requested to turn off your car engine. In these areas, sparks can cause explosion or fire which can lead to personal injury or even death. Turn off the unit at filling stations, and any other place that has gas pumps and auto repair facilities.
English Driving safely Warning! Use of this unit alone or with headphones (even if used only in one ear) while driving a motor vehicle or riding a bicycle is dangerous and is illegal in some areas, and the user should not engage in such conduct. Driving while operating a mobile phone is distracting and could cause serious injury or death. If you decide to use this unit while driving or riding a bicycle, keep in mind the following guidelines: • Give full attention to driving and to the road..
English • Assess the traffic before dialing, or place calls when you are not moving or before pulling into traffic. Try to plan calls when your car will be stationary. Never dial, send SMS text messages, or enter other text while you are driving. Driving while operating a mobile phone is distracting and could cause serious injury or death. • Let the person you are speaking with know you are driving.. If necessary, suspend the call in heavy traffic or hazardous weather conditions.
English For body worn operation, this phone has been tested and meets the FCC RF exposure guidelines for use with an accessory that contains no metal and the positions the handset a minimum of 5/8 inch (1.5 cm) from the body. Use of other enhancements may not ensure compliance with FCC RF exposure guidelines. If you do no t use a body-worn accessory and are not holding the phone at the ear, position the handset a minimum of 5/8 inch (1.5 cm) from your body when the phone is switched on.
English Disclaimer and Limitation of Liability Doro AB and its affiliates, licensees and retailers assume no responsibility for any damage or loss resulting from the use of this guide. Doro AB and its affiliates, licensees and retailers assume no responsibility for any loss or claims by third parties that may arise through the use of this software.
English Care and Maintenance Your unit is a technically advanced product and should be treated with the greatest care. Negligence may void the warranty. • Protect the unit from moisture. Rain/snowfall, moisture and all types of liquid can contain substances that corrode the electronic circuits. If the unit gets wet, you should remove the battery and allow the unit to dry completely before you replace it. • Do not use or keep the unit in dusty, dirty environments.
English • Avoid dropping the phone or battery. If the phone or battery is dropped, especially on a hard surface, and the user suspects damage, take it to a service center for inspection. • Improper battery use may result in a fire, explosion or other hazard. The advice above applies to the unit, battery, mains adapter and other accessories. If the phone is not working as it should, please contact the place of purchase for service. Don’t forget the receipt or a copy of the invoice.
English Support For assistance, please contact: Email: service@ConsumerCellular.com Website: www.ConsumerCellular.com/support Telephone: 1-888-345-5510 Need to test your cell phone? At anytime you can place a mobile phone test call to our FREE test line by dialing 1-888-460-8781 from your cellular phone. If the call is completed correctly you will hear a recorded message telling you that your mobile phone is working. Check your minutes or change your plan.
Español Contenido Instalación. . . . . . . . . . . . . . . . . . . . . . . . . . . . . . . . . . . . . . 3 Instalación de la tarjeta SIM y de la batería. . . . . . . . . . . . . 3 Carga. . . . . . . . . . . . . . . . . . . . . . . . . . . . . . . . . . . . . . . . 4 Funcionamiento. . . . . . . . . . . . . . . . . . . . . . . . . . . . . . . . . . 5 Activación del teléfono . . . . . . . . . . . . . . . . . . . . . . . . . . .
Español Ajustes . . . . . . . . . . . . . . . . . . . . . . . . . . . . . . . . . . . . . . . Hora y fecha. . . . . . . . . . . . . . . . . . . . . . . . . . . . . . . . . . Configuración de usuario. . . . . . . . . . . . . . . . . . . . . . . . . Ajustes de tono (señales de llamada y tonos). . . . . . . . . . . Configuración Bluetooth. . . . . . . . . . . . . . . . . . . . . . . . . . Funciones de bloqueo. . . . . . . . . . . . . . . . . . . . . . . . . . .
Español Instalación Nota Apague el teléfono y desconecte el cargador antes de extraer la tapa de la batería. Instalación de la tarjeta SIM y de la batería El soporte de la tarjeta SIM está ubicado detrás de la batería. 1 . Para extraer la tapa de la batería, presiónela con cuidado y deslícela hacia abajo desde la tecla de llamada de emergencia. 2 . Extraiga la batería si ya está instalada. 3 .
Español Carga Advertencia Utilice únicamente baterías, cargadores y accesorios cuyo uso haya sido aprobado para este modelo en particular. La conexión de otros accesorios podría resultar peligrosa e invalidar la homologación de tipo y la garantía del teléfono. Cuando la batería tenga poca carga, se mostrará en la pantalla y se oirá una señal de aviso. Para cargar la batería, conecte el adaptador de red a una toma de corriente en la pared y a la toma para el cargador y.
Español Funcionamiento Activación del teléfono Mantenga pulsado el botón rojo del teléfono para conectarlo / desconectarlo. Los siguientes mensajes pueden aparecer: No hay tarjeta SIM o está insertada de forma incorrecta. Tarjeta SIM dañada o no válida. Si la tarjeta SIM es válida pero está protegida con un código PIN (Personal Identification Number, número de identificación personal) se visualiza PIN: Introduzca el código PIN y pulse OK. Para borrar, utilice la opción Borrar.
Español Realización de una llamada 1 . Introduzca el número. Para borrar, utilice la opción Borrar. 2 . Pulse q para marcar. Pulse Anular para cancelar el marcado. 3 . Pulse L para finalizar la llamada. Nota Cuando realice llamadas internacionales, pulse * dos veces para el prefijo internacional “+”. Utilice siempre “+” antes del código de país (en vez de 00 o similar) para un mejor funcionamiento. Realización de una llamada desde la agenda 1 . Pulse Nombre para abrir la agenda. 2 .
Español Símbolos de la Pantalla Potencia de la señal Auriculares conectados Solo señal de llamada Bluetooth activado Señal de llamada + vibración Bluetooth conectado Solo vibración Nivel de batería Alarma activa Nuevo mensaje Silencio No hay tarjeta SIM Cargador conectado Error de la tarjeta SIM Cargador desconectado Silencio Auriculares conectados Nuevo mensaje Auriculares desconectados Solo llamadas de emergencia Manos libres activado OK (confirmado) Manos libres desactivado Pregunt
Español Funciones Adicionales Opciones de llamada Durante una llamada, las teclas programables dan acceso a funciones adicionales: Opciones (tecla programable izquierda) Se visualiza un menú con las siguientes opciones: Retener una llamada Retener la llamada actual Finalizar una llamada Finalizar la llamada actual (igual que L) Nueva llamada Llamar a otro número (llamada a tercero) Agenda Buscar en la agenda Centro msj Escribir o leer mensajes SMS.
Español Llamada en espera Se oirá un tono de alerta si hay una llamada entrante mientras habla. Para poner en espera la llamada actual y contestar la llamada entrante, pulse Opciones. Este servicio debe activarse, consulte el apartado Ajustes / Ajuste llamada. Información de llamada Durante una llamada se visualizan el número de teléfono emisor o receptor y el tiempo de llamada transcurrido. Si se ha ocultado la identidad de la llamada entrante, aparecerá en pantalla Desconocido.
Español Agenda La agenda puede almacenar 100 entradas con 3 números de teléfono en cada entrada. Creación de una entrada en la agenda 1 . Pulse Menú, desplácese a y pulse OK. 2 . Seleccione -Nuevo contacto- y pulse Añadir. 3 . Introduzca un nombre para el contacto. Consulte Entrada de texto. Para borrar, utilice la opción Borrar. 4 . Utilice / para seleccionar Móvil, Número casa o N.º oficina, introduzca el/los número/s de teléfono y luego pulse Guardar. 5 . Pulse L para volver al modo de espera.
Español Enviar SMS Pulse OK para escribir un mensaje SMS. Consulte Mensajes de texto SMS. Borrar Pulse OK para borrar la entrada de la agenda seleccionada. Pulse Sí para confirmar o No para anular. Borrar todo Seleccione Desde SIM o Desde teléfono y pulse OK para borrar todas las entradas de la agenda desde la tarjeta SIM o desde la memoria del teléfono. Introduzca el código del teléfono o de la tarjeta SIM y pulse OK para confirmar.
Español Silencio Silencio es un perfil fijo con las señales de llamada y mensajes SMS desactivadas, mientras que los ajustes de vibración y de tono de tecla siguen igual. Mantenga pulsado # para activar / desactivar el modo silencio. Consulte el apartado Ajustes. Auriculares Cuando se conecten unos auriculares, el micrófono interno del teléfono se desconectará automáticamente.
Español Cuando se enciende el teléfono, la tecla programable derecha indica SOS antes de activarse la tarjeta SIM o si está activado el bloqueo del teléfono. Pulse SOS y, a continuación, pulse Sí para llamar automáticamente al 911. Pulse No para volver a la pantalla de activación. Si pulsa Sí por error, pulse Anular de inmediato para cancelar. Cuando el teléfono está encendido, siempre es posible realizar una llamada de SOS introduciendo 911 seguido de q.
Español Alarma 1 . Pulse Menú, desplácese a y pulse OK. 2 . Seleccione On y pulse OK. 3 . Introduzca la hora de la alarma por medio del teclado y luego pulse OK. 4 . Seleccione am o pm y pulse OK. 5 . Para que suene solo una vez, seleccione Una vez y pulse Guardar. 6 . Para que suene repetidamente seleccione Repetición y pulse OK. Desplácese a través de la lista de días de la semana y pulse On / Off para activar / desactivar la alarma para cada día de la semana y posteriormente pulse Guardar. 7 .
Español Calendario 1 . Pulse Menú, desplácese a y pulse OK. 2 . Seleccione Opciones. 3 . Seleccione una de las siguientes opciones y pulse OK. Ver tareas Muestra las tareas en la fecha seleccionada. Añadir tarea 1 . Introduzca una fecha para la tarea y luego pulse . 2 . Introduzca una hora para la tarea. 3 . Seleccione Opciones para llegar a la pantalla donde usted puede cambiar entre am y pm. 4 . Pulse . 5 . Pulse Editar, introduzca una descripción de la tarea (consulte Entrada de texto), y pulse Hecho.
Español Radio FM La radio FM tiene un alcance de frecuencia de 87,5 a 108,0 MHz y nueve canales predeterminados. Nota La radio FM y sus ajustes solo están disponibles si están conectados unos auriculares. Los auriculares funcionan también como antena de radio. Encender la radio 1 . Conecte los auriculares a la toma para auriculares . 2 . Pulse Menú, desplácese a y pulse OK. La radio ya está encendida. Se visualiza la frecuencia sintonizada actualmente.
Español Editar la lista de canales 1 . Pulse Menú, desplácese a y pulse OK. 2 . Seleccione Opciones. 3 . Seleccione Lista canales y pulse OK. 4 . Seleccione el canal que desee editar y pulse Opciones. 5 . Seleccione una de las siguientes opciones y pulse OK. Repr. Borrar Editar Permite escuchar el canal seleccionado. Borra el canal. Pulse Sí para confirmar o No para volver a la lista de canales. Pulse Editar para editar el nombre del canal y, a continuación, pulse Hecho. Pulse para editar la frecuencia.
Español Entrada de texto El texto se introduce pulsando repetidamente las teclas numéricas para seleccionar los caracteres. Cuando escriba mensajes SMS en determinados idiomas, puede utilizar el método predictivo de introducción Smart ABC (eZiType™), el cual utiliza un diccionario para sugerir palabras. Consulte Ajustes para ver cómo cambiar el método de introducción. Introducción de texto Pulse repetidamente la tecla hasta visualizar el carácter deseado.
Español Mensajes de texto SMS Creación y envío de mensajes de texto SMS 1 . Pulse Menú, desplácese a y pulse OK. 2 . Seleccione Escribir mensaje y pulse OK. 3 . Teclee su mensaje (consulte Entrada de texto) y pulse Hecho. 4 . Seleccione una de las opciones de envío de abajo y pulse OK para confirmar. Enviar solo Envía el mensaje sin guardarlo. Guardar y enviar Envía el mensaje y lo guarda en la bandeja de salida. Enviar a varios Añade más receptores al mensaje.
Español Mensajes de texto SMS entrantes (bandeja de entrada) 1 . Pulse Menú, desplácese a y pulse OK. 2 . Seleccione Entrantes y pulse OK. 3 . Seleccione un mensaje de la lista y pulse Leer. Utilice / para desplazarse por el mensaje hacia arriba / hacia abajo. 4 . Pulse Opciones y consulte el apartado Mensajes de texto SMS salientes (bandeja de salida). Mensajes de texto SMS salientes (bandeja de salida) 1 . Pulse Menú, desplácese a y pulse OK. 2 . Seleccione Salientes y pulse OK. 3 .
Español Reenviar (bandeja de entrada) Reenvíe un mensaje desde la bandeja de entrada / salida. Pulse Hecho para mostrar las opciones de envío. Borrar todo Pulse Sí para borrar todos los mensajes de la bandeja de entrada. Pulse No para volver al menú. Usar número Muestra todos los números de teléfono contenidos en el mensaje, así como el número del emisor. 1 . Utilice las teclas de flecha para seleccionar uno de los números mostrados. 2 . Pulse Opciones. 3 .
Español Ajustes Nota Los ajustes descritos en este capítulo se realizan en modo de espera. Hora y fecha Configuración de la fecha y la hora 1 . Pulse Menú, desplácese a y pulse OK. 2 . Seleccione Hora/fecha y pulse OK. 3 . Seleccione Ajuste hora y pulse OK. 4 . Introduzca la hora (HH:MM) y pulse OK. 5 . Seleccione am o pm y pulse OK. 6 . Seleccione Ajuste fecha y pulse OK. 7 . Introduzca la fecha (DD/MM/AAAA) y pulse OK. Ajuste del formato de hora/fecha 1 . Pulse Menú, desplácese a y pulse OK. 2 .
Español Configuración de usuario Fondo de pantalla Puede seleccionar entre ocho fondos de pantalla diferentes. 1 . Pulse Menú, desplácese a y pulse OK. 2 . Seleccione Configurar y pulse OK. 3 . Seleccione Fondo pantalla y pulse OK. 4 . Desplácese hacia arriba / hacia abajo para visualizar los fondos de pantalla disponibles. 5 . Pulse OK para confirmar o Atrás para descartar los cambios. Info pantalla En modo de espera, la pantalla puede indicar la fecha, la hora y la red conectada o solo la hora. 1 .
Español Modo HAC (compatibilidad con audífono) 1 . Pulse Menú, desplácese a y pulse OK. 2 . Seleccione Configurar y pulse OK. 3 . Seleccione Modo HAC y pulse OK. 4 . Seleccione On/Off y pulse OK. Cambiar de idioma El idioma predeterminado para los menús, mensajes, etc., del teléfono es Inglés. Puede cambiarlo por cualquier otro compatible con el teléfono. Puede cambiarlo por cualquier otro idioma compatible con el teléfono. 1 . 2 . 3 . 4 . Pulse Menú, desplácese a y pulse OK.
Español Ajustes de tono (señales de llamada y tonos) Ajuste del tono 1 . Pulse Menú, desplácese a y pulse OK. 2 . Seleccione Ajustes de tono y pulse OK. 3 . Seleccione Ajuste tono y pulse OK. 4 . Seleccione Tono llam. y pulse OK. 5 . Seleccione una de los tonos de llamada disponibles para que suene ese tono. Pulse OK para confirmar o pulse Atrás para descartar los cambios. 6 . Ajuste la Alarma, el Tono de apertura, el Tono de cierre, el Tono del mensaje y el Teclado del mismo modo.
Español Tipo de alerta (sonido / vibración) Las llamadas entrantes pueden señalizarse mediante un tono de llamada y/o vibración. 1 . Pulse Menú, desplácese a y pulse OK. 2 . Seleccione Ajustes de tono y pulse OK. 3 . Seleccione Tipo alerta y pulse OK. 4 . Seleccione el modo de señalización deseado y pulse OK. Tonos de advertencia y error Los tonos de advertencia y error se utilizan para avisar al usuario de batería baja, errores en el teléfono y la tarjeta SIM, etc. 1 . 2 . 3 . 4 .
Español Configuración Bluetooth Puede conectarse sin cables a otros dispositivos compatibles con Bluetooth , como auriculares. ® 1 . Pulse Menú, desplácese a y pulse OK. 2 . Seleccione Bluetooth y pulse OK para las siguientes configuraciones: Buscar unidad Índice de los dispositivos introducidos, al que se pueden conectar nuevos dispositivos. Eija el dispositivo de la lista y pulse Opción.
Español Funciones de bloqueo Puede desactivar algunas funciones para simplificar el uso del teléfono. 1 . 2 . 3 . 4 . Pulse Menú, desplácese a y pulse OK. Seleccione Bloq. función y pulse OK. Seleccione cada función que desee desactivar y pulse On. Pulse Hecho para confirmar. Emergencia Ajustes para la función de la tecla de llamada de emergencia. Consulte el apartado Funcionamiento / Llamada de emergencia. 1 . Pulse Menú, desplácese a y pulse OK. 2 . Seleccione Emergencia y pulse OK. 3 .
Español Definir n.º La lista de números a los cuales se llamará cuando se pulse la tecla de llamada de emergencia. 1 . Pulse Menú, desplácese a y pulse OK. 2 . Seleccione Emergencia y pulse OK. 3 . Seleccione Lista de números y pulse OK. 4 . Seleccione Vacío y pulse Opciones. 5 . Seleccione Agenda si desea añadir un contacto desde la agenda. También puede pulsar Manual para añadir un contacto nuevo. 6 . Pulse Guardar. 7 . Pulse . 8 . Introduzca el número y pulse Guardar.
Español Editar Para editar una entrada ya existente, selecciónela y pulse Opciones, luego seleccione Editar y pulse OK. Borrar Para eliminar una entrada ya existente, selecciónela y pulse Opciones, después seleccione Borrar y pulse OK. Nota El número del buzón de voz se lo proporcionará su operador de red. Marcación rápida Las teclas numéricas 0 y 2 –9 pueden utilizarse para la marcación rápida. Añadir números de marcación rápida 1 . Pulse Menú, desplácese a y pulse OK. 2 .
Español ID de llamada entrante Controla la visualización de su número de teléfono en el teléfono del receptor. Seleccione una opción y pulse OK. Establecido por la red Utilice el ajuste predeterminado por la red. Ocultar ID Su número no se mostrará nunca. Enviar ID Su número se mostrará siempre. Llamada en espera Seleccione una opción y pulse OK. Consulte el apartado Funcionamiento – Llamada en espera. Activar Activa la función. Desactivar Desactiva la función.
Español Restricción de las llamadas El teléfono puede restringirse para no permitir determinados tipos de llamadas. Nota Para cambiar estos ajustes se necesita una contraseña. Póngase en contacto con su operador de red para obtener la contraseña. Llamadas salientes Todas llam. Pulse OK y luego seleccione: El usuario puede responder a las llamadas entrantes, pero no marcar. Llam. internac. El usuario no puede llamar a números internacionales. Int.
Español Mensajes Ajustes SMS 1 . Pulse Menú, desplácese a y pulse OK. 2 . Seleccione Config. SMS y pulse OK para los siguientes ajustes: Config. perfil Este número es necesario para utilizar la función SMS. El operador de red puede proporcionarle el número. 1 . Añada / edite el número de teléfono para el servicio de mensajes. Utilice las teclas laterales para mover el cursor. Pulse Borrar para eliminar. 2 . Pulse Guardar para guardar el nuevo número.
Español Mensaje de Difusión Podrá recibir mensajes sobre diversos temas por parte de su proveedor de servicios, como pueden ser el pronóstico del tiempo o las condiciones del tráfico en una región determinada. Para los canales disponibles y los ajustes de canales correspondientes, póngase en contacto con su proveedor de servicios. Los mensajes de difusión de célula no podrán recibirse cuando el dispositivo efectúe itinerancia (roaming). 1 . Pulse Menú, desplácese a y pulse OK. 2 . Seleccione Config.
Español Nota Debe introducir el código PIN actual para desactivar el bloqueo SIM. Bloq. tfno Seleccione On/Off y pulse OK para activar / desactivar el bloqueo de la tarjeta SIM. Nota Debe introducir el código de bloqueo del teléfono para cambiar este ajuste. El código de bloqueo del teléfono por defecto es 1234. PIN / PIN2 / Contraseña del teléfono Para cambiar los códigos PIN o la contraseña de bloqueo del teléfono: 1 . Introduzca el código actual y confirme con OK. 2 .
Español Reiniciar Reinicia el teléfono a los valores de fábrica. El Reinicio maestro puede hacerse con la tarjeta SIM en el teléfono o sin la tarjeta SIM. Reinicio con la tarjeta SIM insertada 1 . Pulse Menú, desplácese a y pulse OK. 2 . Seleccione Reiniciar y pulse OK. 3 . Introduzca el código actual (el código predeterminado es 1234) y confirme con OK. 4 . Confirme pulsando Sí. Reinicio sin la tarjeta SIM insertada 1 . Pulse Opciones, desplácese a Ajustes y pulse OK. 2 . Seleccione Reiniciar y pulse OK.
Español Vaciar Restablece el teléfono a los valores de fábrica y elimina toda la información almacenada en el teléfono. El Borrado maestro puede hacerse con la tarjeta SIM en el teléfono o sin la tarjeta SIM. Reinicio con la tarjeta SIM insertada 1 . Pulse Menú, desplácese a y pulse OK. 2 . Seleccione Vaciar y pulse OK. 3 . Introduzca el código actual (el código predeterminado es 1234) y confirme con OK. 4 . Confirme pulsando Sí. Reinicio sin la tarjeta SIM insertada 1 .
Español Resolución de Problemas El teléfono no puede encenderse Carga de la batería baja Conecte el adaptador de corriente y cargue la batería durante 12 horas. Batería insertada de modo incorrecto Compruebe la instalación de la batería. Fallo al cargar la batería Batería o cargador dañado Compruebe la batería y el cargador. Compruebe las conexiones del Cargador conectado de forma incorrecta al teléfono o enchufe cargador.
Español Error de la tarjeta SIM Tarjeta SIM dañada Compruebe el estado de la tarjeta SIM. Si está dañada, póngase en contacto con el operador de red. Tarjeta SIM instalada de forma Compruebe la instalación de la tarjeta SIM. Extraiga la tarjeta y vuelva a incorrecta insertarla. Tarjeta SIM sucia o húmeda Limpie las superficies de contacto de la tarjeta SIM con un paño limpio. Fallo de conexión a la red Tarjeta SIM no válida Póngase en contacto con el operador de red.
Español Instrucciones de Seguridad Advertencia La unidad y los accesorios pueden contener componentes de pequeño tamaño. Mantenga todo el equipo lejos del alcance de los niños. Entorno de funcionamiento Siga las reglas y leyes pertinentes en cualquier lugar donde se encuentre y apague siempre la unidad en cualquier momento en que su uso esté prohibido o pueda ocasionar interferencias o peligros. Emplee únicamente la unidad en la posición de uso normal.
Español Áreas con riesgo de explosión Apague siempre la unidad cuando se encuentre dentro de un área en la que exista riesgo de explosión. Siga todas las señales e instrucciones. Hay riesgo de explosión en lugares que incluyen zonas en las que normalmente se pide que se apague el motor de su vehículo. Dentro de estas zonas, las chispas podrían causar explosiones o incendios y provocar lesiones e incluso la muerte.
Español aire podría expandirse. Podrían producirse lesiones graves si el equipo del teléfono celular está instalado en forma incorrecta y la bolsa de aire se llena de aire. Está prohibido utilizar el equipo durante cualquier vuelo. Apague el equipo antes de subir a un avión. Es posible que el uso de equipos de telecomunicación inalámbrica dentro de un avión implique riesgos para la seguridad aérea e interfiera con las telecomunicaciones. También puede ser ilegal.
Español • Utilice auriculares u otro dispositivo manos libres que pueda resultar legalmente necesario.. En los últimos años, varios estados han aprobado leyes que prohíben manejar vehículos automotores mientras habla con un teléfono inalámbrico sin usar auriculares, altavoz u otro dispositivo manos libres. También es posible que las ordenanzas del condado y municipales limiten las conversaciones inalámbricas o que prohíban que los conductores de automóviles mantengan esas conversaciones.
Español Exposición a energía de radiofrecuencia ESTE DISPOSITIVO INALÁMBRICO CUMPLE CON LOS REQUISITOS GUBERNAMENTALES SOBRE EXPOSICIÓN A LAS ONDAS DE RADIO. Su equipo contiene transmisores y receptores de radio. Cuando esté encendido, el teléfono recibe y emite energía de radiofrecuencia (RF) a través de su antena. El equipo está diseñado y fabricado para no exceder los límites de exposición a la energía de radiofrecuencia que fija la Comisión Federal de Comunicaciones (FCC) de EEUU.
Español Compatibilidad con aparatos auditivos Nota Para conocer la compatibilidad de aparatos auditivos, debe desconectar la conectividad Bluetooth. Este modelo de dispositivo móvil cumple con lo establecido en las normas de la FCC que rigen la compatibilidad de auxiliares auditivos. Según estas normas, se requiere un micrófono M3 o superior. El valor M, que se muestra en el empaque del dispositivo, hace referencia a las emisiones más bajas de radiofrecuencia (RF).
Español Exención y Limitación de Responsabilidad Doro AB y sus filiales o licenciatarios no asumen ningún tipo de responsabilidad por los daños o las pérdidas ocasionadas por el uso de esta guía. Doro AB y sus filiales o licenciatarios no asumen ningún tipo de responsabilidad por las pérdidas o los reclamos que presenten terceros y que puedan surgir con motivo del uso de este software.
Español Cuidado y Mantenimiento Su unidad es un producto técnicamente avanzado y deberá tratarla con el mayor cuidado. Cualquier negligencia invalidará la garantía. • Proteja la unidad de la humedad. La lluvia, la nieve, la humedad y otros tipos de líquidos pueden contener sustancias que corroen los circuitos electrónicos. Si la unidad se moja, deberá extraer la batería y dejar que el aparato se seque totalmente antes de volver a colocarla. • No utilice ni deje la unidad en entornos con polvo o suciedad.
Español • El uso de las baterías por parte de niños debe hacerse bajo supervisión. • Evite dejar caer el teléfono o la batería. Ei el teléfono o la batería caen, especialmente en una superficie dura, y el usuario sospecha que hay daños, llévela a un centro de servicio para que la inspeccionen. • El uso incorrecto de las baterías puede dar como resultado un incendio, explosión u otros riesgos. Las recomendaciones anteriores se aplican a la unidad, la batería, el adaptador de red y cualquier otro accesorio.
Español Soporte Para obtener asistencia, póngase en contacto con: E-mail: service@ConsumerCellular.com Sitio web: www.ConsumerCellular.com/support Teléfono: 1-888-345-5510 ¿Necesita probar su teléfono celular? Podrá realizar en cualquier momento una llamada de prueba desde su teléfono móvil a nuestra línea de comprobación GRATUITA marcando el 1-888-460-8781 desde su celular. Si la llamada se realiza correctamente, oirá un mensaje grabado diciéndole que su teléfono móvil funciona.
English (US) Spanish (Lat. Am) Version 1.