
Installation Manual


INSTALL/REMOVAL INSTRUCTIONS: WINDOW REGULATOR
740-872
Disclaimer:
Even though every attempt is made to ensure this information is complete and accurate, it is impossible to account for all possible circumstances or situations. Please consult with a qualied auto technician
before attempting to perform any work you are not qualied to do. Automobiles can be hazardous to work on; be sure to take all necessary safety precautions. Failure to do so may result in property damage
or personal injury. Certain motor vehicle standards and performance requirements may apply to your motor vehicle (such as Federal Motor Vehicle Safety Standards by the National Highway Trac Safety
Administration). Be sure that your work is performed in accordance with such standards and that you do not disable any motor vehicle safety feature.
ATTENTION: Refer to the appropriate shop manual for your vehicle to obtain specic service procedures for this part. If you do not have
a service manual or lack the skill to install this part, it is recommended that you seek the services of a qualied technician. Pay special
attention to all cautions and warnings included in the shop manual. Read and follow all instructions carefully.
12
STEP8:If vehicle was equipped, re-install water vapor barrier.
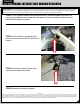
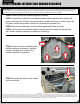
STEP9:Connect the power mirror to the back side of the door trim panel.
STEP10:Connect the door trim panel marker light assembly on the back side of the door
trim panel.
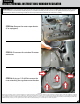
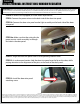
STEP11:Align the door trim panel with its corresponding retainer holes.
STEP12:In a downward motion slide the door trim panel over the lip on the door, while
paying attention to the alignment of the pins on the back of the door panel.
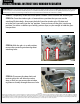
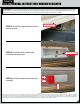
STEP10a:Make sure that the wiring for the
power master switch assembly in through
the hole in the door panel.
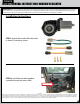
STEP13:Install the door trim panel
attaching screw.