
Specifications

Power Train Testing and Adjusting 44
Transmission Pressure Test
Tools Needed
Pressure Gauge Group 1
WARNING
To prevent personal injury, when the transmission
is tested, move the truck to a clear area, that is
level. Keep all other personnel away from the lift
truck. Use lifting equipment or a save method to
lift the front of the lift truck until the drive wheels
are off the floor. Put wood blocks or jack stands of
the correct capacity under it to hold it in this
position while pressure tests are performed.
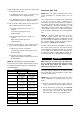
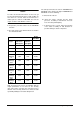
When the transmission tests are made, the
transmission oil must be at the correct level. The
pressure given in the chart are taken with the
transmission oil temperature at 49 to 71°C (120 to
160°F). If the oil temperatue is lower than 49°C
(120°F) the oil pressure will be higher than that shown.
If the oil temperature is higher than 71°C (160°F), the
pressure will be lower than that shown.
Raise the front of the lift truck off the floor. Put wood
blocks or jack stands of the correct capacity under it to
hold it in this position while pressure tests are
performed.
WARNING
Before any pressure tap plugs or connections are
removed, the engine must be stopped with the
transmission controls in NEUTRAL. This will
release hydraulic pressure in the transmission.
For more identification of transmission problems, the
pressures that follow can be checked.
a. Pump pressure in neutral.
b. Forward clutch pressure in forward.
c. Reverse clutch pressure in reverse.
d. Converter charge pressure in neutral.
e. Converter outlet or cooler inlet pressure in neutral.
f. Lubrication pressure in neutral.
Most problems in the hydraulic circuit can normally be
found when the pump pressure is checked. If more
information is necessary, gauges can be installed at
each pressure tap location. Locations of the pressure
taps and procedures for testing are given as follows. If
any of the pressures are not correct, refer to
Troubleshooting For Problems and Probable Causes.
1. Be sure the transmission control adjustments are
correct before tests are made.
See Inching Pedal Adjustment in Testing and
Adjusting.
2. Install a tachometer to the engine to show engine
speed during the test.
3. Put a thermistor probe in place of the dipstick in the
transmission oil reservoir.
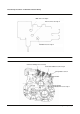
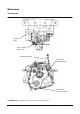
4. Remove each of the following pressure tap plugs in
the order shown and install the 0 to 2050 kPa (0 to
300 psi) pressure gauge. After the pressure check
is done, remove the gauge and install the plug
again.
5. Check pump pressure with the transmission in
neutral at pressure tap (6) on the valve body first. If
it is not correct, then check pump pressure at
pressure tap (1) on the bearing plate.
a. If the pressure is low at pressure tap (6), but
correct at pressure tap (1), there could be an oil
line restriction or a defective inching valve.
NOTE: Pump pressure should be checked at
pressure tap (6) first because pressure tap (6) is
easier to get to than pump pressure tap (1) on the
bearing plate. If pump pressure is correct at
pressure tap (6), it will be correct at pressure tap
(1) also.
b. If the pressure is low at both locations, see
Problem: Low pump pressure in Troubleshooting.
NOTE: Pump pressure is adjusted by adding or
removing shims in the D700296 Plug. The plug is
located in the main relief valve on the valve body.
6. Check clutch pressure as follows:
a. Check forward clutch pressure at pressure tap
(4) with the transmission in forward. If the
pressure is not correct, see Problem: Low
forward clutch pressure in Troubleshooting.
b. Check reverse clutch pressure at pressure tap
(5) with the transmission in reverse. If the
pressure is not correct, see Problem: Low
reverse clutch pressure in Troubleshooting.