
Specifications
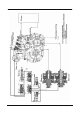

Power Train Testing and Adjusting 38
Testing and Adjusting
Troubleshooting
Troubleshooting can be difficult. A list of possible
problems and corrections is on the pages that follow.
This list of problems and probable causes will only
give an indication of where a problem can be and what
repairs are needed. Normally, more or other repair
work is needed beyond the recommendations on the
list. Remember that a problem is not necessarily
caused only by one part, but by the relation of one part
with other parts. This list cannot give all possible
problems and probable causes. The serviceman must
find the problem and its source, then make the
necessary repairs.
Always make visual checks first. Check the operation
of the machine and then check with instruments.
WARNING
To prevent personal injury, when testing and
adjusting the power train, move the machine to an
area clear of obstructions. There must be
adequate ventilation for the exhaust. When drive
wheels are off the ground for testing, keep away
from wheels that are in rotation.
Operate the machine in each direction. Make note of
all noises that are not normal and find their source. If
the operation is not correct, make reference to the
troubleshooting chart for "problems" and "probable
causes"
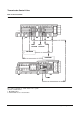
Visual Checks
1. Check the oil level in the transmission and axle with
the engine running and with the Transmission in
NEUTRAL.
2. Check all oil lines, hoses and connections for leaks
and damage. Look for oil on the ground under the
machine.
3. Actuate the controls for the forward direction and
then for the reverse direction. The actuation must
give the same positive action to the hydraulic
control circuit for clutch engagement in both
directions.
4. Remove and check the filter element for loose
particles. Check the strainer behind the
transmission oil plug for foreign material.
a. Particles of friction material give an indication of a
clutch failure.
b. Metallic (metal) particles in the filter give an
indication of wear or mechanical failure in the
transmission and/or axle.
c. Rubber particles give an indication of seal or hose
failure.
If metal or rubber particles are found, all components
of the transmission hydraulic system must be flushed.
Make a replacement of all parts that show damage.
NOTICE
Before these checks are started, fill the transmission
and axle with oil to the correct level. See the Operation
& Maintenance Manual for the procedure to check
transmission and axle oil level.
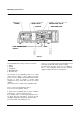
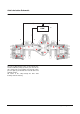
Activate the controls for the FORWARD direction and
then for the REVERSE direction. The modulation will
be seen on pressure gauge in the clutch pressure tap
when the shift is made at low idle. The pressure will
increase to 895 kPa (130 psi) when completely filled.
Operate the machine in each direction. Make note of
noises that are not normal and find their source. If the
operation is not correct, make reference to the check
List During Operation for "problems" and "probable
causes".