
Instruction Manual


1835-065-E-7-13
13
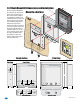
13.5”
12”
2.625”
Bottom View
Side ViewFront View
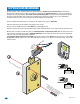
1.3.2 Flush Mount Surface Mounting Kit Dimensions and Installation
Flush mount unit (See page 11 for flush
mount enclosure dimensions) can be
mounted ON a wall or pilaster and NOT IN
the wall by using the optional flush mount
surface mounting kit (P/N 1814-172). This
is useful when cutting a large hole into a
wall or pilaster would be very difficult
(marble or granite for example) .The flush
mount surface mounting kit is a trim ring
that fits around the flush mount enclo-
sure. The enclosure and trim ring get
installed directly on the wall using
appropriate hardware (not included) after
running all necessary conduit to the
enclosure. Be sure the unit is mounted
securely and is not subject to vibration
from closing doors or gates.
Examples of some
small holes in the
wall that may be
needed, depending
on how you choose
to run the wiring.
1”
.375”
Trim Ring
Flush Mount
Enclosure
Knock-outs
Mounting Screws
(Not supplied
)
Wall
Trim Ring
1.125” Dia
1.5”3” 3” 3”
1.125” Sq
1.5”
.875”
1.125”
.875”
1”
Conduit run
to junction box
Conduit
sweep
run
Mount On a Surface
7
7
8
8
9
9
4
4
5
5
6
6
1
1
2
2
3
3
0
0
O
P
E
R
O
P
E
R
W
X
Y
Z
W
X
Y
Z
T
U
V
T
U
V
P
Q
R
S
P
Q
R
S
M
N
O
M
N
O
J
K
L
J
K
L
G
H
I
G
H
I
D
E
F
D
E
F
A
B
C
A
B
C
S
P
S
P
A
Z
C
A
LL