
Installation Guide


D
oo
r
J
a
m
b
P
r
e
p
N
o
t
e
:
I
n
a
ll
s
t
e
p
s
i
t
i
s
i
m
p
e
r
a
t
i
v
e
t
o
e
n
s
u
r
e
t
h
a
t
a
t
no
t
i
m
e
a
n
y
d
r
illi
ng
o
r
s
c
r
e
w
p
l
ace
m
e
n
t
c
o
m
e
i
n
c
on
t
ac
t
w
i
t
h
t
h
e
g
l
a
ss
ca
s
e
m
e
n
t
o
f
t
h
e
s
i
d
e
li
gh
t
.
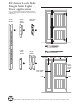
1.
Carefully score along trim edges with sharp tool
such as a razor knife.
2.
Gently pry and remove top interior door trim
molding and all trim molding on the lockside of the
sidelight panel where the door lock interfaces the
door jamb, exposing the door jamb separating the
door and sidelight.
(This trim can and should be reinstalled upon
installation completion.)
D
oo
r
S
h
i
e
l
d
I
n
s
t
a
ll
a
t
i
on
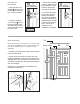
1.
Slide the Mini Door
Shield onto the door
position so the holes will
go over the lock bolts.
2.
Using the supplied
2-1/2” screws , secure
the Door Shield to the
door slab using the hole
above and below screw
lock bolt holes.
F
D
Lock bolt and
latch assemblies
D
Lock bolt and
latch assemblies
3.
With the Door Shields
in place, make sure the
Door Shields are level
and flush against the
door slab on all sides.
4.
Verify that the locks
can function properly
without interference
from the Door Shields.
If there is intereference,
adjust the Door Shields
until the locks operate
freely. If there is no
interference, the
installation is complete.
F
Rough frame
Sidelight
Trim
Trim
Hinge
side
Lock
side/
jamb
side