
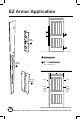
Installation Instructions

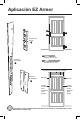

E
A
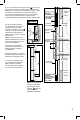
Door
Jamb
Trim
E
A
Jamb Shield
Installation
NOTE: Door is removed for illustrative purposes
only. Application of Jamb Shield should not re-
quire removal of door.
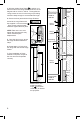
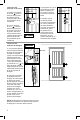
1. Position the Jamb Shield taking care to ensure
that the holes line up with the lock bolt holes in the
door jamb. Using your thumb, punch out the holes
that line up with the locks on your door. The long
leg of the of the Jamb Shield should t behind the
weather stripping.
When placed properly, the edge of the long leg
should be hidden by the weather stripping.
The short leg should rest ush against the inside
edge of the jamb.
It may be necessary to slightly raise the edge of
the trim molding to allow proper positioning.
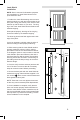
2. While ensuring that the Jamb Shield remains
properly positioned, with an 11/64 in. drill bit,
pre-drill the holes for the Jamb Shield as laid out
in the diagram. (Note: It may be easier to hold the
Jamb Shield in place and mark the holes with a
pencil and then pre-drill the holes) The supplied
securing screws are more than 3 inches long so
pre-drilling should be deep enough to accommo-
date this length.
3. Check to verify the door and door jamb are still
true. If the door is not true, take all neccessary
steps to correct this issue before proceeding.
4. Secure the door jamb with the Jamb Shield at-
tached to the rough frame with the supplied 3-1/2
inch screws . Drive screws until the heads seat
ush against the door jamb.
NOTE: Take care not to over tighten the screws
as this may cause unwanted jamb displacement.
5. Once installation is complete, verify that the
locks can function properly without interference
from the Jamb Shield. If there is interference, ad-
just the Jamb Shield until the locks operate freely,
then tap down any raised trim moulding. The EZ
Armor installation is now complete.
E
3