
Installation Instructions
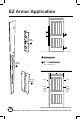

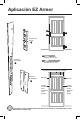
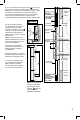

Pre-drill with
11/64 in.
drill bit
Pre-drill with
11/64 in.
drill bit
Hinge
Guard
Shim
Rough
frame
Door
jamb
Hinge
Guard
Hinge
bracket
Pre-existing
hinge screws
3-1/2”
screw
3-1/2”
screw
Door
jamb
Shim
Rough
frame
C
E
E
E
E
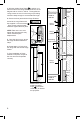
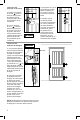
3. With the middle Hinge Shield in position, pre-
drill the holes for the Hinge Shield as laid out on the
diagram with an 11/64 in. drill bit. The supplied se-
curing screws are over 3 inches long so pre-drilling
should be deep enough to accomodate this length.
4. Secure the door jamb with the Hinge Shield at-
C
tached to the rough frame with
the supplied 3-1/2 inch screws
. Drive screws until the heads
seat ush against the door jamb.
NOTE: Take care not to over
tighten the screws as this may
cause unwanted jamb
displacement.
5. Once the door is true, secure
the Hinge Shield as detailed in
step 4.
6. Repeat steps 1-4 for the bot-
tom hinge with the second Hinge
Shield.
7. Once installation of Hinge
Shields is complete, verify that
the door is true and operates
correctly.
E
NOTE: Above, the
middle and lower
hinge screws are
visible only for illustra-
tive purposes.
E
2