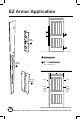
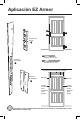
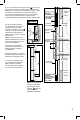
EZ Armor Application A C B Door Shield B C D 2-1/2” screw (4) E Jamb Shield A 3-1/2” screw (17) Door slab Hinge Shield C Trim Hinge Trim Trim Door Jamb Lock side Door Jamb Hinge side Questions? Call customer service at 1-888-582-2294 or visit www.armorconcepts.
SAFETY INFORMATION WARNING • The use of work gloves and safety glasses is strongly recommended while installing this product. Wood and metal shaving/splinters can cause serious bodily injury. • As with all products requiring installation, to reduce the possibility of accidental injury to you or others FOLLOW ALL INSTALLATION INSTRUCTIONS contained herein accurately and carefully. PREPARATION Before beginning assembly of product, make sure all parts are present.
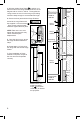
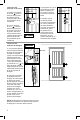
Door Shield Installation 1. Slide the Door Shield B onto the door position so the holes will go over the lock bolts. Lock bolt and latch assemblies Lock bolt and latch assemblies B 2. Using the supplied 2-1/2” screws D , secure the Door Shield to the door slab using the hole above and below screw lock bolt holes. Hinge Shield Installation D E 1. With the door open, remove the two screws from the middle jamb side hinge plate, closest to the weatherstripping.
3. With the middle Hinge Shield C in position, predrill the holes for the Hinge Shield as laid out on the diagram with an 11/64 in. drill bit. The supplied securing screws are over 3 inches long so pre-drilling should be deep enough to accomodate this length. Pre-drill with 11/64 in. drill bit 4. Secure the door jamb with the Hinge Shield attached to the rough frame with the supplied 3-1/2 inch screws E . Drive screws until the heads seat flush against the door jamb.
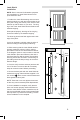
Jamb Shield Installation NOTE: Door is removed for illustrative purposes only. Application of Jamb Shield should not require removal of door. 1. Position the Jamb Shield taking care to ensure that the holes line up with the lock bolt holes in the door jamb. Using your thumb, punch out the holes that line up with the locks on your door. The long leg of the of the Jamb Shield should fit behind the weather stripping. A When placed properly, the edge of the long leg should be hidden by the weather stripping.
WARNING: As with all products requiring installation, to reduce the possibility of accidental injury to you or other accidental damage, FOLLOW ALL INSTALLATION INSTRUCTIONS contained herein accurately and carefully. THREE-YEAR LIMITED WARRANTY The goods sold hereunder are fit and merchantable for the ordinary purposes for which such goods are used and Seller warrants the goods sold hereunder against defects in material and workmanship only for a period of three (3) years from the date of original purchase.
Aplicación EZ Armor A B C Protector de puerta B C D Protector para jamba A E Tornillos de 2 ½” (4) Tornillos de 3 ½” (17) Hoja de la puerta Reborde Bisagra Protector de bisagras C Reborde Jamba del lado de la cerradura de la puerta Reborde Jamba del lado de las bisagras de la puerta ¿Preguntas? Llame al Departamento de Servicio al Cliente al 1-888-582-2294 o visite www.armorconcepts.
INFORMACIÓN DE SEGURIDAD ADVERTENCIA • Se recomienda encarecidamente el uso de guantes de trabajo y gafas de seguridad mientras instala este producto. Virutas/astillas de metal o madera pueden causar lesiones corporales graves. • Como todos los productos que requieren instalación, SIGA TODAS LAS INSTRUCCIONES DE INSTALACIÓN que se incluyen aquí precisa y cuidadosamente para reducir la posibilidad de lesiones personales en usted u otras personas. .
Instalación del protector de la puerta 1. Deslice el protector de puerta B sobre la posición de la puerta de manera que los orificios queden sobre los pasadores de las cerraduras. 2. Use los tornillos de 2 ½” D incluidos para fijar el protector de puerta a la hoja de la puerta, usando el orificio ubicado sobre y debajo de los orificios para los tornillos de los pasadores de las cerraduras. Instalación del protector de bisagras 1.
3. Con el protector de bisagras central C en su lugar, taladre previamente los orificios para el protector de bisagras con una broca para taladro de 11/64”, según se indica en el diagrama. Los tornillos de fijación que se incluyen tienen más de 7,62 cm de longitud, de forma que el taladrado previo debe tener la profundidad suficiente para dar cabida a esta longitud. Protector de bisagras 4.
Instalación del protector para jamba NOTA: La puerta se retira sólo para propósitos ilustrativos. La aplicación del protector para jamba no requiere retirar la puerta. 1. Coloque el protector para jamba asegurándose de que los orificios se alineen con los orificios para los pasadores de la cerradura, ubicados en la jamba de la puerta. Con la ayuda del pulgar, perfore los orificios que se alinean con las cerraduras de la puerta. La pata larga del protector para jamba debe ajustarse detrás del burlete.
ADVERTENCIA: como todos los productos que requieren instalación, SIGA TODAS LAS INSTRUCIONES DE INSTALACIÓN que se incluyen aquí precisa y cuidadosamente para reducir la posibilidad de lesiones personales en usted u otras personas. Aviso: el blindaje del marco interior para puertas está diseñado para usarse como un sistema completo, que incluye un protector del marco interior para puertas, dos protectores de bisagras y un (o dos) protector de puerta.