User Manual Model: PF10-5002 FCC ID: YNG-PF100001
Thanks for using YF GPS PF10-5002! z YF reserves the rights of final interpretation of the manual. z The product is subject to change without any further notice. Please accept our apology for your inconvenience. z Please back up your information in the GPS navigator. YF assumes no responsibility for any loss caused by material loss. z The manual might contain a few mistakes though it has been checked. If mistakes are found, please contact the YF customer service center.
z Please read carefully the instructions in this manual and use only accessories of YF to avoid unpredicted damage. Failure to follow the instructions will invalidate warranty and might endanger personnel safety, for which YF assumes no responsibility. z Data of navigation electronic maps might be inconsistent with actual traffic signals due to transportation development. Please follow traffic regulations and signs and drive according to road situation.
Table of Contents Chapter I Welcome ................................................................................................. 1 Chapter II Basic Operation ..................................................................................... 2 2.1 Appearance ........................................................................................... 2 2.2 Power Supply & Charging .................................................................... 3 2.3 Power on.........................................
Table of Contents 6.4 USSD.................................................................................................. 26 6.5 Pin ...................................................................................................... 27 6.6 Home page.......................................................................................... 28 6.7 SMS Center......................................................................................... 28 6.8 Carrier.............................................
Chapter I Welcome Thanks for using the GPS PF10-5002 featured with navigation as the major function as well as other functions like SMS, GPRS, GSM, audio play, video play, flash play, photo browsing and e-book reading, etc.
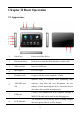
Chapter II Basic Operation 2.1 Appearance 1 Power key Power on/off the device. 2 Dial shortcut key Press on it to enter the Dial interface to make calls 3 SIM card slot Insert the SIM card. 4 Microphone For voice input 5 Earphone Jack Connect with the stereo earphone, 3.5mm Inserted with a T-FLASH card containing map 6 T-FLASH card software, map data and user documents. Do not slot remove it while operating the device. Reset the device when the card is pulled out improperly.
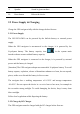
9 Speaker Sound is given out here. 10 Reset button Reboot the device. 2.2 Power Supply & Charging Charge the GPS navigator fully with the charger before first use. 2.2.1 Power Supply The GPS PF10-5002 can be powered by the built-in battery or external power supply. When the GPS navigator is unconnected to the charger, it is powered by the Li-polymer battery. The battery capacity icon in the system main interface shows current residual battery capacity.
Plug the USB terminal of the charger into the USB port on the left side of the GPS navigator and the other to the power socket to supply power and charge the GPS navigator. [Note]: The charging indicator light is red during charging. Do not unplug the charge until the battery is fully charged and the indicator light turns green. Please charge the GPS navigator when the battery is low or used up in succeeding use. 2.2.
mode, and will automatically resume the state before entering sleep mode when it is powered on again (refer to 2.3 Power on). 2.5 Reset When the device has no response, press the reset button on the back side to reset the system.. [Relevant Information] The following situations might lead to no response of the system. 1. Failure of function activation with overlong execution; 2.
in an automobile, fix it on the dashboard under the front windshield. [Note]: Do not place the GPS navigator in positions obstructing the driver’s vision, for example at the steering wheel, pedal or gear lever. Do not place it without fixing it or in the place of air bag or the area after the air bag is inflated. While using the mounting kit, follow local regulations. YF will have no responsibility for any penalty or damage resulting from traffic violation. 2.
screen, use soft cloth with water, isopropyl alcohol or glasses cleanser. Do not use detergent containing ammonia. 2.9 Main Interface & Major Functions Press the power key on the top of the device and let go after two seconds to power it on and enter the system main interface as shown below.
GPS information: display the signal state, TUC, latitude and longitude etc. GPRS setting, including auto dialing, creating or editing operator information. It is in grey when disconnected to network. Setting the system date and time Display the battery capacity [Relevant Information]: In the following situations, the SIM card cannot be registered to network after the device is powered on, and “unregister” will be displayed instead of the network operator name. 1. No SIM card is inserted; 2.
2. Enable the Radio module (refer to 6.1 GSM); 3. Input the PIN code if the Pin code is enabled for the SIM card (refer to 6.5 Pin). [Relevant Information]: Enable PIN code for your SIM card on a mobile phone. The initial PIN code provided by your service provider and is modifiable. Note if the PIN code is input for successes three times, the SIM card will be locked and a PUK code is required to unlock. Do remember your PIN code.
Chapter Ⅲ GPS For initial startup of the navigation program, operate the device in an open area without obstructions. Hold the device after powering it on till it receives signals from at least 4 satellites, and then you may start using the navigation program as you wish. Note: There are various ways to search a location in the map or to plan your routes. See navigation user manual that guides you through the operating process.
Chapter Ⅳ Dial When the device is connected to the network, tap on the system main interface to enter the Dial interface as shown below. 4.1 Make Calls Input a telephone number, Backspace Tap to delete the last number or symbol input Dial Tap to dial a number Besides, you may make calls by selecting a contact person from the phone book. For details, please see the instructions of 4.3 Contacts below. When the call is put through, the following interface will be shown.
In the above interface, tap tap to enter the call Record interface (see 4.4 Record), to enter the SMS interface (see Chapter Ⅴ SMS), tap the Contacts interface (see 4.3 Contacts), tap information, tap to hang off, and tap to open the keypad to input / to turn down/ up the volume. 4.2 Answer Calls When there is an incoming call, the following interface will popup.
Tap to answer the call or tap to reject. 4.3 Contacts Tap to enter the Contacts interface as shown below: In the above interface, tap to add a new contact information in the Contact Fields interface as shown below.
Tap on to open the keypad, set cursor after a field and type in information as follows. [Relevant Information] In the above interface, you may tap on the keypad to select from upper case, lower case, numbers or switch between big and small keypad. Tap to save the info, and then tap to exit.
interface. Select all Tap to select all contacts; tap again to unselect all Add contact Tap to add contact Delete Tap to delete the selected contact(s) View contact fields Select a contact and tap this icon to view the contact fields as shown below Add to the favor list Tap to add the contact to the favor list SIM card contacts Tap to enter the list of SIM card contacts to copy them to the device as shown below In the Contacts interface, tap to view the contact fields as shown below.
Tap to edit the contact information, to call the contact or to send a message. In the Contacts interface, tap to enter the Simcard Contacts interface as follows. Tap on a contact to select it or tap to select all the contacts, and tap copy them to the device.
4.4 Record Tap to enter the Record interface as follows.
Dial Tap to call the number New Message Tap this icon to enter the New Message interface to write and send a message Contacts Fields Tap to enter the Contacts Fields interface to edit the contact information 4.5 Favorite Contacts After adding contacts to favorite (refer to 4.3 Contacts), you may tap the list of Favorite Contacts as follows. Tap to make a call, or to send a message or 18 to exit.
Chapter Ⅴ SMS The device saves 500 short messages, including those in the Inbox, Outbox, Sent message, Drafts and Delete message. Tap on the system main interface to enter the SMS interface as follows. 5.1 Read Message When a new message is received, the following interface will popup.
Tap to reply to the message, and tap to forward the message, or tap to edit and save the sender’s information. 5.2 Create & Send Message Tap to enter the New Message interface as follows. Firstly input the receiver’s mobile phone number with one of the following methods: 1. Move the cursor behind “To” and input a mobile phone number using the prompted keypad, as shown in the following interface.
to enter the Contacts interface as follows. Select a contact (or 2. Tap tap to select multiple numbers), and tap . [Note]: While inputting multiple mobile phone numbers, input “;” between every two numbers. After entering mobile phone number(s), double tap the “Message” area to enter the interface of message input and prompt the keypad as shown below.
Input message content using the keypad, tap to return to the New Message interface as shown below. Tap to send the message. When succeeded, the message will be put into the Sent message; if failed, it will be put into the Outbox to be sent again. Tap to return to the SMS interface. 5.
To save the message being edited for later use, tap and then tap “OK” in the prompted dialog to save the message to the draft box. 5.4 Manage Messages After a message is sent out, it will be saved in the Sent message. You may tap the icon or double tap on a message in the SMS interface to view the message.
Tap / to read the previous/ next piece of message, tap to other ones.
Chapter Ⅵ Network Tap the Network icon on the system main interface to enter the Network interface as follows: 6.1 GSM Tap in the Network interface to enter the Radio interface shown as below. When the “Enable Radio” is ticked, you may use the Internet, make calls or send messages, otherwise the mobile phone will enter flight mode and these services are disabled. 6.
Tap in the Network interface to enter the Contacts interface as follows: For details, refer to 4.3 Contacts. 6.3 SIM Contacts Tap in the Network interface to enter the SIM Contacts interface as follows: For details, please refer to 4.3 Contacts. 6.
In the above interface, input a carrier service number, and tap the icon to open the function. 6.5 Pin The PIN code provided by your network operator is the ID of your SIM card, which is used to protect your SIM card from being used by others. If the power-on PIN code has been enabled, you need to input a 4-digit PIN code before using network service. Tap in the Network interface to enter the following interface. Tap to display the keypad, enter the PIN code and then tap “OK” to finish.
[Attention]: The PIN code is modifiable. Note if a false PIN code is input for consecutive three times, the mobile will be locked and a PUK code will be required to unlock it. You are supposed to always remember the PIN code. 6.6 Home page Tap in the Network interface to enter the IE Home Page interface as follows. Tap to open the keypad, input an IE home address in the “Main Interface” input box and tap to save the setting. 6.
[Note]: The service center number is displayed only when the Radio module is enabled and the PIN code (when enabled) is input. To change the number, tap to prompt a keypad, set the cursor in the input box, and type in a number by tapping on the keypad. For keypad operation, refer to 6.8 Carrier This function enables you to switch from one carrier to another for a dual-network SIM card. After network connection is established (refer to 2.
Mobile, China Unicom or Automatic and then save the setting by tapping . After successful saving, the following interface will be displayed. [Relevant Information]: This function works only when the Radio module is enabled and the PIN code (when enabled) is input.
Chapter Ⅶ GPRS Tap on the system main interface to enter the GPRS Setting interface as shown below.
Chapter Ⅷ Media Tap the Media icon on the system main interface to enter the Media interface as follows: 8.1 Music Player To use the function, please first insert a flash card with music files inside. The music player supports .WMA9, and .WAV files and play sequence select.
Double tap on to display the list of audio files: In above interface, tap the icon or tap the icon to return to the Music Play interface; drag the scroll bar upward/ downward to view all music files; tap the icon / to add one / all music file(s) on the left list to the play list on the right; tap the icon / to delete one / all music file(s) from the play list.
Main functions in the above interface are listed as follows: Return Return to the Media interface Minimize Tap to minimize the player and return to the Media interface Play time Display the play time of the music Music info Shows name, artist, album info and music length of current audio file Play sequence Tap to select a play sequence (5 modes mode in total: single; single repeat; ordinal; repeat all; random) Equalizer Tap to enter sound effect setting Progress Drag leftwards or rightwards
regulation turn down/ up the volume Stop Tap to stop playing music Play list Tap to switch to the Play List interface to select audio file Note: If the music has corresponding lyric file (in .lrc format), when it is played, lyrics will be displayed on the right side of the interface. Double tap the lyric window to view it in full screen. In full-screen mode, double tap the screen to resume the normal playing interface.
Tap Enable equalizer Tap to enable the equalizer Reset Tap to reset the equalizer to save the setting and return to the Music Play interface 8.2 Video Player To use the function, please first insert a flash card with video files inside. The video player supports .WMV, .ASF and .AVI files, full-screen play, progress adjustment and file select.
Double tap to open the list of video files: Double tap on a file to play it as follows: Main functions in the above interface are listed as follows: Tap to return to the Media interface Return 37
Previous Play the previous file Pause/ Play Tap to pause/ continue playing Next Play the next file Stop Tap to stop playing Video list Tap to switch to the interface of video list to select a file to play Progress Drag leftwards /rightwards the slide regulation to a spot to play from it Volume regulation Drag leftwards/ rightwards to turn down/ up the volume Time Played time/ file length While playing, double tap the screen to enter full-screen mode as shown below.
Tap the Photo icon in the Media interface to enter the following interface: Tap Double tap to go to the directory of memory card: to open the list of photo files as follows: Close Tap to close the current file 39
Return Double tap to return to the previous folder Scroll bar Drag upwards/ downwards the slide to display all photos Double tap on a photo to open the browsing interface as shown below. When you rotate the device, the picture rotates, too.
In the above interface, double tap on the screen to display photos in full screen. Tap the icon to enter auto play interface as shown below. Drag the slide at the bottom of the screen to regulate play speed (1-10 seconds), and then tap on the screen to hide the slide (or the slide will be hidden automatically); tap on the screen to show the slide. Double tap on the screen to stop playing and return to the browsing interface. 8.
Tap Double tap in the above interface to enter the following interface: to open the list of text files: Close Tap to close the current file Return Double tap to return to the previous folder 42
Scroll bar Drag upwards/ downwards the slide to show all the files in the folder Double tap on the file to read it in the following interface File name Show the name and format of the current file Return Tap to return to the Media interface Folder Tap to open the interface of TXT file folder to select a file Previous page Go to the previous page Next page Go to the next page Setting Tap to choose a background, font, word size and bold for the reader New Drag the cursor to select partial cont
Bookmark list Tap to open the bookmark list to select or delete bookmarks Current page/ Current page/ total pages of the file total pages Scroll bar Drag upwards/ downwards the slide to show the full content of the file In the above interface, double tap on the screen to enter full screen reading interface as follows: In full screen reading mode, tap the upper part of the screen to view the previous page and tap the lower part of the screen to view the next page.
Close Tap to exit the setting interface Save Tap to save the settings Theme Tap to select a background for the reader Font Tap to select a font for the reader Tap to select a word size Word size Bold Tick in the box to enable bold type; tick again to cancel In the reader interface, drag the slide to locate to a page to create a bookmark, select partial content on the screen, and then tap will popup: 45 and the following dialog
Tap “OK” to create a bookmark for the selected content. After bookmarks created, tap to show the interface of bookmark list as shown below. In the above interface, drag the scroll bar to select a bookmark in the left list, tap to jump to the page. Tap to delete a selected bookmark.
Chapter Ⅸ Tools Tap the Toolbox icon on the system main interface to enter the following interface: 9.1 FM Transmitter FM transmitter realizes transmission of audio signals of the GPS navigator to radio sets. Adjust the emission frequency of the GPS navigator the same as that of the receiving frequency of the radio, and sounds of the navigator will be output by the amplifier system of the radio sets. Tap the icon in the Toolbox interface to enter FM Transmitter interface shown as below.
Close Exit the FM Setting Save Save current setting Use FM Tick in the box to enable FM function Frequency Drag the slide block rightward (or tap ) to increase the frequency and leftward (or tap frequency. The ) to reduce the frequency range is 76.00Mhz—108.00Mhz 9.2 Favorites The function enables you to collect wanted applications that can be run under the WinCE system with .exe ending in its name.
To delete applications from the Favorite, select the application in the above interface and tap . [Note]: While deleting the application, the shortcuts instead of application itself will be deleted. 9.3 Calculator Tap the Calculator icon in the Toolbox interface to enter the Calculator interface as follows. 9.
interface as follows. 9.5 Games Tap the Games icon in the Toolbox interface to enter the Games interface as follows: This device provide two games for entertainment: Othello and BoxMan. Tap the game icon in above interface to start playing the game. Tap the icon to the Toolbox interface.
Chapter Ⅹ Settings This chapter introduces the setting of the GPS navigator. Tap the Settings icon on the system main interface to enter the Settings interface as follows: In the settings interface, you can set/view volume, backlight, language, date & time, calibration, FM transmitter, system info, USB, factory settings and navigation path and to enter the Windows CE system. 10.1 Volume Tap the Volume icon in the Settings interface to enter the volume setting interface as shown below.
Return Exit the volume setting. Save Save settings Volume Ten volume grades (from mute to maximum) available. Tap to decrease the volume by grade. Sounds Tap it to enable the function. Tap it for taps again to disable the function. Startup Tap music or disable it. or to select startup music 10.2 Backlight Backlight setting supports latency of auto backlight. Tap the Backlight icon in the Settings interface to enter the backlight setting interface as shown below.
Return Exit the backlight setting. Save Save settings Backlight Drag leftward to turn down or rightward to turn up the backlight. Auto off Auto backlight shutoff after service stop for a period. The options are always On, 10s, 30s, 1m, 2m and 3m. Tap or to view the options in cycle or select one. Auto When this column is ticked, the backlight backlight adjusted will be automatically according to the environment brightness. 10.
Tap or to select a system language and tap to save the selection. 10.4 Date & Time Tap the DateTime icon in the Settings interface to enter the date & time setting interface as shown below. Date & Time setting includes system date setting, time setting and time zone setting. ● Setting the system date and time In the above interface, tap or to set the year, month, day, hour and minute. [Note]: Time format options are 12-hour and 24-hour. You may select one of them.
In the above interface, tap or to select a time zone. 10.5 Calibration Tap the Calibration icon in the Settings interface to prompt the calibration dialog shown as below. Tap OK to execute calibration or Cancel to cancel calibration and go back to the setting interface. Tap OK and the following calibration interface is prompted.
10.6 GPS Info Tap the GPS Info icon in the Settings interface to view the GPS information as shown below. To reset the GPS satellite receiver, tap to prompt a dialog as follows. Tap OK to reset the GPS satellite or tap Cancel to exit. 10.7 System Information Tap the System information icon in the Settings interface to view the system information as shown below.
In the above interface, it displays system information including ROM version, software version, OEM version, platform ID and device ID. 10.8 USB Setting Connect the GPS navigator to PC via the MINI USB port to transmit data, or back up data from the navigator data to PC. The GPS navigator provides MASS STORAGE and MS STORAGE modes. Select one in the USB setting. ● MASS STORAGE 1. Have the GPS navigator in operation status and the SD card plugged in the slot; 2.
4. Connect the MINI USB terminal of the USB cord to the MINI USB port of the GPS navigator and the standard USB terminal to the USB Host port of PC. Then, the computer will recognize the navigator 5. After communication, unplug the MINI USB cable. ● MS ACTIVESYNC 1. Tap in the setting interface to enter USB Option as shown below. Select MASS ACTIVESYNC and tap to save the setting. 2. Install the application Mobile Device in a drive of PC. Then the following icon will appear in the drive selection. 3.
5. After transmission, unplug the USB cable. [Attention] For data safety, please back up your system data in external storage. Our company has no responsibility for lost or damage of system data. [Note] If MASS STORAGE is selected while the GPS navigator is connected with PC, other operations will be suspended. [Attention] The following operations will stop suspend the communication of the system and PC and unsaved data will be lost. 1. Unplugging the MINI USB cable; 2. Powering off the GPS navigator; 3.
interface. 10.10 Explorer Tap the Explorer icon in the Setting interface to popup the following dialog indicating whether to enter the WINCE system: Tap「OK」to enter the WINCE system as shown below while tap「Cancel」to return to the Setting interface. In the above interface, double tap the icon “GPS” and select “Yes” in the dialog box popped up to return to the GPS main interface. Note: push the Reset button backside the navigator can also exit Explorer and restart up the system.
Please carry out the following operations in case of abnormal operation of the GPS navigator. For further problems, please contact our customer service center. Fault Reason Solution Low battery Supply System down Sudden power cut and Backlight off response Touch screen not calibrated Low volume No sounds earphone Poor PC connection signals reception failure Loss of map data power and Turn up the backlight. Tap the screen with the touch pen. Recalibrate the screen. Turn up the volume.
FCC RF Exposure Information and Statement The SAR limit of USA (FCC) is 1.6 W/kg averaged over one gram of tissue. Device types: PF10-5002(FCC ID: YNG-PF100001) has also been tested against this SAR limit. The highest SAR value reported under this standard during product certification for use on the body is 0.34W/kg and use the GPRS mode on the body is 0.27W/kg. This device complies with part 15 of the FCC rules.