J01 Smart Vacuum Cleaner User Manual Thank you for purchasing our products. Please Read all the instructions before attempting to operate this product and save this instruction manual for future reference.
Important Safety Instructions WARINING Before using the robot for the first time, read the following instructions and pay attention to all warnings. Even if you are familiar with handing electronic devices. Store these operating instructions in a safe place for future reference. If yousell the robot or pass it on, always include these instructions. They are an integral part of the product. General Use 1.Before using check that the voltage power corresponds to the one shown on the appliance nameplate. 2.
play with the product. Cleaning and user maintenance shall not be made by children without supervision (EU). 14.Keep the main brush cleaning tools out of reach of children. 15.DO NOT place any object (including children and pets) on the product, whether it is in operation or not. 16.Keep hair, loose clothing, fingers, and all parts of the body away from openings and moving parts. 17.DO NOT use the product on burning objects (such as cigarette butts). 18.
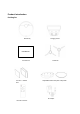
Product Introduction Packing list Main Body Charging station User Manual User Manual Pre-filter + HEPA filter Side Brush Adjustable water tank pad + Mop cloth AC adaptor Remote controller
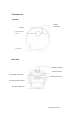
Components Top side Bumper On/Off Auto/Pause Laser distance sensor Top Cover Back side Charging electrode Universal wheel Left & Right side brush Floating main brush Left & Right Drive wheel Mop pad install hole Anti-Drop sensors
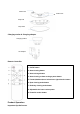
Main brush release sliding button Water flow outlet Adjustable water tank Inside WiFi indicator light WiFi connecting button Reset button Dust bin box -- for dry use Dust bin box Handle Dust bin latch Adjustable water tank Pre-filter HEPA filter
Water inlet Water tank Water tank latch Mop Pad Mop Cloth Charging station & Charging adaptor Charging station AC Adaptor Remote Controller 1. On/Off button 2. Auto-cleaning button 3. Auto-recharge button 4. Auto-cleaning or Auto-recharge pause button 5. Forward,backward,turn left and turn right direction button 6. Spot cleaning mode button 7. Radomly cleaning mode button 8. Adjustable the lower suction power 9.
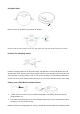
1.Before use, please in order to arrange all furnitures such as tables,chairs, floor fans and remove small and lower objects such as weight scales to organize the largest space for cleaning. 2 1 2. Please open all doors in the room to help LiDAR robot cleaner searching rooms and creating cleaning path map. 3.Anti-drop sensors will prevent LiDAR Robot cleaner from tumbling down stairs and steep drops in most cases.
Get Quick Start Please remove the protection strip and film on bumper. Please install the side brushes at first use, align side brush and fixed shaft and then press them. Position The Charging station Install the charging station on the flat ground firmly and against the vertical wall (fixed on the wall without hollow area). Please remove objects within 0.5m of the left and right side and at least 1.0m of the front of the charging station.
Method 2: Press the Charging button on Apps to send the Robot to the Charging station. charging station to perform auto recharge. ⚠ Attention: ⚫ Please keep the charging station well connected with power socket, otherwise, the Robot cannot find charging station to perform auto recharge. Auto Charge and Resume Robot Vacuum Cleaner returns to the Charging station automatically to recharge when: ➢ Robot vacuum cleaner start working from charging station and has finished cleaning task.
Wi-Fi Status Light Blink Quickly red Waiting for connection and voice reporting start connecting Solid white Wifi successfully connected with your Robot Light off Wifi connection failture ⚠ Attention: ⚫ ⚫ If you have any problems during the Wi-Fi setup process, refer to the “Troubleshooting” Wi-Fi section in this user manual. If Robot gets stuck in any space, tap find my Robot in the App to find the device. This function is available in the App only.
The cleaning paths are planned along the walls, following a bow-shaped cleaning method to complete the cleaning of each zone one by one. Real-time Mapping & Floor plan Real-time mapping helps you know the cleaning path and environment easily. A floor plan will be built after cleaning. The map will be updated real-time during each cleaning to ensure normal navigation.
4.Zone Cleaning (available via the Tuya App only) In this mode, set up a cleaning zone in the Tuya app. Robot will clean this zone only and return to the Charging station after cleaning. Note: Start Zone cleaning only after Robot has created the map. It is recommended that Robot moves from the Charging station to start Zone cleaning. 5.
6.Select Room Cleaning Select specific rooms for cleaning in the app. In this mode,the Robot will only clean the selected rooms. 7.Select a Suction Power Level In the app, find setting section to select a suction power level according to your needs: ➢ Strong ➢ Normal (Default) ➢ Gentle ➢ Auto Use Mopping System 8. Select a cleaning mode to start mopping. Robot automatically sweeps and mops in the selected mode.
Please follow the steps to use the mopping system Step 1: Take out the water tank Step 2: Filling the water and Seal the water tank cover Step 3: Install the mopping module, put mop cloth on the mop pad and stick it firmly. Mop cloth Mop pad Step 4: Align the positioning column of the water tank with the positioning hole of the Robot and install on mopping pad. Step 5: Install mopping module into the tail of Robot until a click is heard.
➢ When the mopping pad is removed, the system automatically exits mopping mode without water release mode without water release. ⚠ Attention: ⚫ DO NOT use any other cleaning solution other than water. Cleaning solutions, even natural ones, can clog the water release system and break down the materials inside the device. ⚫ To add water into the water tank or install the mopping module, pause the cleaning first. DO NOT manually move the device.
Cleaning and Maintenance ➢ ➢ ➢ Before cleaning and maintaining, turn off the device and unplug the adapter. For optimal performance, follow the instructions below to clean and maintain Robot regularly. The cleaning/replacement frequency will depend on your usage habits of Robot.
2.Clean the cloth with water and air-dry it completely to avoid being mildewed or producing unpleasant smell. ⚠ Attention: ⚫ ⚫ DO NOT use hot water, or any acid and alkali detergent to clean. It is recommended to clean the mopping cloth after each use. Cleaning the dustbin box and filters 1.Open the Robot top cover and take out the dustbin box. 2.Press the release button to empty the dustbin box and tap the dustbin box to get rid of any excess dirt. 3.Cleaning the dust bin box with cleaning brush. 4.
5.Clean up the HEPA filters with a cleaning brush. You can also wash the filters for deep cleaning. 6.Air-dry the dustbin box and filter assembly completely before next use. Cleaning the floating rolling main brush and side brushes 1.Remove the main brush guard 2.Take out the rolling brush 3.
4.Remove the side brushes and cleaning it with cleaning tool Cleaning the Charging electrode,Charging pin, driving wheels and universal wheel 1.Dry wipe to clean the charging electrode and charging pins 2.Cleaning the driving wheels and universal wheel with cleaning tool ⚠ Attention: ⚫ DO NOT cleaning the wheels with water. Relacement the battery Battery relacement of Robot ➢ Release the screw with the screw-driver, open its base plate and then take out the battery.
⚠ Attention: ⚫ ⚫ Please DO NOT forget to take out the battery before discarding the Robot. Please turn off the power switch before taking out the battery from the Robot . ⚫ Please DO NOT place the battery in High-temperature environment above 45℃or in the ⚫ ⚫ Please DO NOT exert external force to the battery or drop them from heigh. water. The battery should be recycled with safe disposal.
Trouble shooting Problems No 1 Caused reasons Solutions Can not connecting The router username and Configure the router to ensure that the entered router Wi-Fi (Tuya App) password are incorrect "user name" and "password" are correct. The device is not within the Make sure the device is within the network signal network signal coverage of coverage of the router. the router. The device is not in the Only the device can be configured when it is in configuration state. standby mode.
The device did not start from It is recommended to start cleaning from the charging the charging station. station The charging route is Please keep the recharging route unobstructed. blocked. For example, the room door with a charging station is closed. 7 If the cleaning is not This is a large room, and the It is recommended to turn on the breakpoint to completed, and the device needs to return continue.
repeated cleaning, and phenomenon, the unit will automatically repair the missed scanning of leak, please do not interfere (such as moving the unit small areas. (If there is or blocking the device’s running route). a large area that has It may be that the drive slips It is recommended to close the door of this area and not been cleaned on the ground when the unit clean the area separately.
⚫ WPA and WPA2 encrypted with TKIP, PSK, AES/CCMP. ⚫ WEP EAP (Enterprise Authentication Protocol) is not supported. ⚫ Use Wi-Fi Communications 1-11 in North America and Wi-Fi Communications 1-13 outside North America (consult your local regulatory agency).
The numbers in this icon indicate that the environmental protection use period of the product under normal use is 10 years. Implementation standard: GB4706.1-2005 GB4706.7-2014 GB4343.1-2018 GB17625.
This device complies with part 15 of the FCC Rules. Operation is subject to the following two conditions: (1) This device may not cause harmful interference, and (2) this device must accept any interference received, including interference that may cause undesired operation. Any Changes or modifications not expressly approved by the party responsible for compliance could void the user's authority to operate the equipment.