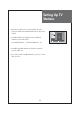
Setting Up TV Stations • After "Auto Search" mode, received channels are in the position of "Add" and scrambled channels are in the position of "Del". Edit Channel Add Del 1 5 13 11-1 (s) 15 40 • Scrambled channels are displayed in (S), and deleted channels are presented normal. 45 Channel Select FAV.CH Favorite Channel Add/Del ex) Scrambled Channel : 11-1(S) Deleted Channel : 11-1 • Scrambled scrambled channels are fixed, they cannot be moved to "Add" side.
Setting Up TV Stations FAV CH - You can set channel you watch frequently as favorites. 1. Programing Favorite Channel. • Press MENU button. Select Channel by pressing " " button. • Select Edit Channel selection bar by pressing " " button. • Press "FAV CH" button, on the Edit Channel mode. then you can see " ". Edit Channel Add Del 1 5 13 15 40 45 Channel Select Del Add FAV.CH Favorite Channel Add/Del MENU Return 2. Deleting Favorite Channel. • Press MENU button.
Selection of TV/VIDEO Input Signal When watching video, Camcorder, DVD, Cable TV with External Input - When you presses INPUT Button, You can select as follows by pressing ” ” and “OK” buttons. AIR/CABLE => AV1 => AV2 => Component1 => Component2 => HDMI1 => HDMI2 => PC Analog Air INPUT 26 AV1 INPUT AV2 Note: • If S-video and RCA jack are connected at the same time, the TV set will only detect the S-Video mode. • If sound signal is mono mode, connect it to the L-terminal of the sound input terminal.
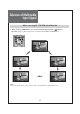
Selection of Multimedia Input Signal When connecting PC, STB, DVD with Multimedia 1. When you presses INPUT Button, You can select as follows by pressing the ” ” buttons. AIR/CABLE => AV1 => AV2 => Component1 => Component2 => HDMI1 => HDMI2 => PC INPUT PC VGA INPUT INPUT HDMI 2 Component 1 INPUT INPUT HDMI 1 Component 2 Note: • If sound signal is mono mode, connect it to the L-terminal of the sound input terminal.
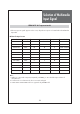
Selection of Multimedia Input Signal HDMI & PC & Component mode 1. If the message ‘No signal’ appears on the screen, adjust the PC output to a format listed in the Multimedia Input table.
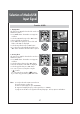
Selection of Media(USB) Input Signal Function of USB 1. Playing Music This menu shows MP3 files from the files saved on a USB memory device. • Press MEDIA button. The Media screen appears as follows. • Select the "MUSIC" then press the "OK" button. • Then Sub-folders are displayed. • Press "OK"button again, You can see files and folders in the USB are displayed. • Select the mp3 files then press "OK" button. • If you don’t choose the MP3 file but Folder, press “OK” button.
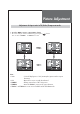
Picture Adjustment Adjustment of Aspect ratio in TV/Video/Component mode 1. Press the "MENU -> Picture -> Aspect Ratio" button. • The screen changes as below whenever by pressing the " 16:9 => 4:3 =>ZOOM 1 => ZOOM 2 => 16:9 " button. 42 42 81 81 58 58 R R G G 4 4 Noise Reduction Noise Reduction Off Color temp. Color temp.
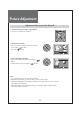
Picture Adjustment Adjustment of the screen in the PC mode 1. Select Picture by pressing the "Menu" button. • The menu screen appears as follows. 2. Select PC Screen Mode • Move to PC Screen Mode in the Picture menu by pressing the ” ” buttons. • Press the ” ” button. 42 81 58 R G 4 Noise Reduction Off Color temp. Dimming 10 Aspect Ratio 16 : 9 PC Screen Mode Move 3. Select and adjust each items. • Move to item what you want by pressing the ” ” button.
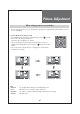
Picture Adjustment When setting up various screen modes - The user may select various screens designed for a good picture without adjusting the brightness, contrast or color individually. 1. Picture Mode selects what you want. • Press MENU button and Select Picture mode by pressing ” ” buttons.
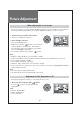
Picture Adjustment When adjusting the screen to taste - You can enjoy various screens by adjusting Brightness, Contrast, Color, Tint, Sharpness, Noise Reduction, Color Temp., Dimming, Aspect Ratio, PC Screen Mode(Only in PC Mode), etc to the user’s taste. 1. Select Picture by pressing the “Menu” button. • The menu screen appears as follows. User 42 81 58 R G 50 2. Select and adjust each items. • Move to the PICTURE menu.
Sound Adjustment When selecting various sound Effects 1. Sound mode selects what you want. • Move to Effect in the Sound menu. • Select desirable Sound mode by pressing the ” ” buttons. (under the effect mode is off) • The Screen status changes as followed : Dynamic Bass => ST Voice => off => Dynamic Bass Off Normal Equalizer Auto Volume Control Digital Volume Off Speaker On Move Change 16 MENU Return Dynamic Bass ST Voice Normal Normal Equalizer Equalizer Move Note.
Sound Adjustment When adjusting sound to taste 3. Sound mode selects what you want. • Move to Mode in the Sound menu. ” buttons.
Sound Adjustment When adjusting sound to taste 4. Adjust the audio Equalizer • Move to Mode in the Sound menu. • Select User mode by pressing the ” ” buttons. • Select and use the relevant frequency by pressing the ” ” buttons. • You can adjust the degree of the frequency by pressing the ” ” buttons. Note: • Equalizer adjustment is available in User mode. • Equalizer: High quality sound range adjustment method used for audio product. 10 kHZ: High sound range 1/3.
Sound Adjustment Choosing a Multi-Channel Sound (MTS) in analog and digital 1. Mono Sound Selection (Mono/Stereo/AutoSAP) – Analog TV Mode • If the Stereo reception is weak, you can switch to MONO by pressing the “MTS” button. Then the OSD character will be change to “Mono”. In Mono reception the depth of sound is improved. • To switch back to stereo, press the “MTS” button again. MTS: Mono MTS: Stereo MTS: Auto SAP Note: The availability of these additional audio tracks depends on the program. 2.
Features Closed Caption Viewing Closed Caption (On-Screen Text Messages) - Analog 1. Caption mode selects what you want. • Move to Caption in the Features menu. • Select Caption by pressing the ” ” buttons. Parental Control Language English Caption Menu Opacity 11 MGDI Demonstration Initialize Move • Select desirable Analog CC by pressing the ” ” buttons.
Features Closed Caption Viewing Closed Caption (On-Screen Text Messages) - Digital 1. Caption mode selects what you want. • Move to Caption in the Features menu. • Select Caption by pressing the ” ” buttons. Parental Control Language English Caption Menu Opacity 11 MGDI Demonstration Initialize Move • Select desirable Closed Caption by pressing the ” buttons.
Features Parental Control Adjustment of Parental Control - The Parental control feature automatically looks out programs that are deemed inappropriate for children. Parental Control 1. Change password • Move to Parental control in the Features menu. Language English Caption Menu Opacity 11 MGDI Demonstration Initialize Move Change MENU Return Parental Control • The message “Enter password” will appear. Enter your 4 digit password Note: • The default password of a new TV set is “0-0-0-0”.
Features Parental Control Adjustment of Parental Control 2. Rating Status • Move to Rating Status in the Parental Control • Select either On or Off by pressing the ” ” buttons. Rating Status Off MPAA TV-Rating Can.English Rating Can.French Rating Change Password Move 3. MPAA • Move to MPAA in the Parental Control and press the ” ” buttons. Change MENU Return Rating Status On MPAA TV-Rating Can.English Rating Can.French Rating • The MPAA screen will appear.
Features Parental Control Adjustment of Parental Control 4. TV Rating • Move to Block and select Block to On. • Move to TV Rating in the Parental Control and press the ” ” buttons. • The TV Rating screen will appear. Press the ” ” buttons to select one of the six aged based categories: Y: Young children 14: Viewers 14 and over Y7: Children 7 and over MA: Mature audience G: General audience PG: Parental guidance • Press the “OK” button. Depending on your existing setup, the “ “ symbol will be selected.
Features Parental Control Adjustment of Parental Control 5. Can. English Rating : • Move to Can. English Rating in the Parental Control and press the “ “ buttons. • The Can. English Rating screen will appear. Press the “VOL” buttons to select the Can. English Rating categories: Press the EXIT button to exit. C: Programming intended for children under age 8. C8+: Programming generally considered acceptable for children 8 years and over to watch on their own.
Features Parental Control 6. Can. French Rating : • Can. French Rating in the Parental Control and press the “ buttons. “ • The Can. French Rating screen will appear. “ buttons to select the Can. French Rating Press the “ categories: Press the EXIT button to exit. G: General 8 ans+ : Programming generally considered acceptable for children 8 years and over to watch on their own. 13 ans+: Programming may not be suitable for children under the age of 13.
Features - ETC When viewing how MGDi improves the picture. 1. Setup of MGDi Demonstration • Move to MGDi Demonstration in the Features menu. • Press the ” ” buttons. In this demo version of MGDi you can only see the functional difference of ON/OFF, not the difference of quality of picture.
Time Setting Adjustment of Time 1. Clock Menu • Move to Clock mode in the Time menu. • It can change ‘MANUAL’ , ‘AUTO’ by pressing “ buttons. “ Clock Mode Current Time Set Time Zone DST Auto AM 12:00 Eastern Auto Sleep Timer Off On Timer Off Timer Move 2. Current Time Set • Move to Current Time Set in the Time menu. “ • To go to the Current Time Set, press the “ buttons. • Place the cursor to AM / PM / Hour / Min. / “ buttons. Month / Day /Year. with “ • Set the AM / PM / Hour / Min.
Time Setting Adjustment of On Timer 4. Setting the On Timer / On Time / On CH / On Volume • Move to Wake Timer in the Time menu. • Select the Wake Timer to "On" by pressing the ” button. Clock Mode Auto Current Time Set Time Zone AM 12:00 Eastern DST Auto Sleep Timer ” Off Timer Move • Move to Wake Time with the ” ” buttons. • To go to Wake Time, press the ” ” buttons. • Place the cursor to AM/PM / Hour / Min. with ” ” buttons. • Set the AM/PM / Hour / Min.
Time Setting Adjustment of Off Time 5. Setting DST • Move to DST in the Time menu. and select On, Off with ” ” buttons. Clock Mode Current Time Set Time Zone DST Auto AM 12:00 Eastern Auto Sleep Timer Off On Timer Off Timer Note: Timezone and DST is available in Auto Clock mode Move Change MENU Return 6. Setting the Sleep mode.
Channel Banner Channel Banner - The channel banner displays information about a channel number, name, broadcasting time, audio service and more. You can see this banner by pressing “OK” button on the Remote Control. DIGITAL Strong 4 ABC News 6 4:00 PM 12:00 PM 9-1 ABC D-1 1080i 5 Next Program : ABC Monie : Omega Man 7 16:9 DOLBY DIGITAL ENGLISH 2007 Web. Dec 25 4:45 PM 8 1. General Information Channel Mode: Display the current channel mode (Air/Cable/DTV).
Channel Banner Electronic Program Guide (EPG) (Digital TV mode only) - The DTV Electronic Program Guide (EPG) displays program information about each channel, up to seven days ahead. - You can edit your own profiles, and record programs. - By pressing the “GUIDE” button to access EPG directly, you can see all channels broadcasting now. Note: • The EPG channel is only available when watching DTV channels. 1. Select a desired channel • Select a channel with the ” ” buttons.
Troubleshooting Symptoms and Solutions Please check the following items before asking for repair service. Symptom Neither picture nor sound Check items - Check the contact of sockets is all right. - Check the TV main power is on. Picture is OK but no sound - Check the Volume control is set to minimum or mute. Sound is OK, but no color. - Check the color control and adjust it properly. - Check the program is in color and not in black & white. The picture has image.
Troubleshooting In Digital TV mode Some Problems will only occur when viewing DTV channels. Due to the different techniques involved in digital reception, DTV signal quality can be poor even if you appear to have a strong signal when viewing analog programs. The DTV system requires a good quality signal to provide the best picture. When viewing analog pictures, interference such as signal reflection from nearby buildings or mountains causes ‘ghosting’, but still provides a viewable picture.
Standard of Product Screen Size LCD Panel Dimension(W x H x D) 32” 37” 42” 42”(Full HD) Aspect Ratio 16:9 16:9 Resolution 1366 x 768 (WXGA) 1920 x1080 (FHD) Pixel Pitch 170.25 x 510.75 x RGB 0.200 x 0.600 mm x RGB 0.227 x 0.681 mm x RGB 0.4845 x 0.4845 mm x RGB Set Dimension 806 x 626.5 x 230mm 940 x 720 x 328.
“GOLDEN WARRANTY” Crosley Corporation warrants this product to be free from defects in material and workmanship and agrees to repair or replace this product to remedy such defects. This warranty covers TWO YEAR LABOR and TWO YEAR PARTS from the date of the original purchase. This warranty applies only to product purchased from an authorized Crosley dealer and used within the boundaries of the U.S.A. and Canada.