PLASMA TELEVISION USER MANUAL DPA-5034LDS Proper use guarantees product life. Before using the product, be advised that you read this user manual well and try to operate it.
CAUTION RISK OF ELECTRIC SHOCK DO NOT OPEN CAUTION: TO REDUCE THE RISK OF ELECTRIC SHOCK, DO NOT REMOVE COVER (OR BACK). NO USER-SERVICEABLE PARTS INSIDE. REFER SERVICING TO QUALIFIED SERVICE PERSONNEL. This symbol is lntended to alert the user to the presence of uninsulated “dangerous voltage” within the product’s enclosure that may be of sufficient magnitude to constitute a risk of electric shock to persons.
Important Safety Instructions 1. 2. 3. 4. 5. 6. 7. Read these instructions. Keep these instructions. Heed all warnings. Follow all instructions. Do not use this apparatus near water. Clean only with a damp cloth. Do not block any of the ventilation openings. Install in accordance with the manufacturer's instructions. 8. Do not install near any heat sources such as radiators, heat registers, stoves, or other apparatus(including amplifiers) that produce heat. 9.
Features • 50” Wide XGA Plasma Panel Television • Built in Analog and Digital Tuner PDP has the analog and digital tuner inside for watching terrestrial broadcasting without the need to purchase a separate broadcasting receiver. • DVD Direct Connection / Outstanding Picture Quality via a Digital Broadcast Receiver A DVD can be directly connected to the unit so that you can view clear digital images.
F C C R F I N T E R F E R E N C E S TAT E M E N T NOTE : This equipment has been tested and found to comply with the limits for a Class B digital device, pursuant to Part 15 of the FCC Rules. These limits are designed to provide reasonable protection against harmful interference in a residential installation. This equipment generates, uses and can radiate radio frequency energy and, if not installed and used in accordance with the instructions, may cause interference to radio communications.
Safety Precautions Power Always obey all safety messages. • All the safety and operating instructions should be read before the product is operated. If anything strange happens, unplug this product from the wall outlet. • Do not disassemble or replace any parts of the TV. Refer to a qualified service personnel for repair. During a lightning storm, or when it is left unattended and unused for a long period of time, unplug it from the wall outlet.
During Use The apparatus shall not be exposed to dripping or splashing and that no objects filled with liquids, such as vases, shall be placed on the apparatus. Do not open the cover (or back) because high voltage is present within the TV enclosure. Never push any kind of objects into this product through openings at the back of TV. It may cause electric shock. It may cause fire or electric shock. Do not allow children to play or hang on the TV. Do not place a candle or lighted cigarette on the TV.
Safety Precautions Power Always obey all safety messages. • All the safety and operating instructions should be read before the product is operated. CAUTION You can be injured, or this product or any other of your property can be damaged if you don’t follow instructions. When moving your TV, remove the power plug, antenna, and cables, and be sure to move it by using two people.. Do not touch the power plug with wet hands when plugging or unplugging it into the wall socket.
During Use Do not wipe the TV using a cloth damped with chemicals (benzene, thinner, etc.). Do not place heavy objects or heat sources on the power cord. TV appearance may be marred. (Unplug the power plug and wipe with soft cloth.) It may damage the power cord, causing fire or electric shock. Do not place any object or cover on the TV. When watching the TV, the distance between the TV screen and your eye should be as 5~7 times as the diagonal distance of the TV.
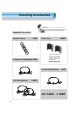
Checking Accessories Note Check to be sure that the following items are packed with your Plasma panel. Supplied Accessories Remote Control 1 UNIT Ferrite Core 2UNITS R WE PO TV CA / EO VIDDVD T SA TV O DE /VI TV AY PL DIS ILL S .EFFE CT CH MULTIME DIA V O L SC REE N SIZE ST NU ME V O L PR EV C H IDE .GU OG PR /SLOW F.F CH PL AY TE MU /SLOW F.
Note Optional Accessories The following items are optional accessories. Refer purchasing optional accessories from Daewoo Electronics Local retailer or the retailer from where you purchased the unit.
CONTENTS PREPARATION 6 • 10 • 14 • 15 • 16 • Safety Precautions Checking Accessories Panel Controls Remote control Remote Control Setup CONNECTION 17 • 20 • 22 • 28 • 30 • 32 • 34 • 36 • 38 • 40 • 42 • Antenna Connection To Watch TV Channel Setup Watching Digital Broadcasts Watching Cable Broadcasts Watching Satellite Broadcasts Watching a DVD Image Watching a VCR Image Watching a Camcorder/Game Console Image Connecting PC(15Pin D-Sub) Connecting PC(DVI) APPLICATION 45 • 46 • 48 • 50 • 52 • 54 • 55 • 5
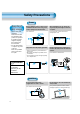
Antenna Connection Outdoor Antenna Connection when watching both analog and digital broadcasts through outdoor antenna connection 1 Connect a antenna coaxial cable to the input terminal 2 Select Input Video Audio Channel CH E RE SC V O L .E FF SI ZE MENU V No signal Feature MU LT I Time MENU Exit Move N SI ZE N CH V O L E PR E PR V S V O L MENU T EC IA ED M S V O L CH MU LT I IA ED M .E FF CH T EC Start Air Air Active Start Ant. setup Analog ant. Digital ant. Ant. 2 Ch.
Shared Antenna Connection when watching both analog and digital broadcasts through antenna connection in your apartment. Please contact your apartment office for terrestrial digital broadcast. the TV's antenna 1 to the antenna socket as 1 Connect shown figure 2 Select Input Video Audio Channel Start Air Air Active Start Ant. setup Analog ant. Digital ant. Ant. 2 Ch. setup Fine tune Sig. strength No signal Feature CH E RE SC .
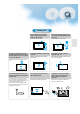
Watching Cable Broadcasts with cable broadcast receiver When receiving digital broadcasts from a cable broadcast. Please contact your local cable TV company for terrestrial digital broadcast. 1 Connect signal divider and coaxial cables as shown figure 2 Select Input Video Audio Channel E RE SC V O L SI ZE MENU V Time CH CH MENU Exit E RE SC 3 Execute automatic channel setting. Refer to 16 No signal Feature MU LT I N SI ZE N CH V O L E PR E PR CH T EC S V O L MENU V .
Watching Cable Broadcasts without cable broadcast receiver When receiving digital broadcasts from a cable broadcast. Please contact your local cable TV company for terrestrial digital broadcast. 1 Connect the TV's antenna 1 to the antenna socket as shown figure. 2 Select Input Video Audio Channel Start Air Air Active Start Ant. setup Analog ant. Digital ant. Ant. 2 Ch. setup Fine tune Sig. strength No signal Feature CH E RE SC .
Watching Digital Broadcasts Through Digital Antenna Use digital(only) antenna when your local cable broadcast company does not transmit digital broadcasts or unable to receive digital broadcasts over the existing antenna. Use UHF antenna for digital(only) antenna. Install the antenna where there aren't any obstacles. It may be difficult to receive for areas with many signal obstacles. If receive many identical digital channel, it is possible to select identical channel several times.
Connecting Antenna Output Terminal(Recoding etc.) Use this feature when record TV broadcast to external recording devices. signal divider and coaxial cables as shown 1 Connect figure. 2 Turn on the TV and the device. 3 From the menu select channel. then choose "Antenna 2" from analog antenna/digital antenna "Air" or "Cable". 4 REcord programs received through TV's Antenna 1 input (Digital Broadcast are NOT recordable).
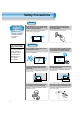
Watching Cable Broadcasts Watching Cable Broadcasts • To watch cable broadcasts, subscribe to your local Cable TV Broadcasting, and then connect a cable Broadcasting Receiver TV to the PDP as shown right. 1 Connect a Cable Broadcasting Receiver to the PDP. • Prepare the A/V cable. • Connect the receiver(Output) to PDP(Video Input) as shown below. • When connecting to an external AV source, be sure to match the colors.
3 Input Select TV/VIDEO • Select [Video 1 or Video 2] by pressing the TV/VIDEO button of the Remote Control or the "INPUT SELECT" Key in KeyPad of the pdp set. • Each time you press the “TV/VIDEO” button, different input modes appear. The sequence is as follows: Video1 Video2 TV 4 Select a Desired Channel and Function • Select a desired channel and function by using the Remote Control of the Cable Broadcasting Receiver.
Watching Digital Broadcasts Watching Digital Broadcasts • To watch digital broadcasts: - Purchase a separate digital Broadcasting Receiver(SET-TOP BOX) - Connect the PDP to a Digital Broadcasting Receiver as shown right. 1 Connect a Digital Broadcasting Receiver to the PDP • Prepare supplied A/V cables. • Connect the cables from the Digital TV Receiver output terminal to the PDP(Component 1, 2) input terminal. • When connecting the cables, be sure to match the cable colors.
3 Input Select MU LT IA ED IM • Select [Component 1 or Component 2] by pressing the “Multimedia” button of the Remote Control or the "INPUT SELECT" Key in KeyPad of the pdp set. • Each time you press the “Multimedia” button, different input modes appear. The sequence is as follows: 4 Component1 Component2 DVI PC Select a Desired Channel and Function • Select a desired channel and function by using the Remote Control of Digital Broadcasting Receiver.
Watching Cable Broadcasts Watching Cable Broadcasts • To watch cable broadcasts, subscribe to your local Cable TV Broadcasting, and then connect a cable Broadcasting Receiver TV to the PDP as shown right. 1 Connect a Cable Broadcasting Receiver to the PDP. • Prepare the A/V cable. • Connect the receiver(Output) to PDP(Video Input) as shown below. • When connecting to an external AV source, be sure to match the colors.
3 Input Select TV/VIDEO • Select [Video 1 or Video 2] by pressing the TV/VIDEO button of the Remote Control or the "INPUT SELECT" Key in KeyPad of the pdp set. • Each time you press the “TV/VIDEO” button, different input modes appear. The sequence is as follows: Video1 Video2 TV 4 Select a Desired Channel and Function • Select a desired channel and function by using the Remote Control of the Cable Broadcasting Receiver.
Watching Satellite Broadcasts Watching Satellite Broadcasts • To watch satellite broadcasting, subscribe to Digital Satellite Broadcasting, then connect satellite Broadcasting Receiver to the PDP as shown right. 1 Connect a Satellite Broadcasting Receiver to the PDP. • Prepare the A/V cable. • Connect the receiver(Output) to PDP(Video Input) as shown below. • When connecting to an external AV source, be sure to match the colors.
3 Input Select TV/VIDEO • Select [Video 1 or Video 2] by pressing the TV/VIDEO button of the Remote Control or the "INPUT SELECT" Key in KeyPad of the pdp set. • Each time you press “TV/VIDEO” button, a different input mode appears. The sequence is as follows: Video1 Video2 TV 4 Select a Desired Channel and Function • Select a desired channel and function by using the Remote Control of the Satellite Broadcasting Receiver.
Watching a DVD Image Watching a DVD Image • Component Input is set to 480i and 480p mode. • Connect the cable from the DVD Video Output (Y, Pb/Cb, Pr/Cr) to the Component Input at the back of PDP, and connect the cable from DVD Audio output (Left, Right) to the Audio Input at the back of PDP. 1 Connect a DVD Player to the PDP. • Prepare the AV cable. • Connect the DVD(Output) to the PDP(Component or Video Input) as shown below. • When connecting to an external AV source, be sure to match the colors.
3 Input Select MU LT IA ED IM TV/VIDEO • Select [Component 1 or Component 2, Video1, Video2] by pressing the “MULTIMEDIA” or “TV/VIDEO” button of the Remote Control or the "INPUT SELECT" Key in KeyPad of the PDP set. • Each time you press the “MULTIMEDIA” or “TV/VIDEO” button, a different input mode appears.
Watching a VCR Image Watching a VCR Image 1 Connect a VCR to the PDP. • Prepare the AV cable. • Connect the Video(Output) to PDP(Video Input) as shown below. • Video can use either the video terminal or the S-video terminal. POWER VIDEO/ DVD TV SAT CATV DISPLAY STILL TV/VIDEO MU LT I S V O L Video/Audio V O L N E PR SI ZE MENU V S-Video IA ED M .E FF CH T EC E RE SC CH CH MUTE F.R/SLOW PLAY REC STOP PROG.GUIDE F.
3 Input Select TV/VIDEO • Select [Video 1 or Video 2] by pressing the “TV/VIDEO” button of Remote Control or the "INPUT SELECT" Key in KeyPad of the pdp set. • Each time you press the “TV/VIDEO” button, a different input mode appears. The sequence is as follows: Video1 Video2 TV 4 Select a Desired Title and Function • Select a desired title and function by using the Remote Control of the VCR. NOTES: 1) When connecting a Video, the S-Video terminal provides a better image than the Video terminal.
Watching a Camcorder/Game Console Image Watching a Camcorder/Game Console Image • Enjoy images recorded by camcorder or the game console after connecting to the PDP. 1 Connect a Camcorder/Game Console to the PDP. • Prepare the AV cable. • Connect the Video(Output) to the PDP(Video Input) as shown below. • When connecting to an external AV source, be sure to match the colors.
3 Input Select TV/VIDEO • Select [Video 1 or Video 2] by pressing the “TV/VIDEO” button of the Remote Control or the "INPUT SELECT" Key in KeyPad of the pdp set. • Each time you press the “TV/VIDEO” button, a different input mode appears. The sequence is as follows: Video1 Video2 TV 4 Select Function • Select the Function by using the Remote Control of Camcorder or Game Console. NOTES: 1) When connecting a Video, the S-Video terminal provides a better image than the Video terminal.
Connecting PC(15pin D-sub) Connecting PC • This product supports resolution of VGA, SVGA, XGA, and SXGA. • Before connecting a PC to the PDP, be sure to adjust the resolution of PC. 1 Before connecting to the PDP, set the resolution of the PC. • Go to SETUP-CONTROL PANEL-DISPLAY PROPERTIES in Window Screen of the PC. • Choose the SETTINGS tab in the DISPLAY Menu. • In the SETTINGS Menu, select 640 x 480 or 800 x 600. 2 Connect the PC to the PDP.
3 Press the Power Buttons. POWER • Turn on the PDP and the PC. 4 Input Select MU LT IA ED IM 5 • Select [PC] by pressing the “MULTIMEDIA” button of the Remote Control or PDP unit. • Each time you press the “MULTIMEDIA” button, a different input mode appears. The sequence is as follows: Component1 Component2 PC DVI Enjoy Dynamic Ultra Screen TV by Using PC’s Keyboard or Mouse. NOTES: 1) The resolution of the PC TV is best at 1024 x 768 (XGA).
Connecting PC(DVI) Connecting PC • This product supports resolution of VGA, SVGA, XGA, SXGA. • Before connecting a PC to the PDP, be sure to adjust the resolution of PC. • This product is supported by Plug and Play only at DVI. 1 Before connecting to the PDP, set the resolution of the PC. • Go to SETUP-CONTROL PANEL-DISPLAY PROPERTIES in Window Screen of the PC. • Choose the SETTINGS tab in the DISPLAY Menu. • In the SETTINGS Menu, select 640 x 480 or 800 x 600. 2 Connect the PC to the PDP.
3 Press the Power Buttons. POWER • Turn on the PDP and the PC. 4 Input Select MU LT IA ED IM 5 • Select [DVI] by pressing the “MULTIMEDIA” button of the Remote Control or PDP unit. • Each time you press the “MULTIMEDIA” button, a different input mode appears. The sequence is as follows: Component1 Component2 PC DVI Enjoy Dynamic Ultra Screen TV by Using PC’s Keyboard or Mouse. NOTES: 1) The resolution of the PC monitor is best at 1024 x 768 (XGA).
PC and DVI Input Resolution Available in PDP • Depending on graphic card, problems like no signal detected or line noises can happen. If these problems happen, contact the graphic card company for help. 38 Resolution 640x480 H Freq. (KHz) 31.469 V Freq. (Hz) 59.940 Remark DOS DVI O PC O 800x600 37.879 60.317 VESA O O 1024x768 48.363 60.
Connecting Dolby digital Amp. Connecting coaxial digital audio output to dolby digital Amp. enables you yo hear enhanced sound.(Dolby digital sound is output only when it is receiving digital broadcasts) When both Optical/Coaxial are connected Coaxial has priority. Note.
Panel Controls Front Panel, Back Panel, Remote Control having same names on Plasma television and the remote control would function in exactly * Items the same way. Front ON/OFF STAND BY/OPERATE • Power control sensor • Power Standby: Red - Standby Select when adjusting volume or select/adjust “MENU.
Remote Control Note The number in ( Use two AAA batteries. Be sure to use replacement batteries of the same type as the original ones. The life of a battery depends on how much it has been used. ) indicates the page in the function of each button is explained in detail. POWER Power button VIDEO/ DVD TV SAT CATV TV/VIDEO(DVD)/SAT/CATV Channel number (0~9) Use to select channel directly 0~9 DISPLAY Display 100 STILL TV/VIDEO Still .
MUTE F.R/SLOW PLAY REC STOP PROG.GUIDE F.F/SLOW PAUSE PREV OPEN/CLOSE NEXT PICTURE SOUND MODE MODE SLEEP Picture Mode Position PIP PIP POSITION SWAP TV/ VIDEO TV/Video MTS CAPTION MTS Caption CH CH Video Function (F.R/PLAY/F.F/REC/STOP/PAUSE) DVD Function (PREV, OPEN/CLOSE, NEXT) Sleep Sound Mode Swap Sub Ch / ADD/ ERASE Add/Erase Button Function Video Function : These buttons are used for controling of video player such as play, record, and so on.
How to insert the battery 1 Push to open the cover of the remote controller. When the battery is changed, previously set code will be 2 Set the buttons in the battery cell after checking the electrode. deleted. Please set again after changing battery. 3 Then shut the cover. We recommend you to use Alkaline Battery for better controlling. The remote control setup 1 Plug in the power cord of external device (cable converter, VCR, DVD, etc)while the main power of the device is turned off.