MICROWAVE CONVECTION/GRILL OVEN KOC-9Q0T7A OWNER’S MANUAL Before operating this oven, please read these manual completely.
PRECAUTIONS TO AVOID POSSIBLE EXPOSURE TO EXCESSIVE MICROWAVE ENERGY (a) Do not attempt to operate this oven with the door open since open-door operation can result in harmful exposure to microwave energy. It is important not to defeat or tamper with the safety interlocks. (b) Do not place any object between the oven front face and the door or allow soil or cleaner residue to accumulate on sealing surfaces. (c) Do not operate the oven if it is damaged.
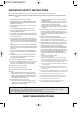
IMPORTANT SAFETY INSTRUCTIONS When using electrical appliances, basic safety precautions should be followed, including the following: WARNING - To reduce the risk of burns, electric shock, fire, injury to persons or exposure to excessive microwave energy: 11. Read all instructions before using the appliance. b) Remove wire twist-ties from paper or plastic bags before placing bag in oven.
FEDERAL COMMUNICATIONS COMMISSION RADIO FREQUENCY INTERFERENCE STATEMENT WARNING: This equipment generates and uses ISM frequency energy and if not installed and used properly, that is in strict accordance with the manufacturer's instructions, may cause interference to radio and television reception.
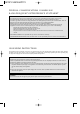
INSTALLATION 1. Examine the oven after unpacking. Check for damage such as a misaligned door, broken door or dent in the cavity. If any damage is visible, DO NOT INSTALL, and notify your dealer immediately. 2. Level, flat location. Install the microwave oven on a level, flat surface. 3. Ventilation. Do not block air vents. If they are blocked during operation, the oven may overheat and eventually cause a failure.
SPECIFICATIONS POWER SUPPLY MICROWAVE 120V AC, 60Hz SINGLE PHASE WITH GROUNDING INPUT POWER 1400 W ENERGY OUTPUT 900 W FREQUENCY 2,450MHz GRILL INPUT POWER 1250 W CONVECTION INPUT POWER 1250 W COMBINATION INPUT POWER OUTSIDE DIMENSIONS (W CAVITY DIMENSIONS (W D D 1500 W H) H) CAVITY VOLUME 20.2 x 15.8 x 12.2 in. 13.9 x 13.4 x 9.1 in. 0.99 cu.ft NET WEIGHT APPROX. 36.6 lbs. TIMER 60 min. POWER SELECTIONS 10 Levels * Specifications are subject to change without notice. 15.8 12.2 20.
FEATURE DIAGRAM 2 4 3 w 5 6 7 1 e 9 1 DOOR HOOK - When the door is closed, it will automatically lock shut. If door is opened while oven is operating, the magnetron will immediately stop operating. 0 8 q 8 TURNTABLE TRAY - Rotates during cooking and ensure even distribution of Microwaves. It can also be used as a cooking utensil. 2 DOOR VIEWING SCREEN - Allows viewing of food. The screen is designed so that light can pass through, but not the microwave.
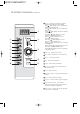
FEATURES DIAGRAM (continued) 1 3 2 4 5 6 q 1 Display : Cooking time, power level, program indicators and present time are displayed. MW ( ): When blinking, the oven is operating in MICROWAVE COOK mode. Grill ( ): When blinking, the oven is operating in GRILL mode. Combi ( ): When blinking, the oven is operating in COMBI mode. Convection ( ): When blinking, the oven is operating in CONVECTION mode. Defrost ( ): When blinking, the oven is operating in DEFROST mode.
ACCESSORIES This oven comes equipped with several accessories. They can be used in various ways to facilitate cooking. 1 Glass Turntable - Center the tray on the roller guide when using the microwave features. Place food or microwave-safe cookware directly on the glass turntable. NOTE : Glass Turntable is attached on the left cushion. 2 Roller Guide - The roller guide must be in place when using the oven. IMPORTANT : The roller guide must be placed at the center of the oven cavity.
BEFORE OPERATION SETTING THE CLOCK When your oven is plugged in, the display will show “ :0” and a tone will sound. If the AC power goes off and comes back on, the display will show “:0”. Your oven has a multiple(12hr/24hr) clock system. To set the clock, follow the procedure below. Example : To set 5:30 in a 24hr clock system. 1. Press Clock button once. (example : to set “5:30”) The display will show “ 12H ”. This is a 12 hour clock system. 2. Press Clock button once more, the display shows “24H”.
CHILD LOCK AND POWER SAVE MODE Child lock : The Child Lock function helps to prevent accidents from children operating the oven without being monitored by the parents. Power save mode : This function is used for saving energy. To set child lock 1. Press the STOP/CLEAR button. “: 0” or clock appears in the display. 2. Press and hold the STOP/CLEAR button for 3 seconds. A beep sounds and the display shows “ LOC ” for 3 seconds. Now the oven cannot be operated. 3.
OPERATION Tips : Please read this OPERATION section for the proper safety information and the operating instructions before use of the oven. Prior to setting the controls, place one cup of water in the oven, in a heat-proof glass measuring cup, for testing purposes. The oven could be damaged if operate the oven in microwave mode without anything in the cavity. Note : When the cooking time elapsed the oven beeps three times and "End" appears on the display.
GRILL COOKING The Grill enables you to heat and make food to turn brown quickly without using microwave. 1. Press the Grill button once. The GRILL indicator ( )lights. 2. Turn the dial knob to set the grilling time. For a grilling time of 11 minutes, turn the dial knob to the right to set 11:00. ( up to 60 minutes ) “11:00” shows in display. 3. Press the START/SPEEDY COOK button. The oven light comes on and the turntable starts rotating. Cooking starts and the time in the display will count down.
CONVECTION COOKING(With pre-heat) For convection cooking, it is recommended to preheat the oven to the appropriate temperature (except for the 105F that displays only) before placing food in the oven. The maximum preheating time is 30 minutes. If cooking is not started immediately after preheating, the convection indicator will continue to flash and the preheated oven temperature will be displayed. It will be maintained for 15 minutes; then switch off automatically. 1. Press the Convection button once.
CONVECTION COOKING(Traditional cooking) The convection mode enables you to cook food in the same way as in a traditional oven. Microwaves are not used. Always use oven gloves when touching the utensils in the oven, as they will be very hot. 1. Press the Convection button once. The CONVECTION indicator ( “355F” shows in display. ) lights. 2. Select the convection cooking temperature by pressing the Convection button again until the corresponding temperature is displayed.
COMBINATION COOKING This function allows you to combine convection operation with microwave to produce traditional baked or roasted results in less time. Always use microwave-safe and oven-proof cookware. Glass or ceramic dishes are ideal as they allow the microwaves to penetrate the food evenly. Always use oven gloves when touching the utensils in the oven, as they will be very hot. 1. Press the Combi button once. The COMBI indicator ( ) light and “C-0” will show in the display.
(1) WEIGHT DEFROST MODE Weight Defrost automatically sets the defrosting times and power levels to give even defrosting results for frozen food. During the defrosting process the oven will beep to remind you to check the food. When the oven beeps, open the door, turn the frozen food over and close the door, and press the START/SPEEDY COOK button again. 1. Press the Defrost button once. The Defrost indicator ( displayed. The ( ) indicator blinks. This is a weight defrost mode. ) lights and “0” is 2.
AUTO COOK This function allows you to simply and automatically cook a range of popular foods. Always use oven gloves when touching the utensils in the oven. 1. Press the Auto Cook button once. The Auto Cook indicator ( ) lights. “AC-1” will show in the display. 2. Select the menu by pressing the Auto Cook button until the required menu is displayed. Refer to the auto cook menu chart below for further details. 3. Turn the dial knob to set the cooking weight. For a cooking weight of 2.
SPEEDY COOK The Speedy Cook function allows the oven to cook immediately on microwave full power. The Speedy Cook function has been pre-programmed to increase the cooking time in increments of 30 seconds up to the maximum time of 5 minutes. 1. Press the START/SPEEDY COOK button. The oven will display as “ :30”, MW indicator ( ) lights, and the oven starts immediately. You may increase the cooking time by keep pressing the START/SPEEDY COOK button.
DISH WARMER (For Premium option model only) The DISH WARMER mode allows the oven to Warm dining dishes/plates before serve the food. The premium option model comes with the specially designed Dish-Warm Rack used for the dish warmer mode only. Please take out the glass turntable and place the dish-warm rack at the center of the oven cavity. Then place dishes/plates (Size ranges from Ø150~Ø260mm) on the rack. 1. Keep press the WARM button to select the desired temperature. (from 105F ~ 175F) 2.
TO STOP THE OVEN WHILE THE OVEN IS OPERATING 1. Open the door. • Oven stops operating. • You can restart the oven by closing the door and pressing the START/SPEEDY COOK button. 2. Press the STOP/CLEAR button. • Oven stops operating. • If you wish to cancel the cooking settings, press the STOP/CLEAR button again. ABNORMAL MESSAGE • If the inside temperature of the oven is higher than expected or the temperature sensor doesn't work properly, “Err 2” message will be shown in the display.
CARE OF YOUR MICROWAVE OVEN The oven should be cleaned regularly and any food deposits removed. Failure to maintain the oven in a clean condition could lead to deterioration of the surface that could adversely affect the life of the appliance and possibly result in a hazardous situation. 1 2 Turn the oven off before cleaning. 6 Keep the inside of the oven clean. When food spatters or spilled liquids adhere to oven walls, wipe with a damp cloth. Mild detergent may be used if the oven gets very dirty.
QUESTIONS AND ANSWERS * Q : I accidentally ran my microwave oven without any food in it. Is it damaged? * A : Running the oven empty for a short time will not damage the oven. However, it is not recommended. * Q : What does “standing time” mean? * A : “Standing time” means that food should be removed from the oven and covered for additional time to allow it to finish cooking. This frees the oven for other cooking. * Q : Can the oven be used with the glass tray or roller guide removed? * A : No.
COOKING INSTRUCTIONS Utensil Guide Only use utensils that are suitable for use in microwave ovens. To cook food in the microwave oven, the microwaves must be able to penetrate the food, without being reflected or absorbed by the dish used. Care must therefore be taken choosing the utensil. If the utensil is marked microwave-safe, you do not need to worry. The following table lists various of utensil and indicates whether and how they should be used in a microwave oven.
USE YOUR MICROWAVE OVEN SAFELY General Use Do not operate the oven if door seals or sealing surfaces are damaged; or if door is bent; or if hinges are loose or broken. Do not operate the oven empty. This will damage the oven. Do not attempt to dry clothes, newspapers or other materials in the oven. They may catch on fire. Do not use recycled paper products as they may contain impurities which may cause sparks or fires. Do not hit or strike the control panel with hard objects. This can damage the oven.
MICROWAVING PRINCIPLES Microwave energy has been used in this country to cook and reheat food since early experiments with RADAR in World War ll. Microwaves are present in the atmosphere all the time, both naturally and manmade sources. Manmade sources include radar, radio, television, telecommunication links and car phones. HOW MICROWAVES COOK FOOD ▲ In a microwave oven, electricity is converted into microwave by the MAGNETRON.
COOKING TECHNIQUES STANDING TIME STARTING TEMPERATURE Dense foods e.g. meat, jacket potatoes and cakes, require standing time(inside or outside of the oven) after cooking, to allow heat to finish conducting to cook the center completely. Wrap meat joints and jacket potatoes in aluminium foil while standing. Meat joints need approx. 10-15 minutes, jacket potatoes 5 minutes. Other foods such as plated meal, vegetables, fish etc require 2-5 minutes standing.
DEFROSTING GUIDE • When defrosted, food should be cool, but softened in all areas. If still slightly icy, return to microwave oven very briefly, or let stand a few minutes. After defrosting, allow food to stand 5-60 minutes if there are any icy areas. Poultry and fish may be placed under running cool water until defrosted ➪ Turn over : Roast, ribs, whole poultry, turkey breasts, hot dogs, sausages, steaks, or chops.
COOKING & REHEATING CHART Reheating chart • Baby food particularly needs to be checked carefully before serving to prevent burns. • When heating pre-packaged ready-cooked foods, always follow the pack instructions carefully. • If you freeze foods which were bought from the fresh or chilled counters, remember that they should be thoroughly thawed before following the heating instructions on the packed. It’s worth putting a note on them so that other members of the household will remember too.
VEGETABLE CHART Use a suitable glass pyrex bowl with lid. Add 30-45ml cold water(2-3 tbsp.) for every 250g unless another water quantity is recommended - see table. Cook covered for the minimum time - see table. Continue cooking to get the result you prefer. Stir once during and once after cooking. Add salt, herbs or butter after cooking. Cover during a standing time of 3 minutes. Hint : cut the fresh vegetables into even sized pieces. The smaller they are cut, the quicker they will cook.
RECIPES TOMATO & ORANGE SOUP 1. Melt the in a large bowl on P-HI for 1 minute. 2. Add the onion, carrot and potato and cook on P-HI for 3 minutes. stir halfway through cooking. 3. Add the tomatoes, orange juice, orange rind and stock. Mix thoroughly. Season with salt and pepper to taste. Cover the bowl and cook on P-HI for 13 minutes. stir 2-3 times during cooking, until the vegetables are tender. 4. Blend and serve immediately. 1 oz.
BLUE CHEESE & CHIVE JACKETS 1. Prick each potato in several places. Cook on P-HI for 7-9 minutes. Halve and scoop the flesh into a bowl, add the butter, cheese, chives, mushrooms, salt and pepper, mix thoroughly. 2. Pile mixture into the potato skins and place in a flan dish. 3. Cook on P-50 for 10 minutes. 2 baking potatoes, (approx.9 oz.(250g) each) 2 oz.(50g) butter 4 oz.(100g) blue cheese, chopped 1 tbsp(15ml) fresh chives, chopped 2 oz.(50g) mushrooms, sliced salt and pepper to taste WHITE SAUCE 1.
SCRAMBLED EGG 1/2 oz.(15g) 1. Melt the butter in a bowl on P-HI for 1 minute. 2. Add the eggs, milk and seasoning and mix well. 3. Cook on P-HI for 3 minutes, stirring every 30 seconds. butter 2 eggs 2 tbsp(30ml) milk salt & pepper SAVORY MINCE 1. Place onion, garlic and oil in casserole, and cook on P-HI for 2 minutes or until soft. 2. Place all other ingredients in casserole. Stir well. 3. Cover and cook on P-HI for 5 minutes then P-50 for 8-13 minutes or until the meat is cooked.