PRECAUTIONS TO AVOID POSSIBLE EXPOSURE TO EXCESSIVE MICROWAVE ENERGY {a) Do not attempt to operate this oven with the door open since open-door operation can result in | exposure lo microwave energy. It is important not to defeat or tamper with the safety interlocks. {b) Do not place any object between the oven front face and the door or allow soil or cleaner residue to accumulate on sealing surfaces.
EARTHING INSTRUCTIONS This appliance must be earthed. In the event of an electrical short circuit, earthing reduces the risk of electric shock by providing an escape wire for the electric current. This appliance is equipped with a cord having a earthing wire with a earthing plug. The plug must be plugged into an outlet that is properly installed and earthed. WARNING : Improper uss of the earthing plug can result in a risk of electric shock.
SPECIFICATIONS POWER SUPPLY 120V AC 60 Hz SINGLE PHASE WITH EARTHING POWER CONSUMPTION MW: 14 KW, MICROWAVE OUTPUT POWER 1000 W FREQUENCY 2450 MHz OUTSIDE DIMENSIONS 583 X 301 X 376.5 mm CAVITY DIMENSIONS 320 X 244 X 338 mm NET WEIGHT APPROX. 16.7 KG TIMER 59 min. 99 sec. POWER LEVELS 101 EVES _Specification are subject to change without notice. IMPORTANT The wires in this mains lead ans collared in accordance with the following code.
IMPORTANT SAFETY INSTRUCTIONS WARNING : Before using this appliance, read all instructions following. 1. Do not touch hot surfaces. Use handles or knobs. 2. To protect against electrical shock do not immerse cord, plug in water or other liquid. 3. Close supervision is necessary when any appliance is used by or near children. 4. Unplug from outlet when not in use and before cleaning. Allow to cool before putting on or taking off parts. 5.
IMPORTANT SAFETY INSTRUCTIONS WARNING : To prevent fire, burns, electric shock and other warnings: Listed below are, as with all appliances, certain rules to follow and safeguards to assure high performance from this oven: 1. Do not use the oven for any reason other than food preparation, such as for drying clothes, paper, or any other nonfood items or for sterilizing purposes. 2. Do not use the oven when empty, this could damage the oven. 3.
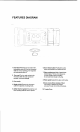
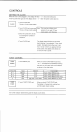
FEATURES DIAGRAM 1. Door fats-When the door is closed it will automatically shut off. if the door is opened while the oven is operating, the magneto will automatically shut off. 2. Door seal-The door seal maintains the microwave within the oven cavity and prevents microwave leakage. 3. Oven cavity 4. Spatter shield-Protects the microwave outlet from splashes of cooking foods. 5. Safety interlock system-Prevents the oven from aerating while the door is opened. 6.
FEATURES DIAGRAM . Time set pad-Used to set the cooking time and the present time. . Display-Cooking time, power level, indicators and present time are displayed. . Toast Bread-Used to bread reheat. . Toast Bagel-Used to bagel reheat. . Toast to stop the toast operation or to detest the toast data. . Toast Start-Used to toast start. . Memory-Used to set favorite cooking mode, . One touch-Used to cook or reheat specific quantities of food. . Auto Cook-Used to cook or reheat. 10. to add time to cooking 11.
CONTROLS SETTING THE CLOCK When the oven is first plugged in, the display will flash and a tone will sound. If the AC owes ever goes off, the display shows “ : 0” when the power comes back onl, CLOCK 1. Touch CLOCK pad. This is a 12 hour clock system. 2. Touch CLOCK pad once more. This fs a 24 hour clock system, 3. Enter the correct time of day by touching the numbers in sequence. 4. Touch CLOCK pad. Note : This oven has multiple clock systems. If you want 12 hour clock stern, omit this step.
TOAST 1. Touch BAGEL pad When you touch TOAST BAGEL pad once, BAGEL “b0" is displayed. By repeatedly touching this pad. you can select other food category as shown in the chart below, CATEGORY] FOOD WEIGHT TOUCH PAD b-0 Medium 2 ea. Touch TOAST BAGEL once bil Dark 2 ea. Touch TOAST BAGEL twice b-Lo Light 2 ea. Touch TOAST BAGEL three times TOAST 2, Touch TOAST START pad. When you touch TOAST START pad. START the display is changed into cooking time and the toaster starts cooking.
WEIGHT DEFROSTING AUTO DEFROST lets you easily defrost food by eliminating guesswork in determining defrosting time. Follow the steps below for easy defrosting. Touch DEFROST pad once. The DEF, Ib indicator light and * DF=1 "Is displayed. DEFROST 2. Touch number pads for the The display will show what you touched. desired defrosting time. Note © Your oven can be programmed for 8.5 Ibs. 3. Touch START pad. MEAT DEFROSTING begins. 1. Touch DEFROST pad twice.
COOKING IN ONE STAGE MICRO 1. Touch MICRO WAVE pad The M/W indicator light and * P~Ht " is displayed. WAVE (Select the desired power level.) Note © If steps 1 is omitted. the oven will cook at full power. 2. Touch number pads for the The display will show what you touched. desired defrosting time. Note : Your oven can be programmed for 59 minutes 99 seconds. (59: 99) 8. Touch START pad.
KITCHEN TIMER MODE Timer operates as a minute timer, can be set to delay cooking and used to set a holding time after cooking. However delay cooking can not be programmed for defrost. Timer operates without microwave energy. HOW TO USE AS A MINUTE TIMER 1. Touch TIMER pad. The TIMER indicator lights and displayed TIMER 2. Press the amount of time The display will show what you touched. you want to count down. 3. Touch START pad.
SPEEDY COOK SPEEDY COOK allows you to reheat for 30 seconds at full power by simply touching the SPEEDY COOK pad. By repeatedly touching the SPEEDY COOK pad, you can also extend reheating time to 5 minutes by 30 second increments. SPEEDY 1. Touch SPEEDY COOK pad When you touch SPEEDY COOK pad, the COOK M/W indicator light and displayed After 1.5 seconds, the oven starts reheating. The M/W indicator starts blinking and the display counts down.
MEMORY COOK If you often cook or reheat the same types of dishes, you can store the cooking times and functions in the oven's memory, so that you do not have to reset them each time. ‘You can store one cooking. To use memory default data 1. Touch MEMORY pad. The M/W & TOAST Indicator lights and MEMORY ¥ 1:20 "is displayed. 2. Touch START pad. When you touch START pad. the display is START changed into cooking time and the oven starts cooking. The M/W indicator starts blinking and the display counts down.
LESS, MORE To alter one touch cooking or cooking time whilst oven is in operation, use LESS or MORE. {except for defrosting) Press LESS/MORE to decreasefincrease the one touch cooking time in multiples of 10 seconds. The overall one touch cooking time can be increased to a maximum of 59 minutes 50 seconds. Press LESS/MORE to decreasefincrease the cooking time in multiples of 1 minute. The overall cocking time can be increased to a maximum of 59 minutes.
COOKING UTENSILS Utensils should be checked to ensure that they are suitable for use in microwave ovens. Microwave energy is produced by high frequency radio waves. They are reflected from metal, but will pass through most cooking utensils without heating them, As the waves come into contact with the food, they are converted into heat energy. Listed below are the suggested cooking utensils for this microwave oven and when to use them. 1. Dishes with metal trim of any type-should not be used.
BEFORE YOU CALL FOR SERVICE Refer to the following checklist, you may prevent an unnecessary service call, #1 The oven doesn't work; 1. Check that the power cord is securely plugged in. 2. Check that the door is firmly closed. 3. Check that the cooking time is set. 4. Check for a blown circuit fuse or ripped main circuit breaker in your house. hyperlinking in the cavity, 1. Check utensils. Metal containers or dishes with metal trim should not be used. 2.