
Operating Instructions

Operating Instructions
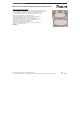
MaxLite
®
LED Architectural Brushed Nickel Ceiling Fixture
© Copyright 2017. MaxLite, Inc. All Rights Reserved.
12 York Ave, West Caldwell, NJ 07006 Tel: 973-244-7300 Fax: 973-244-7333 Email: info@maxlite.com
Page: 6
REV: 10/12/17
Installation Instructions
WARNING:
RISK OF ELECTRICAL SHOCK
•
Turn off electrical power at fuse or circuit breaker box before wiring fixture to the power supply.
•
Turn off the power when you perform any maintenance.
•
Verify that supply voltage is correct by comparing it with the luminaire label information.
•
Make all electrical and grounded connections in accordance with the National Electrical Code and any applicable
local code requirements.
•
All wiring connections should be capped with UL approved wire connectors.
WARNING:
RISK OF INJURY, RISK OF DAMAGE!
•
Luminaire may fall if inner bezel is not secured properly to outer bezel. Ensure that the whole loop is positioned
and secured under the washer.
For items: ML2LASPWHU169CSMSV,ML2LAMPWHU209CSMSV,ML2LALPWHU249CSMS
ML2LASPWHU169CSEMMSV,ML2LAMPWHU209CSEMMSV,
ML2LALPWHU249CSEMMSV
1.) Before beginning assembly, installation or operation of
product, make sure all parts are present. Compare parts
with package contents list on previous page. If any part is
missing or damaged, do not attempt to assemble, install or
operate the product. Contact customer service for
replacement parts.
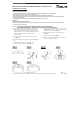
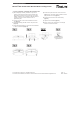
2.) Loosen the lens counterclockwise and remove lens
(figure 1).
3.) Install the electrical box screws in the junction box (figure
2).
4.) Follow the Wiring diagram to contact wires from
luminaires to wires of Junction box(figure 3).
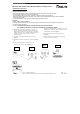
5.) Put the fixture plate across the screw of the lock in
figure 2, then rotate fixture plate clockwise and lock it
tightly with the screw lock (figure 4).
6.) Securely mount the lens to the fixture housing
(figure 5).
7.) Restore power to the electrical box. Turn the light
switch on to activate the fixture.
Fig.1
Fig.2
Fig.3
Fig.4