User manual Washing Machine WMD 1050
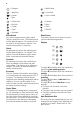
Contents Safety information Product description Control panel Before first use Daily use Helpful hints and tips Washing programmes 2 3 5 7 7 9 11 Care and cleaning 12 What to do if… 13 Technical data 15 Consumption values 16 Installation 16 Environment concerns 19 Warranty 20 Subject to change without notice Important! Read carefully & keep for future reference.
• • • • • and drain hose and the worktop is not pressing the electrical supply cable against the wall. If the machine is situated on a carpeted floor, please adjust the feet in order to allow air to circulate freely under the appliance. Always be sure, that there is no water leakage from hoses and their connections after the installation. If the appliance is installed in a location subject to frost, please read the “dangers of freezing” chapter.
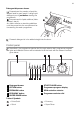
Machine front 1 2 1 2 3 4 Detergent dispenser drawer Control panel Door opening handle 4 adjustable feet 1 2 3 4 Transit locking devices Drain hose Electrical lead Inlet hose 3 4 Machine rear 1 2 3 4
Detergent dispenser drawer Compartment for powder or liquid detergent used for main wash. If using liquid detergent pour it just before starting the programme. Compartment for liquid additives (fabric softener, starch). Any fabric softener or starching additives must be poured into the compartment before starting the wash programme. Prewash detergent is to be added straight into the drum.
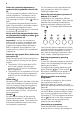
= Prewash = Start/Pause = Washing = Cycle End = Rinses = Door Locked = Spin = Rinse Hold = Delicate = No Spin = Wool = Cotton = Drain = Cold = ON/OFF = Synthetic Extra Quick Very short programme for lightly soiled laundry, except for wool. The washing time will be reduced approx. 30 minutes for cotton and by 20 minutes for synthetic. The machine will perform 1 rinse less. Quick By selecting this option the washing time will be reduced approx. 10 minutes.
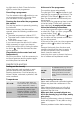
Programme Selector Dial It allows you to switch the appliance on/off and/or to select a programme. Before first use Warning! Ensure that the electrical and water connections comply with the installation instructions. Important! Remove any material from the drum. any residues which may have been left by the manufacturing process. Pour approx. 100 ml of detergent straight into the drum and run a cotton cycle at 60°C. When the programme is finished the machine will be ready to use.
Select the required programme by means of the programme selector dial (9) Turn the programme selector dial to the required programme. The selector can be turned either clockwise or anticlockwise. starts to The green light of button "Start" flash. On programme progress display the pilot lights corresponding to all phases composing the selected programme are lit. the programme is reset and On position the machine is switched OFF.
ing light starts to flash. Press the button again to restart the programme. Cancelling a programme position to canTurn the selector dial to cel a programme which is running. Now you can select a new programme. Opening the door after the programme has started First set the machine to pause by pressing the button 6. After some minutes, the door can be opened, when the following conditions are observed: • The water temperature is below 55°C. • The water level is below the bottom edge of the door.
Rub particularly soiled areas with a special detergent or detergent paste. Treat curtains with special care. Remove hooks or tie them up in a bag or net. Maximum loads Recommended loads are indicated in the washing programme charts. General rules: • Cotton, linen: drum full but not too tightly packed; • Synthetics: drum no more than half full; • Delicate fabrics and woollens: drum no more than one third full. Washing a maximum load makes the most efficient use of water and energy.
If using liquid detergents, a programme without prewash must be selected. Pour the liquid detergent into the detergent compartment immediately before you start the programme. Your appliance incorporates a recirculation system which allows an optimal use of the concentrated detergent. Follow the product manufacturer’s recommendations on quantities to use and do not exceed the «MAX» mark in the detergent dispenser drawer.
Programme/ Temperature Type of laundry Options Description of the programme DRAIN For emptying out the water of the last rinse in programmes with the Rinse Hold or No spin option selected. Draining of water Max Load 3 kg SPIN Separate spin for hand washed garments and after programmes with the Rinse Hold option selected. You can choose the spin speed by turning the spin speed selector to adapt it to the fabrics to be spun. Drain and long spin Max.
2. To remove the siphon at the inside edge of the drawer for cleaning, you need to press it inwards and pull it upwards at the same time. Flush it out under a tap, to remove any traces of accumulated powder. When you put it back, press it downwards until you hear a distinct click. Cleaning the drawer recess Having removed the drawer, use a small brush to clean the recess, ensuring that all washing powder residue is removed from the upper and lower part of the recess.
• 4 flashes: door open. Once the problem has been eliminated, press the button START to restart the proProblem gramme. If after all checks, the problem persists, contact your local Service Centre. Possible cause/Solution The machine does not start: The door has not been closed. • Close the door firmly. The plug is not properly inserted in the power socket. • Insert the plug into the power socket. There is no power at the socket. • Please check your domestic electrical installation.
Problem Possible cause/Solution The machine vibrates is noisy: The transit bolts and packing have not been removed. • Check the correct installation of the appliance. The support feet have not been adjusted • Check the correct levelling of the appliance. The laundry is not evenly distributed in the drum. • Redistribute the laundry. Maybe there is very little laundry in the drum. • Load more laundry.
Spin Speed Maximum 1000 rpm 1) Connect the water inlet hose to a water tap with a 3/4'' thread. Consumption values Programme Energy consumption (KWh) Water consumption (litres) Programme duration (Minutes) White Cottons 90° 1.43 44 ~ 126 Cottons 60° 0.78 44 ~ 107 Cotton + ECO option 60° 1) 0.57 39 ~ 130 Synthetic 60° 0.57 42 ~ 82 Synthetic 40° 0.26 42 ~ 67 Delicate 40° 0.38 45 ~ 61 Wool 30° 0.20 45 ~ 45 Rinses 0.
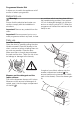
4. The three holes must then be plugged with the plastic plug caps supplied in the bag containing the instruction booklet, which can be found inside the drum. 2. Return machine to it's upright position and remove the power supply cable and the draining and inlet hose from the hose holders on the rear of the appliance. 3. With a suitable spanner unscrew and remove the three screws and their spacers on machine's rear. Positioning Install the machine on a flat hard floor.
Caution! Never place cardboard, wood or similar materials under the machine to compensate for any unevenness in the floor. Water inlet Warning! This appliance must be connected to a cold water supply. 1. Connect the water inlet hose supplied with the machine to a tap with a 3/4" thread. Always use the hose supplied with the appliance. Important! Do not use the hose from your previous machine to connect to the water supply. 2. The machine end of the inlet hose can be turned in any direction.
internal diameter of the standpipe must be larger than the outer diameter of the hose. 650-800 mm 40 mm 650-800 mm The drain hose can be connected directly into the pipe (e.g. beneath a washtub or sink), above the water trap. The drain hose must be arranged so that some part of it’s length is routed up to a level corresponding to the top edge of the tub and fixed in place there. Directly into a drain pipe at a height of not less than 65 cm and not more than 80 cm.
and electronic equipment. By ensuring this product is disposed of correctly, you will help prevent potential negative consequences for the environment and human health, which could otherwise be caused by inappropriate waste handling of this product. For more detailed information about recycling of this product, please contact your local council, your household waste disposal service or the shop where you purchased the product. Packaging materials The materials marked with the symbol are recyclable.
2. 3. 4. 5. 6. ranted against manufacturing defects in Australia for 3 months and in New Zealand for 3 months, following the date of original purchase of the Appliance. h) ‘you’ means the purchaser of the Appliance not having purchased the Appliance for re-sale, and ‘your’ has a corresponding meaning.
any other reasonably foreseeable loss or damage. You are also entitled to have the Appliance repaired or replaced if the Appliance fails to be of acceptable quality and the failure does not amount to a major failure. The benefits to you given by this warranty are in addition to your other rights and remedies under a law in relation to the Appliances or services to which the warranty relates. 11.
D Dometic WAECO International GmbH Hollefeldstraße 63 · D-48282 Emsdetten +49 (0) 2572 879-195 · +49 (0) 2572 879-322 Mail: info@waeco.de · Internet: www.waeco.de Dometic Austria GmbH Neudorferstrasse 108 2353 Guntramsdorf +43 2236 908070 +43 2236 90807060 Mail: info@waeco.at I Dometic Italy S.p.A. Via Virgilio, 3 I-47100 Forlì +39 0543 754901 +39 0543 756631 Mail: info@dometicwta.com AUS WAECO Pacific Pty. Ltd.