FanTastic-Vent-IO-16s.book Seite 1 Freitag, 5. Mai 2017 11:41 11 WINDOWS, DOORS & LIGHTS FANTASTIC VENT NO Takvindu med vifte Monterings- og bruksanvisning . . . . . . . . 139 FI Tuulettimella varustettu kattoluukku Asennus- ja käyttöohje . . . . . . . . . . . . . . . 153 FanTastic Vent EN Installation and Operating Manual. . . . . . . 13 Montage- und Bedienungsanleitung . . . . .27 FR Dôme de toit avec ventilateur Instructions de montage et de service . . . . . . . . . . . . . . . . . . . . . . . .
FanTastic-Vent-IO-16s.book Seite 2 Freitag, 5.
FanTastic-Vent-IO-16s.book Seite 3 Freitag, 5.
FanTastic-Vent-IO-16s.book Seite 4 Freitag, 5. Mai 2017 11:41 11 FanTastic Vent 2 A 0 0 0 5 4 3 3 4 5 0 0 0 m m m m m m m m C B Ø 24 mm 12 m m m m 12 3 4 W A B 2. 1.
FanTastic-Vent-IO-16s.book Seite 5 Freitag, 5.
FanTastic-Vent-IO-16s.book Seite 6 Freitag, 5.
FanTastic-Vent-IO-16s.book Seite 7 Freitag, 5.
FanTastic-Vent-IO-16s.book Seite 8 Freitag, 5.
FanTastic-Vent-IO-16s.book Seite 9 Freitag, 5. Mai 2017 11:41 11 FanTastic Vent c 2. MA N UA L % 10 0 85 SP EE D 70 55 40 25 10 AU TO 90 /33 85 /30 80 /27 75 /24 70 /21 TE MP 65 /18 60 /15 UP /DO WN RA IN SE N AIR IN SO /O RO UT FF 1.
FanTastic-Vent-IO-16s.book Seite 10 Freitag, 5.
FanTastic-Vent-IO-16s.book Seite 11 Freitag, 5. Mai 2017 11:41 11 FanTastic Vent e 3. 2. 4. 1. f 2. 1.
FanTastic-Vent-IO-16s.book Seite 12 Freitag, 5. Mai 2017 11:41 11 FanTastic Vent g 2. 1.
FanTastic-Vent-IO-16s.book Seite 13 Freitag, 5. Mai 2017 11:41 11 FanTastic Vent Please read this instruction manual carefully before installation and first use, and store it in a safe place. If you pass on the product to another person, hand over this instruction manual along with it. Table of contents 1 Explanation of symbols . . . . . . . . . . . . . . . . . . . . . . . . . . . . . . . . . . . . . . . . . .14 2 Safety instructions . . . . . . . . . . . . . . . . . . . . . . . . . . . . . . . . . . .
FanTastic-Vent-IO-16s.book Seite 14 Freitag, 5. Mai 2017 11:41 11 Explanation of symbols 1 ! ! A 2 FanTastic Vent Explanation of symbols WARNING! Safety instruction: Failure to observe this instruction can cause fatal or serious injury. CAUTION! Safety instruction: Failure to observe this instruction can lead to injury. NOTICE! Failure to observe this instruction can cause material damage and impair the function of the product.
FanTastic-Vent-IO-16s.book Seite 15 Freitag, 5. Mai 2017 11:41 11 FanTastic Vent Scope of delivery • Keep the roof light free of snow and ice. • Close the cover hood of the roof light, before the vehicle is in motion. • With closed cover hood, do not exceed the maximum travel speed of 150 km/h. 3 Scope of delivery Quantity 4 Description 1 Roof light with fan 1 Seal (only for 350 x 350 mm fan base) 1 Inner frame 6 Fastening screws (3/4" (19.
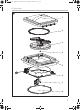
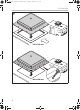
FanTastic-Vent-IO-16s.book Seite 16 Freitag, 5. Mai 2017 11:41 11 Technical description 5 Technical description 5.1 Components 6 No. in fig. 1, page 3 Description 1 Cover hood 2 Top grille ring 3 Fan blades 4 Fan blade screw 5 Fan base 6 Grille assembly 7 Hoist motor assembly 8 Bottom grille ring FanTastic Vent Instructions before installation ➤ Before installation, check the roof thickness of your vehicle. Consult the vehicle manufacturer if you have any questions.
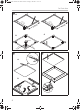
FanTastic-Vent-IO-16s.book Seite 17 Freitag, 5. Mai 2017 11:41 11 FanTastic Vent 6.1 Installing the device Pressing out the hole See fig. 2, page 4 6.2 Using the reinforcing rails Proceed as follows (fig. 3, page 4): ➤ Before installation, check whether the roof opening needs reinforcing. ➤ Remove the foam according to the width of the reinforcing rails (not in scope of delivery) (A). ➤ Fit the reinforcing rails (B).
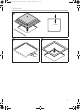
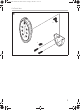
FanTastic-Vent-IO-16s.book Seite 18 Freitag, 5. Mai 2017 11:41 11 Using the device (7350, 7300) FanTastic Vent ➤ If the roof is thinner than 25 mm, use the spacer (accessory). ➤ Install the inner frame (fig. b, page 8). ➤ After installing, check again the fan works properly. ➤ If necessary, enter the new vehicle height and weight in the vehicle documents. 7.1 Mounting the holder for the remote control (7350, 7300) ➤ Fasten the holder of the remote control onto the wall with two screws (fig.
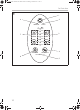
FanTastic-Vent-IO-16s.book Seite 19 Freitag, 5. Mai 2017 11:41 11 FanTastic Vent Using the device (7350, 7300) The remote control goes into standby mode to conserve the battery 30 seconds after entering the last command. To activate the remote control, press any button on the remote. The last temperature or speed setting before it goes into standby is displayed. If the remote control is switched off manually with the button, all the settings are reset. 8.
FanTastic-Vent-IO-16s.book Seite 20 Freitag, 5. Mai 2017 11:41 11 Using the device (7350, 7300) 8.5 FanTastic Vent Setting the fan speed The fan can be operated at 13 speeds. The fan speed is displayed with an LED on the remote control from 10 % (low speed) to 100 % (high speed). An LED lights up next to the percentage value of the fan speed. If two LEDs light up, the temperature setting is in the middle between the illuminated percentage values.
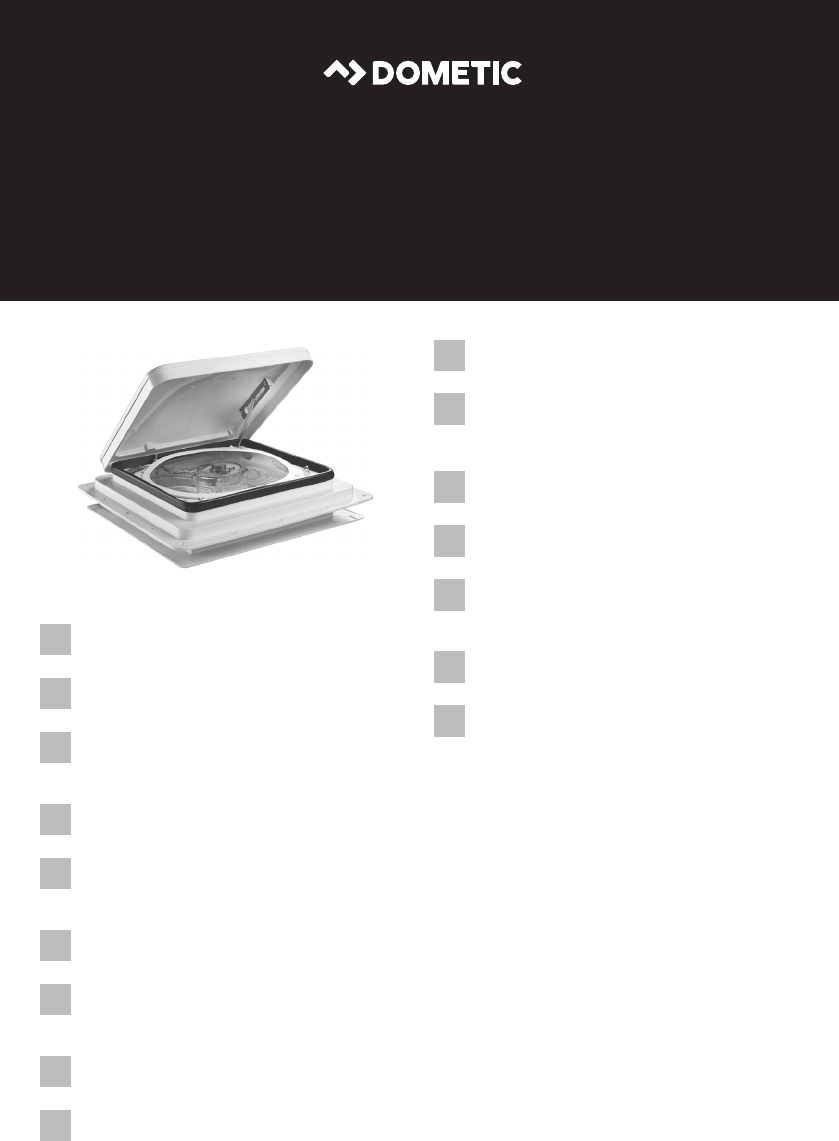
FanTastic-Vent-IO-16s.book Seite 21 Freitag, 5. Mai 2017 11:41 11 FanTastic Vent 8.8 Using the device (3300, 3350) Replacing the batteries The remote control operates with two AA batteries (included in delivery). To change the batteries (fig. e, page 11), proceed as follows: ➤ Open the cover of the battery compartment on the back of the remote control. ➤ Replace the old batteries with two new AA batteries.
FanTastic-Vent-IO-16s.book Seite 22 Freitag, 5. Mai 2017 11:41 11 Using the device (3300, 3350) 9.3 FanTastic Vent Switching the fan on and off ➤ Open the window on the shady side of the caravan. ➤ Set the required speed on the fan. ➤ Press UP. ➤ Set the fan, if required, to inlet (IN) or outlet (OUT). ➤ If required, turn the on/off switch to ON. 9.4 Switching to inlet/outlet (3350 only) ➤ Turn the reversing switch to OFF (centre position).
FanTastic-Vent-IO-16s.book Seite 23 Freitag, 5. Mai 2017 11:41 11 FanTastic Vent Using the device (2250) 10 Using the device (2250) 10.1 Opening and closing the cover hood ➤ Open the cover hood approx. 10 cm or more. ✓ The safety switch starts the fan not before the cover hood is partially open. ➤ Adjust the power level with the rotary control switch. – 0: Off – 1: Lowest power level – 2: Middle power level – 3: Highest power level ➤ For an air exchange, open a window or a door.
FanTastic-Vent-IO-16s.book Seite 24 Freitag, 5. Mai 2017 11:41 11 Maintaining and cleaning the device 11.2 FanTastic Vent Cleaning the fan blades To do this, proceed as follows (fig. f, page 11, fig. g, page 12): ➤ Open the cover hood completely. ➤ Remove the safety catch. ➤ Remove the grille ring by holding the tab with one hand and pulling straight down. Support the grille assembly with the other hand to protect the grille ring from breaking.
FanTastic-Vent-IO-16s.book Seite 25 Freitag, 5. Mai 2017 11:41 11 FanTastic Vent 11.3 Warranty Loosening the cover hood when stuck In warm weather, it is possible that the seal dries up and the cover hood sticks to it. ➤ Open the cover hood completely. ➤ If the seal is damaged, replace the seal. ➤ Clean the underside of the cover hood and the seal with methylated spirits or solvent. ➤ If available, apply a water-based protective agent (e.g. 303 Protectant). ➤ Leave the protective agent to dry.
FanTastic-Vent-IO-16s.book Seite 26 Freitag, 5. Mai 2017 11:41 11 Disposal 13 FanTastic Vent Disposal ➤ Place the packaging material in the appropriate recycling waste bins wherever possible. M If you wish to finally dispose of the product, ask your local recycling centre or specialist dealer for details about how to do this in accordance with the applicable disposal regulations. 14 Technical data FanTastic Vent7350 Voltage: 12 Vg Max.
FanTastic-Vent-IO-16s.book Seite 27 Freitag, 5. Mai 2017 11:41 11 FanTastic Vent Bitte lesen Sie diese Anleitung vor Einbau und Inbetriebnahme sorgfältig durch und bewahren Sie sie auf. Geben Sie sie im Falle einer Weitergabe des Produktes an den Nutzer weiter. Inhaltsverzeichnis 1 Erklärung der Symbole . . . . . . . . . . . . . . . . . . . . . . . . . . . . . . . . . . . . . . . . . 28 2 Sicherheits- und Einbauhinweise . . . . . . . . . . . . . . . . . . . . . . . . . . . . . . . . .
FanTastic-Vent-IO-16s.book Seite 28 Freitag, 5. Mai 2017 11:41 11 Erklärung der Symbole 1 ! ! A 2 FanTastic Vent Erklärung der Symbole WARNUNG! Sicherheitshinweis: Nichtbeachtung kann zu Tod oder schwerer Verletzung führen. VORSICHT! Sicherheitshinweis: Nichtbeachtung kann zu Verletzungen führen. ACHTUNG! Nichtbeachtung kann zu Materialschäden führen und die Funktion des Produktes beeinträchtigen.
FanTastic-Vent-IO-16s.book Seite 29 Freitag, 5. Mai 2017 11:41 11 FanTastic Vent Lieferumfang • Schließen Sie die Deckelhaube des Dachfensters, bevor Sie das Fahrzeug bewegen. • Bei geschlossener Deckelhaube empfiehlt der Hersteller ausdrücklich eine maximale Reisegeschwindigkeit von 150 km/h nicht zu überschreiten. 3 Lieferumfang Menge 4 Bezeichnung 1 Dachfenster mit Lüfter 1 Dichtung (nur bei 350 x 350 mm Lüfter) 1 Innenrahmen 6 Befestigungsschrauben (3/4“ (19.
FanTastic-Vent-IO-16s.book Seite 30 Freitag, 5. Mai 2017 11:41 11 Technische Beschreibung 5 Technische Beschreibung 5.1 Bestandteile Nr. in Abb. 1, Seite 3 6 FanTastic Vent Beschreibung 1 Deckelhaube 2 Oberer Gitterring 3 Lüfterflügel 4 Lüfterflügelschraube 5 Lüftersockel 6 Gitterbaugruppe 7 Hubmotorbaugruppe 8 Unterer Gitterring Hinweise vor dem Einbau ➤ Prüfen Sie vor der Montage die Dachstärke lhres Fahrzeugs. Bei Fragen wenden Sie sich an den Fahrzeughersteller.
FanTastic-Vent-IO-16s.book Seite 31 Freitag, 5. Mai 2017 11:41 11 FanTastic Vent 6.1 Gerät montieren Ausschnitt ausarbeiten Siehe Abb. 2, Seite 4 6.2 Verstärkungsleisten verwenden Gehen Sie wie folgt vor (Abb. 3, Seite 4): ➤ Klären Sie vor dem Einbau, ob der Dachausschnitt verstärkt werden muss. ➤ Entfernen Sie die Ausschäumung entsprechend der Breite der Verstärkungsleisten (nicht im Lieferumfang) (A). ➤ Passen Sie die Verstärkungsleisten ein (B).
FanTastic-Vent-IO-16s.book Seite 32 Freitag, 5. Mai 2017 11:41 11 Gerät benutzen (7350, 7300) FanTastic Vent ➤ Dichten Sie die Schraubenköpfe ab (Abb. a, Seite 8). ➤ Wenn das Dach dünner als 25 mm ist, verwenden Sie Abstandshalter (Zubehör). ➤ Installieren Sie den Innenrahmen (Abb. b, Seite 8). ➤ Prüfen Sie nach der Montage erneut die Funktion des Lüfters. ➤ Lassen Sie die geänderte Fahrzeughöhe und das geänderte Gewicht in die Fahrzeugpapiere eintragen, falls erforderlich. 7.
FanTastic-Vent-IO-16s.book Seite 33 Freitag, 5. Mai 2017 11:41 11 FanTastic Vent Gerät benutzen (7350, 7300) Ein doppelter Piepton gibt an, dass ein Befehl nicht zulässig ist. Die Fernbedienung geht 30 Sekunden nach der letzten Befehlseingabe in den Standby-Modus über, um die Batterie zu schonen. Um die Fernbedienung zu aktivieren, drücken Sie eine beliebige Taste auf der Fernbedienung. Die letzte Temperatur- oder Drehzahleinstellung vor dem Standby wird angezeigt.
FanTastic-Vent-IO-16s.book Seite 34 Freitag, 5. Mai 2017 11:41 11 Gerät benutzen (7350, 7300) FanTastic Vent ➤ Drücken Sie die Taste , um die gewünschte Temperatur zu erhöhen. ➤ Drücken Sie die Taste , um die gewünschte Temperatur zu verringern. 8.5 Lüftergeschwindigkeit einstellen Der Lüfter kann in 13 Geschwindigkeitsstufen betrieben werden.
FanTastic-Vent-IO-16s.book Seite 35 Freitag, 5. Mai 2017 11:41 11 FanTastic Vent 8.8 Gerät benutzen (3300, 3350) Batterien wechseln Die Fernbedienung wird mit zwei AA-Batterien (im Lieferumfang enthalten) betrieben. Gehen Sie wie folgt vor, um die Batterien zu wechseln (Abb. e, Seite 11): ➤ Öffnen Sie den Batteriefachdeckel auf der Rückseite der Fernbedienung. ➤ Ersetzen Sie die alten Batterien durch zwei neue AA-Batterien.
FanTastic-Vent-IO-16s.book Seite 36 Freitag, 5. Mai 2017 11:41 11 Gerät benutzen (3300, 3350) 9.3 FanTastic Vent Lüfter ein- und ausschalten ➤ Öffnen Sie ein Fenster auf der schattigen Seite des Wohnwagens. ➤ Stellen Sie die gewünschte Geschwindigkeit am Lüfter ein. ➤ Drücken Sie auf UP. ➤ Stellen Sie ggf. den Lüfter auf Zuluft (IN) oder Abluft (OUT). ➤ Stellen Sie ggf. den Ein-/Ausschalter auf ON. 9.4 Zuluft/Abluft umschalten (nur 3350) ➤ Stellen Sie den Reversierschalter auf OFF (Mittelstellung).
FanTastic-Vent-IO-16s.book Seite 37 Freitag, 5. Mai 2017 11:41 11 FanTastic Vent 10 Gerät benutzen (2250) 10.1 Deckelhaube öffnen und schließen Gerät benutzen (2250) ➤ Öffnen Sie die Deckelhaube ca. 10 cm oder mehr. ✓ Der Sicherheitsschalter im Lüfter startet diesen erst, wenn die Deckelhaube teilweise geöffnet ist. ➤ Stellen Sie den Drehregler auf die gewünschte Leistungsstufe ein.
FanTastic-Vent-IO-16s.book Seite 38 Freitag, 5. Mai 2017 11:41 11 Gerät pflegen und reinigen 11.2 FanTastic Vent Lüfterflügel reinigen Gehen Sie vor wie folgt vor (Abb. f, Seite 11, Abb. g, Seite 12): ➤ Öffnen Sie die Deckelhaube vollständig. ➤ Entfernen Sie die Sicherung. ➤ Entfernen Sie den Gitterring, indem Sie die Lasche mit einer Hand ergreifen und gerade nach unten ziehen. Stützen Sie mit der anderen Hand die Gitterbaugruppe, um den Gitterring vor Bruch zu schützen.
FanTastic-Vent-IO-16s.book Seite 39 Freitag, 5. Mai 2017 11:41 11 FanTastic Vent 11.3 Gerät pflegen und reinigen Haftende Deckelhaube lösen Bei warmen Temperaturen kann es vorkommen, dass die Dichtung austrocknet und die Deckelhaube daran kleben bleibt. ➤ Öffnen Sie die Deckelhaube vollständig. ➤ Falls die Dichtung beschädigt ist, ersetzen Sie die Dichtung. ➤ Reinigen Sie die Unterseite der Deckelhaube und die Dichtung mit Brennspiritus oder Reinigungsbenzin.
FanTastic-Vent-IO-16s.book Seite 40 Freitag, 5. Mai 2017 11:41 11 Gewährleistung 12 FanTastic Vent Gewährleistung Es gilt die gesetzliche Gewährleistungsfrist. Sollte das Produkt defekt sein, wenden Sie sich bitte an einen Service-Partner in Ihrem Land (Adressen siehe Rückseite der Anleitung). Unsere Spezialisten helfen Ihnen gerne weiter und besprechen mit Ihnen den weiteren Verlauf der Gewährleistung. 13 Entsorgung ➤ Geben Sie das Verpackungsmaterial möglichst in den entsprechenden Recycling-Müll.
FanTastic-Vent-IO-16s.book Seite 41 Freitag, 5. Mai 2017 11:41 11 FanTastic Vent Veuillez lire attentivement cette notice avant le montage et la mise en service. Veuillez ensuite la conserver. En cas de passer le produit, veuillez le transmettre au nouvel acquéreur. Sommaire 1 Explication des symboles . . . . . . . . . . . . . . . . . . . . . . . . . . . . . . . . . . . . . . . 42 2 Consignes de sécurité et instructions de montage . . . . . . . . . . . . . . . . . . . 42 3 Contenu de la livraison . .
FanTastic-Vent-IO-16s.book Seite 42 Freitag, 5. Mai 2017 11:41 11 Explication des symboles 1 ! ! A 2 FanTastic Vent Explication des symboles AVERTISSEMENT ! Consigne de sécurité : le non-respect de ces consignes peut entraîner la mort ou de graves blessures. ATTENTION ! Consigne de sécurité : le non-respect de ces consignes peut entraîner des blessures. AVIS ! Le non-respect de ces consignes peut entraîner des dommages matériels et des dysfonctionnements du produit.
FanTastic-Vent-IO-16s.book Seite 43 Freitag, 5. Mai 2017 11:41 11 FanTastic Vent Contenu de la livraison • Protégez le dôme de toit de la neige et de la glace. • Fermez le dôme avant de bouger le véhicule. • Avec le dôme fermé, le fabricant recommande de ne pas dépasser une vitesse de croisière maximale de 150 km/h. 3 Contenu de la livraison Quantité 4 Désignation 1 Dôme de toit avec ventilateur 1 Joint (uniquement pour ventilateur 350 x 350 mm) 1 Cadre intérieur 6 Vis de fixation (3/4" (19.
FanTastic-Vent-IO-16s.book Seite 44 Freitag, 5. Mai 2017 11:41 11 Description technique 5 Description technique 5.1 Éléments N° dans fig. 1, page 3 6 FanTastic Vent Description 1 Dôme 2 Anneau de grille supérieur 3 Pale de ventilateur 4 Vis à ailette du ventilateur 5 Socle du ventilateur 6 Module de grille 7 Module de moteur de levage 8 Anneau de grille inférieur Consignes préalables au montage ➤ Avant le montage, veuillez vérifier l'épaisseur de toit de votre véhicule.
FanTastic-Vent-IO-16s.book Seite 45 Freitag, 5. Mai 2017 11:41 11 FanTastic Vent 6.1 Montage de l'appareil Élaboration de la découpe Voir fig. 2, page 4 6.2 Utilisation de barres de renforcement Procédez comme suit (fig. 3, page 4) : ➤ Avant le montage, vérifiez si la découpe de toit doit être renforcée ou non. ➤ Retirez la mousse en fonction de la largeur des barres de renforcement (non comprises dans la livraison) (A). ➤ Insérez les barres de renforcement (B).
FanTastic-Vent-IO-16s.book Seite 46 Freitag, 5. Mai 2017 11:41 11 Utilisation de l’appareil (7350, 7300) FanTastic Vent ➤ Étanchez les têtes de vis (fig. a, page 8). ➤ Si l’épaisseur du toit est inférieure à 25 mm, utilisez des entretoises (accessoires). ➤ Installez le cadre intérieur (fig. b, page 8). ➤ Après le montage, vérifiez à nouveau le fonctionnement du ventilateur. ➤ Faites noter les modifications de la hauteur et du poids du véhicule sur les papiers du véhicule, si nécessaire. 7.
FanTastic-Vent-IO-16s.book Seite 47 Freitag, 5. Mai 2017 11:41 11 FanTastic Vent Utilisation de l’appareil (7350, 7300) Un bip double indique qu’une commande n’est pas autorisée. 30 secondes après la dernière entré de commande, la télécommande passe en mode d’attente pour ménager la batterie. Pour activer la télécommande, appuyez sur une touche quelconque de la télécommande. Le dernier réglage de température ou de régime avant le mode d’attente est indiqué.
FanTastic-Vent-IO-16s.book Seite 48 Freitag, 5. Mai 2017 11:41 11 Utilisation de l’appareil (7350, 7300) 8.4 FanTastic Vent Réglage de la température La température peut être réglée en 13 niveaux. La température réglée est indiquée par une LED allumée sur la télécommande en °F et °C (60 à 90 °F/15 à 33 °C). Si deux LED brillent, le réglage de température se situe entre les deux valeurs de degrés illuminées. (Exemple : Si les LEDs 80 °F et 85 °F sont allumées, le réglage est environ à 83 °F/28 °C).
FanTastic-Vent-IO-16s.book Seite 49 Freitag, 5. Mai 2017 11:41 11 FanTastic Vent ➤ Maintenez la touche Utilisation de l’appareil (3300, 3350) enfoncée pendant 3 secondes. ✓ Le capteur de pluie est activé. ✓ La LED « Rain Sensor Off » s’éteint. 8.8 Remplacement des piles La télécommande fonctionne avec deux piles AA (comprises dans la livraison). Procédez de la manière suivante pour changer les piles (fig.
FanTastic-Vent-IO-16s.book Seite 50 Freitag, 5. Mai 2017 11:41 11 Utilisation de l’appareil (3300, 3350) 9.2 FanTastic Vent Ouverture et fermeture du dôme ➤ Appuyez sur UP. ✓ Le dôme s'ouvre. ➤ Appuyez sur DOWN. ✓ Le dôme se ferme. 9.3 Activation/désactivation du ventilateur ➤ Ouvrez une fenêtre du côté ombragé de la caravane. ➤ Réglez la vitesse souhaitée au niveau du ventilateur. ➤ Appuyez sur UP. ➤ La cas échéant, réglez le ventilateur sur flux d’entrée (IN) ou de sortie (OUT).
FanTastic-Vent-IO-16s.book Seite 51 Freitag, 5. Mai 2017 11:41 11 FanTastic Vent Utilisation de l’appareil (2250) Conditions : • Le dôme est ouvert au moins 5 cm (2 pouces) • L’interrupteur d’inversion est sur OUT (flux de sortie) ou sur IN (flux d’entrée) (3350) • L’interrupteur marche/arrêt est sur ON (3300) 9.6 Capteur de pluie Si le capteur de pluie entre en contact avec de l’humidité, le dôme se ferme et le moteur du ventilateur s’arrête. ➤ Appuyez sur UP pour ouvrir à nouveau le dôme.
FanTastic-Vent-IO-16s.book Seite 52 Freitag, 5. Mai 2017 11:41 11 Entretien et nettoyage de l'appareil FanTastic Vent 11 Entretien et nettoyage de l'appareil 11.1 Remplacement du fusible ➤ Tournez le capuchon noir d’un quart de tour dans le sens antihoraire. ➤ Avec précaution, tirez le capuchon vers le bas. Le fusible se trouve sur le côté arrière du capuchon. ➤ Contrôlez si le fil à l’intérieur du verre est intact. ➤ Si nécessaire, retirez le fusible du capuchon.
FanTastic-Vent-IO-16s.book Seite 53 Freitag, 5. Mai 2017 11:41 11 FanTastic Vent Entretien et nettoyage de l'appareil ➤ Dès que l’anneau de grille et la pale de ventilateur sont propres et secs, vous pouvez appliquer un produit de protection à base d’eau et polir l’anneau de grille et la pale de ventilateur. Ceci diminue les dépôts de poussière et de saleté et facilite le nettoyage. ➤ Remontez le ventilateur en suivant les étapes dans l’ordre inverse. ! 11.
FanTastic-Vent-IO-16s.book Seite 54 Freitag, 5. Mai 2017 11:41 11 Garantie 12 FanTastic Vent Garantie Le délai légal de garantie s'applique. Si le produit s'avérait défectueux, veuillez vous adresser à un de nos partenaires de service présent dans votre pays (voir adresses au dos du présent manuel). Nos spécialistes vous aideront avec plaisir et répondront à vos questions concernant la suite de la procédure pour la garantie.
FanTastic-Vent-IO-16s.book Seite 55 Freitag, 5. Mai 2017 11:41 11 FanTastic Vent Lea detenidamente estas instrucciones antes de llevar a cabo la instalación y puesta en funcionamiento, y consérvelas en un lugar seguro. En caso de vender o entregar el producto a otra persona, entregue también estas instrucciones. Índice 1 Explicación de los símbolos . . . . . . . . . . . . . . . . . . . . . . . . . . . . . . . . . . . . . 56 2 Indicaciones de seguridad e instalación . . . . . . . . . . . . . . . . . . .
FanTastic-Vent-IO-16s.book Seite 56 Freitag, 5. Mai 2017 11:41 11 Explicación de los símbolos 1 ! ! A 2 FanTastic Vent Explicación de los símbolos ¡ADVERTENCIA! Indicación de seguridad: su incumplimiento puede acarrear la muerte o graves lesiones. ¡ATENCIÓN! Indicación de seguridad: su incumplimiento puede acarrear lesiones. ¡AVISO! Su incumplimiento puede acarrear daños materiales y perjudicar el correcto funcionamiento del producto.
FanTastic-Vent-IO-16s.book Seite 57 Freitag, 5. Mai 2017 11:41 11 FanTastic Vent Volumen de entrega • No salga del vehículo dejando la claraboya abierta. • Mantenga la claraboya libre de nieve y hielo. • Cierre la tapa de la claraboya antes de poner el vehículo en movimiento. • Estando la tapa cerrada, el fabricante recomienda expresamente no superar una velocidad máxima de 150 km/h.
FanTastic-Vent-IO-16s.book Seite 58 Freitag, 5. Mai 2017 11:41 11 Descripción técnica 5 Descripción técnica 5.1 Componentes N.º en fig. 1, página 3 6 FanTastic Vent Descripción 1 Tapa 2 Aro de la rejilla superior 3 Aspas del ventilador 4 Tornillo de las aspas del ventilador 5 Zócalo del ventilador 6 Módulo de rejilla 7 Módulo de motor de elevación 8 Aro de la rejilla inferior Indicaciones previas al montaje ➤ Antes del montaje, compruebe el grosor del techo de su vehículo.
FanTastic-Vent-IO-16s.book Seite 59 Freitag, 5. Mai 2017 11:41 11 FanTastic Vent 6.1 Montaje del aparato Preparación de la abertura Véase fig. 2, página 4 6.2 Utilización de guías de refuerzo Proceda de la siguiente manera (fig. 3, página 4): ➤ Antes del montaje, aclare si la abertura del techo debe ser reforzada. ➤ Retire el aislamiento de espuma lo equivalente a la anchura de las guías de refuerzo (no incluidas en el volumen de entrega) (A). ➤ Adapte las guías de refuerzo (B).
FanTastic-Vent-IO-16s.book Seite 60 Freitag, 5. Mai 2017 11:41 11 Uso del aparato (7350, 7300) FanTastic Vent ➤ Si el techo tiene un grosor inferior a 25 mm, utilice un separador (accesorio). ➤ Coloque el marco interior (fig. b, página 8). ➤ Tras el montaje, vuelva a comprobar el funcionamiento del ventilador. ➤ En caso necesario, haga registrar en la documentación del vehículo la nueva altura y el nuevo peso del mismo. 7.
FanTastic-Vent-IO-16s.book Seite 61 Freitag, 5. Mai 2017 11:41 11 FanTastic Vent Uso del aparato (7350, 7300) Treinta segundos después de haber introducido el último comando, el control remoto pasa al modo standby para ahorrar batería. Para activar el control remoto, pulse una tecla cualquiera del control remoto. Se visualiza el último ajuste de temperatura o el régimen de revoluciones previos al standby. Si el control remoto se apaga manualmente con la tecla , se restauran todos los ajustes. 8.
FanTastic-Vent-IO-16s.book Seite 62 Freitag, 5. Mai 2017 11:41 11 Uso del aparato (7350, 7300) 8.4 FanTastic Vent Ajuste de la temperatura La temperatura se puede ajustar en 13 niveles. La temperatura ajustada se indica por medio de un LED que se enciende en el control remoto en °F y °C (60 – 90 °F/15 – 33 °C). Si se encienden dos LED, la temperatura ajustada se encuentra en la mitad de los valores iluminados.
FanTastic-Vent-IO-16s.book Seite 63 Freitag, 5. Mai 2017 11:41 11 FanTastic Vent ➤ Mantenga pulsada la tecla Uso del aparato (3300, 3350) durante tres segundos. ✓ El sensor de lluvia se activa. ✓ El LED “Rain Sensor Off” se apaga. 8.8 Cambiar las pilas El control remoto funciona con dos pilas AA (incluidas en el volumen de entrega). Proceda de la siguiente manera para cambiar las pilas (fig. e, página 11): ➤ Abra la tapa del compartimento de las pilas prevista en la parte posterior del control remoto.
FanTastic-Vent-IO-16s.book Seite 64 Freitag, 5. Mai 2017 11:41 11 Uso del aparato (3300, 3350) 9.2 FanTastic Vent Apertura y cierre de la tapa de la claraboya ➤ Pulse en UP. ✓ La tapa de la claraboya se abre. ➤ Pulse en DOWN. ✓ La tapa de la claraboya se cierra. 9.3 Encender y apagar el ventilador ➤ Abra una ventana donde no dé el sol. ➤ Ajuste el ventilador a la velocidad que desee. ➤ Pulse en UP. ➤ Ajuste el ventilador a entrada de aire (IN) o a salida de aire (OUT).
FanTastic-Vent-IO-16s.book Seite 65 Freitag, 5. Mai 2017 11:41 11 FanTastic Vent Uso del aparato (2250) Requisitos: • La tapa de la claraboya está abierta un mínimo de 5 cm (2 pulgadas) • El interruptor de inversión está en OUT (salida de aire) o en IN (entrada de aire) (3350) • El interruptor de encendido y apagado está en ON (3300) 9.6 Sensor de lluvia Si el sensor de lluvia entra en contacto con humedad, la tapa de la claraboya se cierra y el motor del ventilador se apaga.
FanTastic-Vent-IO-16s.book Seite 66 Freitag, 5. Mai 2017 11:41 11 Mantenimiento y limpieza del aparato FanTastic Vent 11 Mantenimiento y limpieza del aparato 11.1 Sustitución de fusibles ➤ Gire la caperuza negra un cuarto de reloj en sentido contrario a las agujas. ➤ Tire de la caperuza cuidadosamente hacia abajo. En la parte trasera de la caperuza hay un fusible. ➤ Compruebe si el cable de dentro del cristal está defectuoso. ➤ En caso necesario, extraiga el fusible de la caperuza.
FanTastic-Vent-IO-16s.book Seite 67 Freitag, 5. Mai 2017 11:41 11 FanTastic Vent Mantenimiento y limpieza del aparato ➤ Cuando se hayan secado el aro de rejilla y las aspas del ventilador, puede aplicar un agente protector a base de agua y frotar ambas piezas hasta que queden brillantes. Así se reduce la sedimentación de polvo y suciedad, y se facilita la limpieza. ➤ Vuelva a montar el ventilador siguiendo los mismos pasos en el orden inverso. ! 11.
FanTastic-Vent-IO-16s.book Seite 68 Freitag, 5. Mai 2017 11:41 11 Garantía legal 12 FanTastic Vent Garantía legal Rige el plazo de garantía legal. Si el producto presenta algún defecto, diríjase a nuestro socio de servicio en su país (ver direcciones en el dorso de este manual). Nuestros especialistas estarán encantados de poder ayudarle y de poder orientarle en los siguientes pasos a dar respecto a la garantía.
FanTastic-Vent-IO-16s.book Seite 69 Freitag, 5. Mai 2017 11:41 11 FanTastic Vent Por favor, leia atentamente este manual antes da montagem e colocação em funcionamento do aparelho e guarde-o em local seguro. Em caso de transmissão do produto, entregue o manual ao novo utilizador. Índice 1 Explicação dos símbolos . . . . . . . . . . . . . . . . . . . . . . . . . . . . . . . . . . . . . . . 70 2 Indicações de segurança e de montagem . . . . . . . . . . . . . . . . . . . . . . . . .
FanTastic-Vent-IO-16s.book Seite 70 Freitag, 5. Mai 2017 11:41 11 Explicação dos símbolos 1 ! ! A 2 FanTastic Vent Explicação dos símbolos AVISO! Indicação de segurança: o incumprimento pode provocar a morte ou ferimentos graves. PRECAUÇÃO! Indicação de segurança: o incumprimento pode provocar ferimentos. NOTA! O incumprimento pode causar danos materiais e pode prejudicar o funcionamento do produto.
FanTastic-Vent-IO-16s.book Seite 71 Freitag, 5. Mai 2017 11:41 11 FanTastic Vent Material fornecido • Não abandone o veículo com a claraboia aberta. • Mantenha a claraboia isenta de neve e de gelo. • Feche a cobertura da claraboia, antes de mover o veículo. • Com a cobertura fechada, o fabricante recomenda expressamente não exceder uma velocidade máxima de viagem de 150 km/h.
FanTastic-Vent-IO-16s.book Seite 72 Freitag, 5. Mai 2017 11:41 11 Descrição técnica 5 Descrição técnica 5.1 Componentes N.º na fig. 1, página 3 Descrição 1 Cobertura 2 Anel gradeado superior 3 Pás do ventilador 4 Parafuso da pá do ventilador 5 Base do ventilador 6 Conjunto de grelhas 7 Conjunto do motor de guincho 8 Anel gradeado inferior 6 FanTastic Vent Indicações antes da montagem ➤ Antes da montagem, verifique a espessura do tejadilho do seu veículo.
FanTastic-Vent-IO-16s.book Seite 73 Freitag, 5. Mai 2017 11:41 11 FanTastic Vent 6.1 Montar o aparelho Preparar a abertura do tejadilho Ver fig. 2, página 4 6.2 Utilizar as guias de reforço Proceda do seguinte modo (fig. 3, página 4): ➤ Antes da montagem, esclareça se o recorte no tejadilho necessita de ser reforçado. ➤ Retire a espuma ao longo de toda a largura das guias de reforço (não incluídas no volume de fornecimento) (A). ➤ Adapte as guias de reforço (B).
FanTastic-Vent-IO-16s.book Seite 74 Freitag, 5. Mai 2017 11:41 11 Utilização do aparelho (7350, 7300) FanTastic Vent ➤ Vede a claraboia (fig. a, página 8). ➤ Vede as cabeças dos parafusos (fig. a, página 8). ➤ Se a espessura do tejadilho for inferior a 25 mm, utilize o espaçador (acessórios). ➤ Monte a armação interior (fig. b, página 8). ➤ Depois da montagem, verifique de novo o funcionamento do ventilador. ➤ Mande registar na documentação do veículo a nova altura e o novo peso do mesmo, se necessário.
FanTastic-Vent-IO-16s.book Seite 75 Freitag, 5. Mai 2017 11:41 11 FanTastic Vent Utilização do aparelho (7350, 7300) N.º na fig. d, página 10 Descrição 6 premir por breves instantes: Abrir/fechar cobertura Premir durante 3 segundos: Ligar/desligar o sensor de chuva 7 Configurar a velocidade do ventilador 8 LED “Manual” O controlo do ventilador confirma as entradas de comando de um controlo remoto com um sinal sonoro. Se não se ouvir um sinal sonoro único, o comando não foi recebido.
FanTastic-Vent-IO-16s.book Seite 76 Freitag, 5. Mai 2017 11:41 11 Utilização do aparelho (7350, 7300) 8.3 FanTastic Vent Ligar e desligar o ventilador O ventilador está equipado com um interruptor de segurança. Pode ligar o ventilador apenas se a cobertura estiver aberta. ➤ Abra uma janela do lado sombreado da autocaravana. ➤ Prima o botão . ✓ O ventilador inicia no modo automático. ➤ Prima o botão . ✓ O ventilador é desativado. ✓ A cobertura fecha-se. 8.
FanTastic-Vent-IO-16s.book Seite 77 Freitag, 5. Mai 2017 11:41 11 FanTastic Vent 8.6 Utilização do aparelho (3300, 3350) Comutar a entrada de ar/saída de ar ➤ Prima o botão . ✓ O ventilador comuta de entrada de ar para saída de ar e vice-versa. 8.7 Ligar e desligar o sensor de chuva ➤ Prima o botão durante 3 segundos. ✓ O sensor de chuva é desativado. ✓ O LED “Rain Sensor Off” acende. ➤ Prima o botão durante 3 segundos. ✓ O sensor de chuva é ligado. ✓ O LED “Rain Sensor Off” apaga. 8.
FanTastic-Vent-IO-16s.book Seite 78 Freitag, 5. Mai 2017 11:41 11 Utilização do aparelho (3300, 3350) FanTastic Vent • Interruptor basculante para abrir/fechar a cobertura (UP/DOWN) • Botão de ligar/desligar (apenas 3300) • Interruptor de inversão para a saída de ar/entrada de ar (apenas 3350) • Interruptor do termostato 9.2 Abrir e fechar a cobertura ➤ Prima UP. ✓ A cobertura abre-se. ➤ Prima DOWN. ✓ A cobertura fecha-se. 9.
FanTastic-Vent-IO-16s.book Seite 79 Freitag, 5. Mai 2017 11:41 11 FanTastic Vent Utilização do aparelho (2250) Pré-requisitos: • A cobertura está, pelo menos, 5 cm (2 polegadas) aberta • O interruptor de inversão encontra-se em OUT (saída de ar) ou IN (entrada de ar) (3350) • O botão de ligar/desligar encontra-se em ON (3300) 9.6 Sensor de chuva Quando o sensor de chuva entra em contacto com a humidade, a cobertura fechase e o motor da ventoinha é desligado.
FanTastic-Vent-IO-16s.book Seite 80 Freitag, 5. Mai 2017 11:41 11 Conservar e limpar o aparelho 11 Conservar e limpar o aparelho 11.1 Substituir o fusível FanTastic Vent ➤ Rode a tampa preta um quarto de rotação contra o sentido dos ponteiros do relógio. ➤ Puxe a tampa cuidadosamente para baixo. Na parte traseira da tampa encontrase o fusível. ➤ Verifique se o fio dentro do vidro está defeituoso. ➤ Se necessário, retire o fusível da tampa. ➤ Insira um novo fusível do mesmo tipo (4 A Fusível lento).
FanTastic-Vent-IO-16s.book Seite 81 Freitag, 5. Mai 2017 11:41 11 FanTastic Vent Conservar e limpar o aparelho ➤ Assim que o anel gradeado e a pá do ventilador estiverem limpos e secos, pode aplicar um meio de proteção à base de água e polir o anel gradeado e a pá do ventilador até adquirirem brilho. Isto reduz a acumulação de poeira e sujidade e facilita a limpeza. ➤ Volte a montar o ventilador, seguindo os passos na ordem inversa. ! 11.
FanTastic-Vent-IO-16s.book Seite 82 Freitag, 5. Mai 2017 11:41 11 Garantia 12 FanTastic Vent Garantia É válido o prazo de garantia legal. Se o produto estiver com defeito, por favor, dirija-se à assistência técnica do seu país (endereços, ver verso do manual). Os nossos técnicos têm todo o gosto em ajudá-lo e aconselhá-lo durante o processo dos direitos de garantia. 13 Eliminação ➤ Sempre que possível, coloque o material de embalagem no respectivo contentor de reciclagem.
FanTastic-Vent-IO-16s.book Seite 83 Freitag, 5. Mai 2017 11:41 11 FanTastic Vent Prima di effettuare il montaggio e la messa in funzione leggere accuratamente questo manuale di istruzioni, conservarlo e in caso di trasmissione del prodotto, consegnarlo all'utente successivo. Indice 1 Spiegazione dei simboli . . . . . . . . . . . . . . . . . . . . . . . . . . . . . . . . . . . . . . . . 84 2 Indicazioni di sicurezza e di montaggio. . . . . . . . . . . . . . . . . . . . . . . . . . . . 84 3 Dotazione .
FanTastic-Vent-IO-16s.book Seite 84 Freitag, 5. Mai 2017 11:41 11 Spiegazione dei simboli 1 ! ! A 2 FanTastic Vent Spiegazione dei simboli AVVERTENZA! Avviso di sicurezza: la mancata osservanza di questo avviso può causare ferite gravi anche mortali. ATTENZIONE! Avviso di sicurezza: la mancata osservanza di questo avviso può essere causa di lesioni. AVVISO! La mancata osservanza di questa nota può causare danni materiali e compromettere il funzionamento del prodotto.
FanTastic-Vent-IO-16s.book Seite 85 Freitag, 5. Mai 2017 11:41 11 FanTastic Vent Dotazione • Chiudere la copertura protettiva dell’oblò da tetto prima di mettere in movimento il veicolo. • Quando la copertura protettiva è chiusa, il produttore raccomanda esplicitamente di non superare la velocità di marcia massima di 150 km/h. 3 Dotazione Quantità 4 Denominazione 1 Oblò da tetto con ventola 1 Guarnizione (solo con ventola da 350 x 350 mm) 1 Telaio interno 6 Viti di fissaggio (3/4" (19.
FanTastic-Vent-IO-16s.book Seite 86 Freitag, 5. Mai 2017 11:41 11 Descrizione tecnica 5 Descrizione tecnica 5.1 Componenti N. in fig. 1, pagina 3 6 FanTastic Vent Descrizione 1 Copertura protettiva 2 Anello griglia superiore 3 Pala della ventola 4 Vite della pala della ventola 5 Base della ventola 6 Gruppo griglia 7 Gruppo motore di sollevamento 8 Anello griglia inferiore Indicazioni prima del montaggio ➤ Prima del montaggio controllare lo spessore del tetto del proprio veicolo.
FanTastic-Vent-IO-16s.book Seite 87 Freitag, 5. Mai 2017 11:41 11 FanTastic Vent 6.1 Montaggio dell’apparecchio Rifinitura dell’apertura Vedi fig. 2, pagina 4 6.2 Impiego di listelli di rinforzo Procedere come segue (fig. 3, pagina 4): ➤ Prima dell’installazione stabilire se l’apertura sul tetto deve essere rinforzata. ➤ Rimuovere lo strato di schiuma in base alla larghezza dei listelli di rinforzo (non in dotazione) (A). ➤ Adattare i listelli di rinforzo (B).
FanTastic-Vent-IO-16s.book Seite 88 Freitag, 5. Mai 2017 11:41 11 Impiego dell’apparecchio (7350, 7300) FanTastic Vent ➤ Sigillare le teste delle viti (fig. a, pagina 8). ➤ Se lo spessore del tetto è inferiore a 25 mm utilizzare dei distanziatori (accessorio). ➤ Installare il telaio interno (fig. b, pagina 8). ➤ Dopo il montaggio, controllare nuovamente il funzionamento della ventola. ➤ Se necessario far registrare l’altezza e il peso modificati del veicolo nella carta di circolazione. 7.
FanTastic-Vent-IO-16s.book Seite 89 Freitag, 5. Mai 2017 11:41 11 FanTastic Vent Impiego dell’apparecchio (7350, 7300) Il comando della ventola conferma le immissioni di istruzione del comando a distanza con un segnale acustico. Se non viene emesso nessun singolo segnale acustico il comando non è stato ricevuto. Un segnale acustico doppio indica che il comando non è consentito.
FanTastic-Vent-IO-16s.book Seite 90 Freitag, 5. Mai 2017 11:41 11 Impiego dell’apparecchio (7350, 7300) FanTastic Vent ➤ Per passare alla modalità automatica premere il tasto o (Temp). ✓ Si accende il LED “Auto”. ➤ Per aumentare la temperatura desiderata premere il tasto ➤ Per ridurre la temperatura desiderata premere il tasto 8.5 . . Regolazione della velocità della ventola La ventola può essere azionata con 13 livelli di velocità.
FanTastic-Vent-IO-16s.book Seite 91 Freitag, 5. Mai 2017 11:41 11 FanTastic Vent 8.8 Impiego dell’apparecchio (3300, 3350) Sostituzione delle batterie Il comando a distanza è azionato con batterie AA (fornite in dotazione). Per sostituire le batterie (fig. e, pagina 11), procedere come segue: ➤ Aprire il coperchio del vano batterie sul lato posteriore del comando a distanza. ➤ Sostituire le batterie vecchie con due nuove batterie AA.
FanTastic-Vent-IO-16s.book Seite 92 Freitag, 5. Mai 2017 11:41 11 Impiego dell’apparecchio (3300, 3350) 9.3 FanTastic Vent Accensione e spegnimento della ventola ➤ Aprire una finestra sul lato in ombra del caravan. ➤ Impostare la velocità desiderata sulla ventola. ➤ Premere su UP. ➤ Posizionare eventualmente la ventola su aria di alimentazione (IN) o aria di scarico (OUT). ➤ Posizionare eventualmente l’interruttore On/Off su ON. 9.
FanTastic-Vent-IO-16s.book Seite 93 Freitag, 5. Mai 2017 11:41 11 FanTastic Vent 9.6 Impiego dell’apparecchio (2250) Sensore pioggia Se il sensore pioggia viene in contatto con l’umidità, la copertura protettiva si chiude e il motore della ventola viene spento. ➤ Per riaprire la copertura protettiva premere su UP. ✓ La ventola riprende a funzionare con le impostazioni precedenti. ✓ Il sensore pioggia si riattiva solo quando è asciutto. 10 Impiego dell’apparecchio (2250) 10.
FanTastic-Vent-IO-16s.book Seite 94 Freitag, 5. Mai 2017 11:41 11 Cura e pulizia dell’apparecchio FanTastic Vent ➤ Inserire un nuovo fusibile dello stesso tipo (valvola a fusibile da 4 A). ➤ Serrare di nuovo il coperchio. 11.2 Pulizia della pala della ventola Procedere come segue (fig. f, pagina 11, fig. g, pagina 12): ➤ Aprire completamente la copertura protettiva. ➤ Rimuovere il fusibile. ➤ Rimuovere l’anello della griglia afferrando la linguetta con una mano e tirandola esattamente verso il basso.
FanTastic-Vent-IO-16s.book Seite 95 Freitag, 5. Mai 2017 11:41 11 FanTastic Vent 11.3 Cura e pulizia dell’apparecchio Svitamento della copertura protettiva aderente In caso di temperature elevate può verificarsi che la guarnizione si secchi e la copertura protettiva vi rimanga incollata. ➤ Aprire completamente la copertura protettiva. ➤ Se la guarnizione è danneggiata, sostituirla. ➤ Pulire il lato inferiore della copertura protettiva e la guarnizione con alcool denaturato o benzina per smacchiare.
FanTastic-Vent-IO-16s.book Seite 96 Freitag, 5. Mai 2017 11:41 11 Garanzia 12 FanTastic Vent Garanzia Vale il termine di garanzia previsto dalla legge. Qualora il prodotto risultasse difettoso, La preghiamo di contattare il Service Partner del Suo Paese (l'indirizzo si trova sul retro del manuale). I nostri specialisti sono sempre pronti ad aiutarvi e a concordare con Voi l'ulteriore disbrigo delle condizioni garanzia.
FanTastic-Vent-IO-16s.book Seite 97 Freitag, 5. Mai 2017 11:41 11 FanTastic Vent Lees deze handleiding voor de montage en de ingebruikname zorgvuldig door en bewaar hem. Geef de handleiding bij het doorgeven van het product aan de gebruiker. Inhoudsopgave 1 Verklaring van de symbolen . . . . . . . . . . . . . . . . . . . . . . . . . . . . . . . . . . . . . 98 2 Veiligheids- en inbouwinstructies . . . . . . . . . . . . . . . . . . . . . . . . . . . . . . . . 98 3 Omvang van de levering . . . . . . . .
FanTastic-Vent-IO-16s.book Seite 98 Freitag, 5. Mai 2017 11:41 11 Verklaring van de symbolen 1 ! ! A 2 FanTastic Vent Verklaring van de symbolen WAARSCHUWING! Veiligheidsaanwijzing: Het niet naleven kan leiden tot overlijden of ernstig letsel. VOORZICHTIG! Veiligheidsaanwijzing: Het niet naleven kan leiden tot letsel. LET OP! Het niet naleven ervan kan leiden tot materiële schade en de werking van het product beperken.
FanTastic-Vent-IO-16s.book Seite 99 Freitag, 5. Mai 2017 11:41 11 FanTastic Vent Omvang van de levering • Sluit de dekselkap van het dakvenster voordat het voertuig wordt bewogen. • Bij gesloten dekselkap adviseert de fabrikant uitdrukkelijk een maximale rijsnelheid van 150 km/h niet te overschrijden. 3 Omvang van de levering Aantal 4 Omschrijving 1 Dakvenster met ventilator 1 Afdichting (alleen bij 350 x 350 mm ventilator) 1 Binnenframe 6 Bevestigingsschroeven (3/4" (19.
FanTastic-Vent-IO-16s.book Seite 100 Freitag, 5. Mai 2017 11:41 11 Technische beschrijving 5 Technische beschrijving 5.1 Bestanddelen Nr. in afb. 1, pagina 3 6 FanTastic Vent Beschrijving 1 Dekselkap 2 Bovenste roosterring 3 Ventilatorbladen 4 Ventilatorbladschroef 5 Ventilatorsokkel 6 Roostermodule 7 Motormodule 8 Onderste roosterring Aanwijzingen voor de inbouw ➤ Controleer voor de montage de dakdikte van uw voertuig. Neem bij vragen contact op met de fabrikant van het voertuig.
FanTastic-Vent-IO-16s.book Seite 101 Freitag, 5. Mai 2017 11:41 11 FanTastic Vent 6.1 Toestel monteren Uitsparing bewerken Zie afb. 2, pagina 4 6.2 Verstevigingslijsten gebruiken Ga als volgt te werk (afb. 3, pagina 4): ➤ Bepaal voor de montage of de dakopening verstevigd moet worden. ➤ Verwijder de schuimvulling in overeenstemming met de breedte van de verstevigingslijsten (niet bij de levering inbegrepen) (A). ➤ Pas de verstevigingslijsten erin (B).
FanTastic-Vent-IO-16s.book Seite 102 Freitag, 5. Mai 2017 11:41 11 Toestel gebruiken (7350, 7300) FanTastic Vent ➤ Als het dak dunner is dan 25 mm, gebruik dan afstandhouders (toebehoren). ➤ Installeer het binnenframe (afb. b, pagina 8). ➤ Controleer na de montage de werking van de ventilator. ➤ Laat de gewijzigde voertuighoogte en het gewijzigde gewicht in de voertuigpapieren opnemen, indien nodig. 7.
FanTastic-Vent-IO-16s.book Seite 103 Freitag, 5. Mai 2017 11:41 11 FanTastic Vent Toestel gebruiken (7350, 7300) Een dubbele pieptoon geeft aan dat een bevel niet is toegestaan. De afstandsbediening gaat 30 seconden na het laatste ingevoerde bevel in de stand-bymodus om de accu te besparen. Om de afstandsbediening te activeren op een willekeurige toets van de afstandsbediening drukken. De laatste temperatuur- of toerentalinstelling voor de stand-by wordt weergegeven.
FanTastic-Vent-IO-16s.book Seite 104 Freitag, 5. Mai 2017 11:41 11 Toestel gebruiken (7350, 7300) ➤ Druk op de toets om de gewenste temperatuur te verhogen. ➤ Druk op de toets om de gewenste temperatuur te verlagen. 8.5 FanTastic Vent Ventilatorsnelheid instellen De ventilator kan met 13 snelheden worden gebruikt. De ventilatorsnelheid wordt door een brandende led op de afstandsbediening van 10 % (lage snelheid) tot 100 % (hoge snelheid) weergegeven.
FanTastic-Vent-IO-16s.book Seite 105 Freitag, 5. Mai 2017 11:41 11 FanTastic Vent 8.8 Toestel gebruiken (3300, 3350) Batterijen vervangen De afstandsbediening werkt op twee AA-batterijen (meegeleverd). Ga als volgt te werk om de batterijen te wisselen (afb. e, pagina 11): ➤ Open de batterijafdekking aan de achterzijde van de afstandsbediening. ➤ Vervang de oude batterijen door twee nieuwe AA-batterijen.
FanTastic-Vent-IO-16s.book Seite 106 Freitag, 5. Mai 2017 11:41 11 Toestel gebruiken (3300, 3350) 9.3 FanTastic Vent Ventilator in-/uitschakelen ➤ Open een raam aan de schaduwzijde van de caravan. ➤ Stel de gewenste snelheid van de ventilator in. ➤ Druk op UP. ➤ Stel de ventilator eventueel in op luchttoevoer (IN) of luchtafvoer (OUT). ➤ Zet de aan/uit-schakelaar eventueel op ON. 9.4 Luchttoevoer/-afvoer omschakelen (alleen 3350) ➤ Zet de omkeerschakelaar op OFF (middelste stand).
FanTastic-Vent-IO-16s.book Seite 107 Freitag, 5. Mai 2017 11:41 11 FanTastic Vent 10 Toestel gebruiken (2250) 10.1 Dekselkap openen en sluiten Toestel gebruiken (2250) ➤ Open de dekselkap ca. 10 cm of meer. ✓ De veiligheidsschakelaar in de ventilator start deze pas, zodra de dekselkap deels is geopend. ➤ Zet de draairegelaar op de gewenste stand. – 0: Uit – 1: Laag vermogen – 2: Gemiddeld vermogen – 3: Hoog vermogen ➤ Open een venster of een deur om ventilatie te waarborgen.
FanTastic-Vent-IO-16s.book Seite 108 Freitag, 5. Mai 2017 11:41 11 Apparaat verzorgen en reinigen 11.2 FanTastic Vent Ventilatorbladen reinigen Ga als volgt te werk (afb. f, pagina 11, afb. g, pagina 12): ➤ Open de dekselkap volledig. ➤ Verwijder de zekering. ➤ Verwijder de roosterring door de greep met een hand vast te pakken en recht naar beneden te trekken. Steun de roostermodule met de andere hand om te voorkomen dat de roosterring breekt.
FanTastic-Vent-IO-16s.book Seite 109 Freitag, 5. Mai 2017 11:41 11 FanTastic Vent 11.3 Apparaat verzorgen en reinigen Vastzittende dekselkap losmaken Bij hoge temperaturen kan het voorkomen, dat de afdichting uitdroogt en de kap eraan blijft vastkleven. ➤ Open de dekselkap volledig. ➤ Als de afdichting beschadigd is moet deze worden vervangen. ➤ Reinig de onderkant van de dekselklap en de afdichting met spiritus of benzine. ➤ Breng, indien voorhanden, een beschermingsmiddel op waterbasis aan (bijv.
FanTastic-Vent-IO-16s.book Seite 110 Freitag, 5. Mai 2017 11:41 11 Garantie 12 FanTastic Vent Garantie De wettelijke garantieperiode is van toepassing. Indien het product defect is, dient u contact op te nemen met een servicepartner in uw land (zie achterzijde van de gebruiksaanwijzing voor adressen). Onze specialisten helpen u graag verder en bespreken het verdere verloop van de garantie met u. 13 Afvoer ➤ Laat het verpakkingsmateriaal indien mogelijk recyclen.
FanTastic-Vent-IO-16s.book Seite 111 Freitag, 5. Mai 2017 11:41 11 FanTastic Vent Læs denne vejledning omhyggeligt igennem før installation og ibrugtagning, og opbevar den. Giv den til brugeren, hvis du giver produktet videre. Indholdfortegnelse 1 Forklaring af symbolerne . . . . . . . . . . . . . . . . . . . . . . . . . . . . . . . . . . . . . . . 112 2 Sikkerheds- og installationshenvisninger. . . . . . . . . . . . . . . . . . . . . . . . . . . 112 3 Leveringsomfang. . . . . . . . . . . . . . . . .
FanTastic-Vent-IO-16s.book Seite 112 Freitag, 5. Mai 2017 11:41 11 Forklaring af symbolerne 1 ! ! A 2 FanTastic Vent Forklaring af symbolerne ADVARSEL! Sikkerhedshenvisning: Manglende overholdelse kan medføre død eller alvorlig kvæstelse. FORSIGTIG! Sikkerhedshenvisning: Manglende overholdelse kan medføre kvæstelser. VIGTIGT! Manglende overholdelse kan medføre materielle skader og begrænse produktets funktion.
FanTastic-Vent-IO-16s.book Seite 113 Freitag, 5. Mai 2017 11:41 11 FanTastic Vent Leveringsomfang • Hold tagvinduet fri for sne og is. • Luk tagvinduets dæklåg, før du bevæger køretøjet. • Med lukket dæklåg anbefaler producenten udtrykkeligt ikke at overskride en maksimal kørehastighed på 150 km/h.
FanTastic-Vent-IO-16s.book Seite 114 Freitag, 5. Mai 2017 11:41 11 Teknisk beskrivelse 5 Teknisk beskrivelse 5.1 Bestanddele Nr. på fig. 1, side 3 6 FanTastic Vent Beskrivelse 1 Dæklåg 2 Øverste gitterring 3 Ventilatorvinge 4 Ventilatorvingeskrue 5 Ventilatorsokkel 6 Gittermodul 7 Løftemotormodul 8 Nederste gitterring Henvisninger før monteringen ➤ Kontrollér før monteringen køretøjets tagtykkelse. Kontakt køretøjsproducenten, hvis du har spørgsmål.
FanTastic-Vent-IO-16s.book Seite 115 Freitag, 5. Mai 2017 11:41 11 FanTastic Vent 6.1 Montering af apparat Udarbejdelse af udsnit Se fig. 2, side 4 6.2 Anvendelse af forstærkningslister Gå frem på følgende måde (fig. 3, side 4): ➤ Afklar før monteringen, om tagudsnittet skal forstærkes. ➤ Fjern skummet i overensstemmelse med forstærkningslisters bredde (ikke i leveringsomfanget) (A). ➤ Tilpas forstærkningslisterne (B).
FanTastic-Vent-IO-16s.book Seite 116 Freitag, 5. Mai 2017 11:41 11 Anvendelse af apparatet (7350, 7300) FanTastic Vent ➤ Anvend afstandsholdere (tilbehør), hvis taget er tyndere end 25 mm. ➤ Installér den indvendige ramme (fig. b, side 8). ➤ Kontrollér ventilatorens funktion igen efter monteringen. ➤ Få om nødvendigt køretøjets ændrede højde og den ændrede vægt registreret i indregistreringspapirerne. 7.
FanTastic-Vent-IO-16s.book Seite 117 Freitag, 5. Mai 2017 11:41 11 FanTastic Vent Anvendelse af apparatet (7350, 7300) En dobbelt pip-tone angiver, at en kommando ikke er tilladt. Fjernbetjeningen skifter 30 sekunder efter den sidste kommandoindtastning til standby-modusen for at skåne batteriet. Tryk på en vilkårlig tast på fjernbetjeningen for at aktivere fjernbetjeningen. Den sidste temperatur- eller hastighedsindstilling før standby vises.
FanTastic-Vent-IO-16s.book Seite 118 Freitag, 5. Mai 2017 11:41 11 Anvendelse af apparatet (7350, 7300) ➤ Tryk på tasten for at forøge den ønskede temperatur. ➤ Tryk på tasten for at reducere den ønskede temperatur. 8.5 FanTastic Vent Indstilling af ventilatorhastigheden Ventilatoren kan anvendes på 13 hastighedstrin. Ventilatorhastigheden vises fra 10 % (lav hastighed) til 100 % (høj hastighed) med en lysende lysdiode på fjernbetjeningen.
FanTastic-Vent-IO-16s.book Seite 119 Freitag, 5. Mai 2017 11:41 11 FanTastic Vent 8.8 Anvendelse af apparatet (3300, 3350) Udskiftning af batterier Fjernbetjeningen anvendes med to AA-batterier (indeholdt i leveringsomfanget). Gå frem på følgende måde for at udskifte batterierne (fig. e, side 11): ➤ Åbn batterirummets afdækning på bagsiden af fjernbetjeningen. ➤ Udskift de gamle batterier med to nye AA-batterier.
FanTastic-Vent-IO-16s.book Seite 120 Freitag, 5. Mai 2017 11:41 11 Anvendelse af apparatet (3300, 3350) 9.3 FanTastic Vent Til- og frakobling af ventilatoren ➤ Åbn et vinduet på campingvognens skyggeside. ➤ Indstil den ønskede hastighed på ventilatoren. ➤ Tryk på UP. ➤ Indstil evt. ventilatoren på tilført luft (IN) eller aftræksluft (OUT). ➤ Stil evt. tænd/sluk-kontakten på ON. 9.4 Omstilling tilført luft/aftræksluft (kun 3350) ➤ Stil reverseringskontakten på OFF (midterstilling).
FanTastic-Vent-IO-16s.book Seite 121 Freitag, 5. Mai 2017 11:41 11 FanTastic Vent Anvendelse af apparatet (2250) 10 Anvendelse af apparatet (2250) 10.1 Åbning og lukning af dæklåget ➤ Åbn dæklåget ca. 10 cm eller mere. ✓ Sikkerhedsafbryderen i ventilatoren starter den først, når dæklåget er delvist åbnet. ➤ Indstil drejereguleringen på det ønskede effekttrin. – 0: Fra – 1: Lavt effekttrin – 2: Middel effekttrin – 3: Højt effekttrin ➤ Åbn et vindue eller en dør for at sikre en udskiftning af luften.
FanTastic-Vent-IO-16s.book Seite 122 Freitag, 5. Mai 2017 11:41 11 Vedligeholdelse og rengøring af apparatet 11.2 FanTastic Vent Rengør ventilatorvingerne Gå frem på følgende måde (fig. f, side 11, fig. g, side 12): ➤ Åbn dæklåget fuldstændigt. ➤ Fjern sikringen. ➤ Fjern gitterringen ved at tage fat i lasken med en hånd og trække den lige ned. Understøt gittermodulet med den anden hånd for at beskytte gitterringen mod brud.
FanTastic-Vent-IO-16s.book Seite 123 Freitag, 5. Mai 2017 11:41 11 FanTastic Vent 11.3 Vedligeholdelse og rengøring af apparatet Løsgørelse af klæbende dæklåg Ved varme temperaturer kan det forekomme, at tætningen tørrer ud og dæklåget klæber på den. ➤ Åbn dæklåget fuldstændigt. ➤ Hvis tætningen er beskadiget, skal du udskifte tætningen. ➤ Rengør undersiden af dæklåget og tætningen med kogesprit eller rensebenzin. ➤ Påfør et vandbaseret beskyttelssmiddel, hvis det er til rådighed (f.eks.
FanTastic-Vent-IO-16s.book Seite 124 Freitag, 5. Mai 2017 11:41 11 Garanti 12 FanTastic Vent Garanti Den lovbestemte garantiperiode gælder. Hvis produktet er defekt, skal du kontakte en servicepartner i dit land (adresser, se vejledningens bagside). Vores specialister hjælper gerne videre og diskuterer garantiens videre forløb. 13 Bortskaffelse ➤ Bortskaf så vidt muligt emballagen sammen med det tilsvarende genbrugsaffald.
FanTastic-Vent-IO-16s.book Seite 125 Freitag, 5. Mai 2017 11:41 11 FanTastic Vent Läs igenom anvisningarna noga innan produkten monteras och används. Spara monterings- och bruksanvisningen för senare bruk. Överlämna bruksanvisningen till den nya ägaren vid ev. vidareförsäljning. Innehållsförteckning 1 Förklaring av symboler . . . . . . . . . . . . . . . . . . . . . . . . . . . . . . . . . . . . . . . . .126 2 Säkerhets- och monteringsanvisningar . . . . . . . . . . . . . . . . . . . . . . . . . . . .
FanTastic-Vent-IO-16s.book Seite 126 Freitag, 5. Mai 2017 11:41 11 Förklaring av symboler 1 ! ! A 2 FanTastic Vent Förklaring av symboler VARNING! Observera: Beaktas anvisningen ej kan det leda till dödsfara eller svåra skador. AKTA! Observera: Beaktas anvisningen ej kan det leda till kroppsskador. OBSERVERA! Om anvisningarna inte beaktas kan det leda till materialskador och produktens funktion kan påverkas negativt.
FanTastic-Vent-IO-16s.book Seite 127 Freitag, 5. Mai 2017 11:41 11 FanTastic Vent Leveransomfattning • Stäng huven till takfönstret innan du kör iväg med fordonet. • Med stängd huv rekommenderar tillverkaren uttryckligen att fordonet inte körs fortare än 150 km/h. 3 Leveransomfattning Mängd 4 Beteckning 1 Takfönster med fläkt 1 Tätning (endast vid 350 x 350 mm fläkt) 1 Innerram 6 Fästskruvar (3/4" (19.05 mm)) för den inre ramen 8 Fästskruvar (1" (25.
FanTastic-Vent-IO-16s.book Seite 128 Freitag, 5. Mai 2017 11:41 11 Teknisk beskrivning 5 Teknisk beskrivning 5.1 Delar Nr på bild 1, sida 3 6 FanTastic Vent Beskrivning 1 Huv 2 Övre gallerring 3 Fläktblad 4 Fläktbladsskruv 5 Fläktsockel 6 Gallerenhet 7 Lyftmotorenhet 8 Nedre gallerring Före monteringen ➤ Kontrollera taktjockleken på fordonet före monteringen. Kontakta fordonstillverkaren om du har frågor.
FanTastic-Vent-IO-16s.book Seite 129 Freitag, 5. Mai 2017 11:41 11 FanTastic Vent 6.1 Montera apparaten Urskärningen Se bild 2, sida 4 6.2 Använda förstärkningslister Gör enligt på följande sätt (bild 3, sida 4): ➤ Kontrollera om taköppningen måste förstärkas före monteringen. ➤ Ta bort en del av skumfyllningen så att det motsvarar förstärkningslisternas bredd (ingår ej i leveransen) (A). ➤ Justera in förstärkningslisterna (B).
FanTastic-Vent-IO-16s.book Seite 130 Freitag, 5. Mai 2017 11:41 11 Använda apparaten (7350, 7300) FanTastic Vent ➤ Om taket är tunnare än 25 mm ska distanser användas (tillbehör). ➤ Installera innerramen (bild b, sida 8). ➤ Kontrollera fläktens funktion efter monteringen. ➤ Om så krävs, skriv in den ändrade fordonshöjden och den ändrade vikten i fordonshandlingarna. 7.
FanTastic-Vent-IO-16s.book Seite 131 Freitag, 5. Mai 2017 11:41 11 FanTastic Vent Använda apparaten (7350, 7300) Fjärrkontrollen övergår 30 sekunder efter den senaste knapptryckningen till standbyläge för att spara batteriet. Tryck på valfri knapp på fjärrkontrollen för att aktivera den igen. Då visas den senaste inställningen av temperatur eller varvtal innan standbyläget aktiverades. Om fjärrkontrollen stängs av manuellt med knappen , återställs alla inställningar. 8.
FanTastic-Vent-IO-16s.book Seite 132 Freitag, 5. Mai 2017 11:41 11 Använda apparaten (7350, 7300) 8.5 FanTastic Vent Ställa in fläkthastighet Fläkten kan köras på 13 olika hastighetssteg. Fläkthastigheten visas med en lysande lysdiod på fjärrkontrollen, från 10 % (låg hastighet) till 100 % (hög hastighet). En lysdiod lyser bredvid fläkthastighetens procentvärde. Om två lysdioder lyser ligger fläkthastigheten mitt emellan de belysta procentvärdena.
FanTastic-Vent-IO-16s.book Seite 133 Freitag, 5. Mai 2017 11:41 11 FanTastic Vent 8.8 Använda apparaten (3300, 3350) Byta batterier Fjärrkontrollen drivs med två AA-batterier (ingår i leveransen). Gör på följande sätt för att byta batterier (bild e, sida 11): ➤ Öppna batterilocket på baksidan av fjärrkontrollen. ➤ Byt ut de gamla batterierna mot två nya AA-batterier. Kontrollera att batteriernas plus- och minuspoler stämmer överens med plus- och minusmarkeringarna i batterifacket.
FanTastic-Vent-IO-16s.book Seite 134 Freitag, 5. Mai 2017 11:41 11 Använda apparaten (3300, 3350) 9.3 FanTastic Vent Slå på och stänga av fläkten ➤ Öppna ett fönster på husvagnens skuggsida. ➤ Ställ in önskad hastighet på fläkten. ➤ Tryck på UP. ➤ Ställ ev. fläkten på tilluft (IN) eller frånluft (OUT). ➤ Ställ ev. strömbrytaren på ON. 9.4 Växla mellan tilluft/frånluft (endast 3350) ➤ Ställ reverseringsbrytaren på OFF (mellanläget). ➤ Vänta tills fläktbladet har stannat helt.
FanTastic-Vent-IO-16s.book Seite 135 Freitag, 5. Mai 2017 11:41 11 FanTastic Vent Använda apparaten (2250) 10 Använda apparaten (2250) 10.1 Öppna och stänga huven ➤ Öppna huven ca 10 cm eller mer. ✓ Säkerhetsbrytaren i fläkten startar inte fläkten förrän huven är delvis öppen. ➤ Ställ vridreglaget på önskat effektläge. – 0: Av – 1: Låg effekt – 2: Medelhög effekt – 3: Hög effekt ➤ Öppna ett fönster eller en dörr för att se till att luften byts ut.
FanTastic-Vent-IO-16s.book Seite 136 Freitag, 5. Mai 2017 11:41 11 Skötsel och rengöring 11.2 FanTastic Vent Rengöra fläktbladet Tillvägagångssätt (bild f, sida 11, bild g, sida 12): ➤ Öppna huven helt. ➤ Ta bort säkringen. ➤ Ta bort gallerringen genom att ta tag i tungan med en hand och dra den rakt nedåt. Stöd med den andra handen gallerenheten så att inte gallerringen går sönder. De första gångerna kan det vara svårt att få bort gallerringen, men det går lättare efter ett par demonteringar.
FanTastic-Vent-IO-16s.book Seite 137 Freitag, 5. Mai 2017 11:41 11 FanTastic Vent 11.3 Skötsel och rengöring Lossa fastsittande huv När det är varmt kan det hända att tätningen torkar och huven klibbar fast i denna. ➤ Öppna huven helt. ➤ Byt tätningen om den är skadad. ➤ Rengör huvens undersida och tätningen med T-sprit eller lacknafta. ➤ Stryk i förekommande fall på ett vattenbaserat skyddsmedel (t.ex. 303 Protectant). ➤ Låt skyddsmedlet torka. ➤ Polera huven med en mjuk trasa.
FanTastic-Vent-IO-16s.book Seite 138 Freitag, 5. Mai 2017 11:41 11 Garanti 12 FanTastic Vent Garanti Den lagstadgade garantitiden gäller. Om produkten är defekt: kontakta en servicepartner i ditt land (adresser, se bruksanvisningens baksida). Våra specialister står gärna till förfogande och förklarar hur garantiärenden behandlas. 13 Avfallshantering ➤ Lämna om möjligt förpackningsmaterialet till återvinning.
FanTastic-Vent-IO-16s.book Seite 139 Freitag, 5. Mai 2017 11:41 11 FanTastic Vent Les bruksanvisningen nøye før du monterer og tar apparatet i bruk, og ta vare på den. Hvis produktet selges videre, må du sørge for å gi bruksanvisningen videre også. Innholdsfortegnelse 1 Symbolforklaring. . . . . . . . . . . . . . . . . . . . . . . . . . . . . . . . . . . . . . . . . . . . . .140 2 Råd om sikkerhet og montering . . . . . . . . . . . . . . . . . . . . . . . . . . . . . . . . . .140 3 Leveringsomfang. .
FanTastic-Vent-IO-16s.book Seite 140 Freitag, 5. Mai 2017 11:41 11 Symbolforklaring 1 ! ! A 2 FanTastic Vent Symbolforklaring ADVARSEL! Sikkerhetsregel: Hvis man ikke overholder denne regelen, kan det føre til død eller alvorlig skade. FORSIKTIG! Sikkerhetsregel: Hvis man ikke overholder denne regelen, kan det føre til personskader. PASS PÅ! Hvis man ikke overholder denne regelen, kan det føre til materielle skader og skade funksjonen til produktet.
FanTastic-Vent-IO-16s.book Seite 141 Freitag, 5. Mai 2017 11:41 11 FanTastic Vent Leveringsomfang • Lukk takluken på takvinduet før du setter kjøretøyet i bevegelse. • Ved lukket takluke anbefaler produsenten uttrykkelig å ikke overskride en maksimal hastighet på 150 km/t.
FanTastic-Vent-IO-16s.book Seite 142 Freitag, 5. Mai 2017 11:41 11 Teknisk beskrivelse 5 Teknisk beskrivelse 5.1 Bestanddeler Nr. i fig. 1, side 3 6 FanTastic Vent Beskrivelse 1 Takluke 2 Øvre gitterring 3 Vifteblad 4 Viftebladskrue 5 Viftesokkel 6 Gitter (komponentgruppe) 7 Løftemotor (komponentgruppe) 8 Nedre gitterring Råd før montering ➤ Kontroller kjøretøyets taktykkelse før monteringen. Kontakt kjøretøyprodusenten hvis du har spørsmål.
FanTastic-Vent-IO-16s.book Seite 143 Freitag, 5. Mai 2017 11:41 11 FanTastic Vent 6.1 Montere apparatet Ta på hull Se fig. 2, side 4 6.2 Bruke forsterkingslister Gå fram på følgende måte (fig. 3, side 4): ➤ Før innmonteringen må du avklare om takutsparingen må forsterkes. ➤ Fjern skummingen avhengig av bredden på forsterkingslistene (ikke inkludert) (A). ➤ Tilpass forsterkingslistene (B).
FanTastic-Vent-IO-16s.book Seite 144 Freitag, 5. Mai 2017 11:41 11 Bruk apparatet (7350, 7300) FanTastic Vent ➤ Installer den innvendige rammen (fig. b, side 8). ➤ Etter monteringen må du på nytt kontrollere at viften fungerer. ➤ Sørg for at den endrede kjøretøyhøyden og den endrede vekten blir ført inn i vognkortet hvis det er nødvendig. 7.1 Monter fjernstyringens holder (7350, 7300) ➤ Fest fjernstyringens holder med to skruer til veggen (fig. c, side 9). 8 Bruk apparatet (7350, 7300) 8.
FanTastic-Vent-IO-16s.book Seite 145 Freitag, 5. Mai 2017 11:41 11 FanTastic Vent Bruk apparatet (7350, 7300) Fjernstyringen går over i standby-modus 30 sekunder etter siste innlegging av en kommando for å spare batteriet. For å aktivere fjernstyringen trykker du på en hvilken som helst tast på fjernstyringen. Den siste temperatur- eller turtallinnstillingen før standby blir vist. Hvis fjernstyringen blir slått manuelt av med tasten blir alle innstillingene nullstilt. 8.
FanTastic-Vent-IO-16s.book Seite 146 Freitag, 5. Mai 2017 11:41 11 Bruk apparatet (7350, 7300) 8.5 FanTastic Vent Stille inn viftehastighet Viften kan drives på 13 hastighetstrinn. Viftehastigheten vises med en lysende LED fra 10 % (lav hastighet) til 100 % (høy hastighet) på fjernkontrollen. En LED lyser ved siden av prosentverdien til viftehastigheten. Hvis to LED-er lyser ligger viftehastigheten midt mellom de to opplyste gradverdiene.
FanTastic-Vent-IO-16s.book Seite 147 Freitag, 5. Mai 2017 11:41 11 FanTastic Vent 8.8 Bruke apparatet (3300, 3350) Bytte batteri Fjernkontrollen drives med to AA-batterier (en del av leveringsomfanget). Gå fram på følgende måte for å skifte batterier (fig. e, side 11): ➤ Åpne lokket til batterirommet på baksiden av fjernkontrollen. ➤ Bytt ut de gamle batteriene med to nye AA-batterier. Pass på at pluss- og minuspolen på batteriene stemmer overens med pluss- og minus-markeringene i batterirommet.
FanTastic-Vent-IO-16s.book Seite 148 Freitag, 5. Mai 2017 11:41 11 Bruke apparatet (3300, 3350) 9.3 FanTastic Vent Slå viften av og på ➤ Åpne et vindu på skyggesiden av bobilen. ➤ Still inn den ønskede hastigheten på viften. ➤ Trykk på UP. ➤ Still ev. viften på tilførselsluft (IN) eller avtrekksluft (OUT). ➤ Still ev. på-/av-bryteren på ON. 9.4 Veksle mellom avtrekksluft/tilførselsluft (kun 3350) ➤ Still reverseringsbryteren på OFF (midtstilling). ➤ Vent til viftebladet har stanset helt.
FanTastic-Vent-IO-16s.book Seite 149 Freitag, 5. Mai 2017 11:41 11 FanTastic Vent 10 Bruke apparatet (2250) 10.1 Åpne og lukke takluken Bruke apparatet (2250) ➤ Åpne takluken ca. 10 cm eller mer. ✓ Sikkerhetsbryteren i viften starter den først når takluken er delvis åpnet. ➤ Still inn regulatoren til ønsket effekttrinn. – 0: Av – 1: Lavt effekttrinn – 2: Middels effekttrinn – 3: Høyt effekttrinn ➤ Åpne et vindu eller en dør for å sikre at luften skiftes ut.
FanTastic-Vent-IO-16s.book Seite 150 Freitag, 5. Mai 2017 11:41 11 Stell og rengjøring av apparatet 11.2 FanTastic Vent Rengjøre vifteblad Gå fram på følgende måte (fig. f, side 11, fig. g, side 12): ➤ Åpne takluken helt. ➤ Fjern sikringen. ➤ Ta av gitterringen ved å gripe fatt i fliken med en hånd og trekke den rett nedover. Støtt gitterkomponentgruppen med den andre hånden for å beskytte gitterringen mot brudd.
FanTastic-Vent-IO-16s.book Seite 151 Freitag, 5. Mai 2017 11:41 11 FanTastic Vent 11.3 Stell og rengjøring av apparatet Løsne festende takluke Ved varme temperaturer kan det forekomme at tetningen tørker ut og takluken dermed blir klistret fast. ➤ Åpne takluken helt. ➤ Hvis tetningen er skadet må du erstatte tetningen. ➤ Rengjør undersiden av takluken og tetningen med teknisk sprit eller rensebensin. ➤ Hvis tilgjengelig påfører du et vannbasert beskyttelsesmiddel (f.eks. 303 Protectant).
FanTastic-Vent-IO-16s.book Seite 152 Freitag, 5. Mai 2017 11:41 11 Garanti 12 FanTastic Vent Garanti Lovmessig garantitid gjelder. Hvis produktet skulle være defekt, sender du det til en servicepartner i ditt land (du finner adressene på baksiden av veiledningen). Våre spesialister hjelper deg gjerne, og avtaler garantiens videre forløp med deg. 13 Avfallsbehandling ➤ Lever emballasje til resirkulering så langt det er mulig.
FanTastic-Vent-IO-16s.book Seite 153 Freitag, 5. Mai 2017 11:41 11 FanTastic Vent Lue tämä ohje huolellisesti läpi ennen asennusta ja käyttöönottoa ja säilytä ohje hyvin. Jos myyt tuotteen eteenpäin, anna ohje tällöin edelleen uudelle käyttäjälle. Sisällysluettelo 1 Symbolien selitykset . . . . . . . . . . . . . . . . . . . . . . . . . . . . . . . . . . . . . . . . . . .154 2 Turvallisuus- ja kiinnitysohjeita . . . . . . . . . . . . . . . . . . . . . . . . . . . . . . . . . . .
FanTastic-Vent-IO-16s.book Seite 154 Freitag, 5. Mai 2017 11:41 11 Symbolien selitykset 1 ! ! A 2 FanTastic Vent Symbolien selitykset VAROITUS! Turvallisuusohje: Huomiotta jättäminen voi aiheuttaa hengenvaaran tai vakavan loukkaantumisen. HUOMIO! Turvallisuusohje: Huomiotta jättäminen voi johtaa loukkaantumiseen. HUOMAUTUS! Huomiotta jättäminen voi johtaa materiaalivaurioihin ja haitata tuotteen toimintaa.
FanTastic-Vent-IO-16s.book Seite 155 Freitag, 5. Mai 2017 11:41 11 FanTastic Vent Toimituskokonaisuus • Sulje kattoluukku, ennen kuin siirrät ajoneuvoa. • Valmistaja suosittelee painokkaasti, että ajettaessa kattoluukku suljettuna ei ylitetä 150 km/h ajonopeutta.
FanTastic-Vent-IO-16s.book Seite 156 Freitag, 5. Mai 2017 11:41 11 Tekninen kuvaus 5 Tekninen kuvaus 5.1 Osat Nro kuva 1, sivulla 3 Kuvaus 1 Luukku 2 Ylempi ritilärengas 3 Tuuletinpyörä 4 Tuuletinpyörän kiinnitysruuvi 5 Tuuletinkehys 6 Ritilämoduuli 7 Nostomoottorimoduuli 8 Alempi ritilärengas 6 FanTastic Vent Ohjeita ennen asennusta ➤ Tarkasta kattosi paksuus ennen asennusta. Jos sinulla on kysymyksiä, käänny ajoneuvon valmistajan puoleen.
FanTastic-Vent-IO-16s.book Seite 157 Freitag, 5. Mai 2017 11:41 11 FanTastic Vent 6.1 Laitteen asentaminen Aukon työstäminen Katso kuva 2, sivulla 4 6.2 Vahvistuslistojen käyttö Menettele seuraavasti (kuva 3, sivulla 4): ➤ Selvitä ennen asennusta, tuleeko katon aukkoa vahvistaa. ➤ Poista eristeet vahvistuslistojen (eivät sisälly toimitukseen) leveydeltä (A). ➤ Sovita vahvistuslistat paikalleen (B).
FanTastic-Vent-IO-16s.book Seite 158 Freitag, 5. Mai 2017 11:41 11 Laitteen käyttö (7350, 7300) FanTastic Vent ➤ Asenna sisäkehys (kuva b, sivulla 8). ➤ Kokeile tuulettimen toiminta uudelleen asennuksen jälkeen. ➤ Anna viranomaisen tarvittaessa merkitä muuttunut ajoneuvokorkeus ja muuttunut paino ajoneuvopapereihin. 7.1 Kaukosäätimen asennus (7350, 7300) ➤ Kiinnitä kaukosäätimen pidin kahdella ruuvilla seinään (kuva c, sivulla 9). 8 Laitteen käyttö (7350, 7300) 8.
FanTastic-Vent-IO-16s.book Seite 159 Freitag, 5. Mai 2017 11:41 11 FanTastic Vent Laitteen käyttö (7350, 7300) Kaukosäädin siirtyy akun säästämiseksi lepotilaan 30 sekuntia sen jälkeen, kun viimeinen komento on annettu. Jonkin kaukosäätimen napin painaminen aktivoi sen uudelleen. Näkyviin tulee viimeinen ennen lepotilaan menoa vallinnut lämpötila- tai pyörintänopeusasetus. Jos kaukosäädin kytketään painikkeella pois päältä, kaikki asetukset nollautuvat. 8.
FanTastic-Vent-IO-16s.book Seite 160 Freitag, 5. Mai 2017 11:41 11 Laitteen käyttö (7350, 7300) 8.5 FanTastic Vent Tuuletinnopeuden säätäminen Tuulettimessa on 13-portainen nopeuden säätö. Kaukosäätimen valaistu LED osoittaa asetetun tuulettimen nopeuden välillä 10% (pieni nopeus) ja 100% (suuri nopeus). Yksi LED loistaa tuulettimelle asetetun prosenttiarvon vieressä. Jos kaksi LEDiä loistaa, tuulettimen nopeusasetus on valaistujen astearvojen välissä.
FanTastic-Vent-IO-16s.book Seite 161 Freitag, 5. Mai 2017 11:41 11 FanTastic Vent 8.8 Laitteen käyttö (3300, 3350) Paristojen vaihtaminen Kaukosäädin toimii kahdella AA-paristolla (mukana toimituksessa). Vaihda paristot seuraavasti (kuva e, sivulla 11): ➤ Avaa kaukosäätimen takapuolella oleva paristokotelon kansi. ➤ Korvaa vanhat paristot kahdella uudella AA-paristolla. Varmista, että paristojen positiivinen ja negatiivinen napa vastaavat akkukotelossa olevia plus- ja miinusmerkintöjä.
FanTastic-Vent-IO-16s.book Seite 162 Freitag, 5. Mai 2017 11:41 11 Laitteen käyttö (3300, 3350) 9.3 FanTastic Vent Tuulettimen kytkeminen päälle ja pois ➤ Avaa ikkuna vaunun varjoisalta puolelta. ➤ Aseta haluttu tuulettimen nopeus. ➤ Paina UP. ➤ Aseta puhallussuunta tarvittaessa joko sisäänpuhallukselle (IN) tai ulospuhallukselle (OUT). ➤ Aseta tarvittaessa päälle/pois-kytkin asentoon ON. 9.
FanTastic-Vent-IO-16s.book Seite 163 Freitag, 5. Mai 2017 11:41 11 FanTastic Vent 9.6 Laitteen käyttö (2250) Sadetunnistin Kun sadetunnistin joutuu kosketuksiin kosteuden kanssa, luukku sulkeutuu ja tuuletin kytkeytyy pois päältä. ➤ Paina UP jos haluat avata luukun uudelleen. ✓ Tuuletin käynnistyy jälleen aikaisemmilla asetuksillaan. ✓ Sadetunnistin aktivoituu uudelleen vasta kuivuttuaan. 10 Laitteen käyttö (2250) 10.1 Luukun avaaminen ja sulkeminen ➤ Avaa luukkua 10 cm tai enemmän.
FanTastic-Vent-IO-16s.book Seite 164 Freitag, 5. Mai 2017 11:41 11 Laitteen hoito ja puhdistus 11 Laitteen hoito ja puhdistus 11.1 Sulakkeen vaihto FanTastic Vent ➤ Kierrä mustaa suojatulppaa neljänneskierros vastapäivään. ➤ Vedä tulppaa varovasti alaspäin. Sulake on tulpan takapuolella. ➤ Tarkasta, onko lasin sisällä oleva lanka poikki. ➤ Vedä tarvittaessa sulake pois tulpasta. ➤ Laita uusi samantyyppinen sulake paikalleen (4 A lankasulake). ➤ Kierrä tulppa kiinni. 11.
FanTastic-Vent-IO-16s.book Seite 165 Freitag, 5. Mai 2017 11:41 11 FanTastic Vent Laitteen hoito ja puhdistus ➤ Kun ritilärengas ja tuuletinpyörä ovat puhtaat ja kuivat, voit kiillottaa ne vesipohjaisella suoja-aineella kiiltäviksi. Tällöin lian ja pölyn kertyminen on hitaampaa ja seuraava puhdistuskerta on helpompi. ➤ Kokoa tuuletin uudelleen noudattamalla ohjeita käänteisessä järjestyksessä. ! 11.3 HUOMIO! Loukkaantumisvaara! Käyttäkää tuuletinta vain ritilärengas paikallaan.
FanTastic-Vent-IO-16s.book Seite 166 Freitag, 5. Mai 2017 11:41 11 Tuotevastuu 12 FanTastic Vent Tuotevastuu Laitetta koskee lakisääteinen tuotevastuuaika. Jos tuote sattuu olemaan viallinen, käänny maasi sopimushuollon puoleen (osoitteet käyttöohjeen takasivulla). Asiantuntijamme auttavat sinua ja neuvovat sinua tuotevastuun jatkomenettelyn suhteen. 13 Hävittäminen ➤ Vie pakkausmateriaali mahdollisuuksien mukaan vastaavan kierrätysjätteen joukkoon.
FanTastic-Vent-IO-16s.book Seite 167 Freitag, 5. Mai 2017 11:41 11 Система вентиляции FanTastic Vent Прочтите данную инструкцию перед монтажом и вводом в эксплуатацию и сохраните ее. В случае передачи продукта передайте инструкцию следующему пользователю. Оглавление 1 Пояснение к символам . . . . . . . . . . . . . . . . . . . . . . . . . . . . . . . . . . . . . . . .168 2 Инструкции по технике безопасности и установке . . . . . . . . . . . . . . . . .168 3 Комплект поставки . . . . . . . . . . . . .
FanTastic-Vent-IO-16s.book Seite 168 Freitag, 5. Mai 2017 11:41 11 Пояснение к символам 1 ! ! A 2 Система вентиляции FanTastic Vent Пояснение к символам ПРЕДУПРЕЖДЕНИЕ! Указания по технике безопасности: Несоблюдение может привести к смертельному исходу или тяжелым травмам. ОСТОРОЖНО! Указания по технике безопасности: Несоблюдение может привести к травмам. ВНИМАНИЕ! Несоблюдение может привести к повреждениям и нарушить работу продукта.
FanTastic-Vent-IO-16s.book Seite 169 Freitag, 5. Mai 2017 11:41 11 Система вентиляции FanTastic Vent Комплект поставки • Закрывайте крышный люк во время дождя или снегопада. • Не оставляйте автомобиль с открытым крышным люком. • Следите за тем, чтобы в люке не скапливался снег и лед. • Прежде чем начать поездку, закройте люк. • С закрытым люком производитель настоятельно не рекомендует развивать скорость более 150 км/ч.
FanTastic-Vent-IO-16s.book Seite 170 Freitag, 5. Mai 2017 11:41 11 Техническое описание Система вентиляции FanTastic Vent 5 Техническое описание 5.1 Компоненты № на рис. 1, стр. 3 6 Описание 1 Крышка люка 2 Верхнее кольцо 3 Крыльчатка вентилятора 4 Винт крыльчатки вентилятора 5 Цоколь вентилятора 6 Решетка 7 Подъемный двигатель 8 Нижнее кольцо Указания перед монтажом ➤ Проверьте перед монтажом толщину крыши автомобиля.
FanTastic-Vent-IO-16s.book Seite 171 Freitag, 5. Mai 2017 11:41 11 Система вентиляции FanTastic Vent 6.1 Монтаж прибора Подготовьте отверстие в крыше См. рис. 2, стр. 4 6.2 Использовать крепежные планки При этом соблюдайте следующий порядок действий (рис. 3, стр. 4): ➤ Перед монтажом решите, должен ли быть усилен вырез в крыше. ➤ Удалите пенистое вещество в соответствии с шириной усиливающих планок (не входят в комплект поставки) (A). ➤ Пригоните усиливающие планки (B).
FanTastic-Vent-IO-16s.book Seite 172 Freitag, 5. Mai 2017 11:41 11 Изделие готово к эксплуатации (7350, 7300) Система вентиляции FanTastic Vent ➤ Нанесите герметик на головки винтов (рис. a, стр. 8). ➤ Если толщина крыши менее 25 мм, используйте держатель (приобретается отдельно). ➤ Установите внутреннюю раму (рис. b, стр. 8). ➤ Еще раз проверьте работу вентилятора. ➤ При необходимости внесите в паспорт автомобиля сведения об изменении высоты и веса автомобиля. 7.
FanTastic-Vent-IO-16s.book Seite 173 Freitag, 5. Mai 2017 11:41 11 Система вентиляции FanTastic Vent Изделие готово к эксплуатации (7350, 7300) № на рис. d, стр. 10 Описание 6 Короткое нажатие: открыть или закрыть крышку люка Нажать 3 с: включить или выключить датчик дождя 7 Регулировка скорости вентилятора 8 Индикатор режима «Manual» Блок управления вентилятором подтверждает команду, полученную с дистанционного пульта управления, коротким звуковым сигналом.
FanTastic-Vent-IO-16s.book Seite 174 Freitag, 5. Mai 2017 11:41 11 Изделие готово к эксплуатации (7350, 7300) Система вентиляции FanTastic Vent ➤ Нажмите кнопку . ✓ Вентилятор выключится. ✓ Крышка люка закроется. 8.4 Регулировка температуры Регулировка температуры производится по 13-ступенчатой шкале. Заданная температура отображается на светодиодном дисплее пульта дистанционного управления в градусах Фаренгейта (°F) и в градусах Цельсия (°C) (60 – 90 °F/15 – 33 °C).
FanTastic-Vent-IO-16s.book Seite 175 Freitag, 5. Mai 2017 11:41 11 Система вентиляции FanTastic Vent Изделие готово к эксплуатации (3300, 3350) 8.7 Включение и выключение датчика дождя ➤ Нажмите и удерживайте кнопку в течение 3 секунд. ✓ Датчик дождя выключится. ✓ Загорится индикатор «Rain Sensor Off». ➤ Нажмите и удерживайте кнопку в течение 3 секунд. ✓ Включится датчик дождя. ✓ Индикатор «Rain Sensor Off» выключится. 8.
FanTastic-Vent-IO-16s.book Seite 176 Freitag, 5. Mai 2017 11:41 11 Изделие готово к эксплуатации (3300, 3350) Система вентиляции FanTastic Vent • Переключатель режимов вентиляции (только в модели 3350) • Термостат 9.2 Открывание и закрывание крышки люка ➤ Нажмите UP. ✓ Крышка люка откроется. ➤ Нажмите DOWN. ✓ Крышка люка закроется. 9.3 Включение и выключение вентилятора ➤ Откройте окно с теневой стороны автомобиля. ➤ Выберите нужную скорость вентилятора. ➤ Нажмите UP.
FanTastic-Vent-IO-16s.book Seite 177 Freitag, 5. Mai 2017 11:41 11 Система вентиляции FanTastic Vent Эксплуатация устройства (2250) Условия: • Крышка люка раскрыта не менее чем на 5 см (2 дюйма) • Переключатель режимов вентиляции находится в положении OUT (вытяжная вентиляция) или IN (приточная вентиляция) (3350) • Главный выключатель в положении ON (3300) 9.6 Датчик дождя Как только на датчик дождя попадает влага, крышка люка закрывается и двигатель вентилятора отключается.
FanTastic-Vent-IO-16s.book Seite 178 Freitag, 5. Mai 2017 11:41 11 Уход и очистка устройства Система вентиляции FanTastic Vent 11 Уход и очистка устройства 11.1 Замена предохранителя ➤ Поверните черный крышку на четверть оборота против часовой стрелки. ➤ Осторожно потяните крышку вниз. С обратной стороны крышки находится предохранитель. ➤ Проверьте, поврежден ли провод внутри стеклянной оболочки. ➤ Если необходимо, вытащите предохранитель из крышки.
FanTastic-Vent-IO-16s.book Seite 179 Freitag, 5. Mai 2017 11:41 11 Система вентиляции FanTastic Vent Гарантия ➤ Соберите вентилятор, выполнив перечисленные выше шаги в обратной последовательности. ! 11.3 ОСТОРОЖНО! Опасность травмирования! Разрешается эксплуатировать вентилятор только с установленным кольцом. Высвобождение застрявшей крышки люка При эксплуатации в условиях высоких температур возможно высыхание уплотнения и застревание крышки люка. ➤ Полностью откройте крышку люка.
FanTastic-Vent-IO-16s.book Seite 180 Freitag, 5. Mai 2017 11:41 11 Утилизация 13 Система вентиляции FanTastic Vent Утилизация ➤ По возможности, выкидывайте упаковочный материал в мусор, подлежащий вторичной переработке. M Если Вы окончательно выводите продукт из эксплуатации, то получите информацию в ближайшем центре по вторичной переработке или в торговой сети о соответствующих предписаниях по утилизации.
FanTastic-Vent-IO-16s.book Seite 181 Freitag, 5. Mai 2017 11:41 11 FanTastic Vent Przed instalacją i uruchomieniem urządzenia należy uważnie przeczytać niniejszą instrukcję. Instrukcję należy zachować. W razie przekazywania urządzenia należy ją udostępnić kolejnemu nabywcy. Spis treści 1 Objaśnienie symboli . . . . . . . . . . . . . . . . . . . . . . . . . . . . . . . . . . . . . . . . . . .182 2 Wskazówki dotyczące bezpieczeństwa i montażu . . . . . . . . . . . . . . . . . . .182 3 W zestawie . . .
FanTastic-Vent-IO-16s.book Seite 182 Freitag, 5. Mai 2017 11:41 11 Objaśnienie symboli 1 ! ! A 2 FanTastic Vent Objaśnienie symboli OSTRZEŻENIE! Wskazówka dot. bezpieczeństwa: Nieprzestrzeganie może prowadzić do śmierci lub ciężkich obrażeń ciała. OSTROŻNIE! Wskazówka dot. bezpieczeństwa: Nieprzestrzeganie może prowadzić do obrażeń ciała. UWAGA! Nieprzestrzeganie może prowadzić do powstania szkód materialnych i zakłóceń w działaniu produktu.
FanTastic-Vent-IO-16s.book Seite 183 Freitag, 5. Mai 2017 11:41 11 FanTastic Vent W zestawie • Nie należy opuszczać pojazdu, gdy okno jest otwarte. • Należy zadbać, aby na oknie nie gromadził się śnieg i lód. • Przed ruszeniem pojazdem zamknąć pokrywę okna dachowego. • Przy zamkniętej pokrywie producent wyraźnie zaleca nie przekraczać prędkości 150 km/h.
FanTastic-Vent-IO-16s.book Seite 184 Freitag, 5. Mai 2017 11:41 11 Opis techniczny 5 Opis techniczny 5.1 Części składowe Nr na rys. 1, strona 3 6 FanTastic Vent Opis 1 Pokrywa 2 Górny pierścień kratkowy 3 Łopatki wentylatora 4 Śruba łopatek wentylatora 5 Cokół wentylatora 6 Element kratkowy 7 Moduł silnika podnoszenia 8 Dolny pierścień kratkowy Wskazówki przed montażem ➤ Przed montażem należy koniecznie sprawdzić grubości dachu pojazdu.
FanTastic-Vent-IO-16s.book Seite 185 Freitag, 5. Mai 2017 11:41 11 FanTastic Vent 6.1 Montaż urządzenia Przygotowanie wykroju Zob. rys. 2, strona 4 6.2 Stosowanie listew wzmacniających W tym celu należy postępować w następujący sposób: (rys. 3, strona 4): ➤ Przed instalacją należy ustalić, czy wycięcie w dachu wymaga wzmocnienia. ➤ Usunąć piankę zgodnie z szerokością listew wzmacniających (nieobjęte dostawą) (A). ➤ Następnie należy wpasować listwy wzmacniające (B).
FanTastic-Vent-IO-16s.book Seite 186 Freitag, 5. Mai 2017 11:41 11 Eksploatacja urządzenia (7350, 7300) FanTastic Vent ➤ Uszczelnić łby śrub (rys. a, strona 8). ➤ Gdy grubość dachu jest mniejsza niż 25 mm, zastosować uchwyt dystansowy (osprzęt). ➤ Zamontować ramę wewnętrzną (rys. b, strona 8). ➤ Po zamontowaniu ponownie sprawdzić działanie wentylatora. ➤ W razie konieczności należy zgłosić do wpisania do dokumentów pojazdu zmienioną wysokość pojazdu i masę. 7.
FanTastic-Vent-IO-16s.book Seite 187 Freitag, 5. Mai 2017 11:41 11 FanTastic Vent Eksploatacja urządzenia (7350, 7300) Podwójny dźwięk oznacza niedopuszczalne polecenie. Pilot po 30 sekundach od ostatniego wysłanego polecenia przechodzi w tryb uśpienia w celu ochrony baterii. Aby zaktywować pilota, należy nacisnąć dowolny jego przycisk. Wyświetlane jest ostatnie ustawienie temperatury lub prędkości obrotowej przed przejściem w tryb uśpienia.
FanTastic-Vent-IO-16s.book Seite 188 Freitag, 5. Mai 2017 11:41 11 Eksploatacja urządzenia (7350, 7300) ➤ Nacisnąć przycisk , aby zwiększyć temperaturę. ➤ Nacisnąć przycisk , aby zmniejszyć temperaturę. 8.5 FanTastic Vent Ustawianie prędkości wentylatora Wentylator może pracować na 13 poziomach prędkości. Prędkość wentylatora jest sygnalizowana za pomocą świecącej diody LED na pilocie od 10% (niska prędkość) do 100% (wysoka prędkość).
FanTastic-Vent-IO-16s.book Seite 189 Freitag, 5. Mai 2017 11:41 11 FanTastic Vent 8.8 Eksploatacja urządzenia (3300, 3350) Wymiana baterii Pilot jest zasilany dwiema bateriami AA (zawarte w zestawie). Sposób wymiany baterii (rys. e, strona 11): ➤ Otworzyć pokrywkę z tyłu pilota. ➤ Wymienić stare baterie na nowe typu AA. Uwzględnić położenie biegunów. ➤ Aby zamknąć pokrywkę, umieścić łącznik w kwadratowy otwór z tyłu pilota. ➤ Docisnąć pokrywkę, aż łącznik zablokuje się z wyraźnym kliknięciem.
FanTastic-Vent-IO-16s.book Seite 190 Freitag, 5. Mai 2017 11:41 11 Eksploatacja urządzenia (3300, 3350) 9.3 FanTastic Vent Włączanie i wyłączanie wentylatora ➤ Otworzyć okno po zacienionej stronie pojazdu. ➤ Ustawić żądaną prędkość wentylatora. ➤ Nacisnąć UP. ➤ W razie potrzeby ustawić wentylator na powietrza dolotowe (IN) lub odlotowe (OUT). ➤ Ustawić włącznik/wyłącznik na ON. 9.
FanTastic-Vent-IO-16s.book Seite 191 Freitag, 5. Mai 2017 11:41 11 FanTastic Vent 9.6 Eksploatacja urządzenia (2250) Czujnik deszczu Gdy na czujnik deszczu spadnie woda, pokrywa zamyka się i wyłączany jest silnik wentylatora. ➤ Nacisnąć UP, aby ponownie otworzyć pokrywę. ✓ Wentylator uruchamia się ponownie z wcześniejszymi ustawieniami. ✓ Czujnik deszczu uaktywnia się ponownie po wysuszeniu. 10 Eksploatacja urządzenia (2250) 10.1 Otwieranie i zamykanie pokrywy ➤ Otworzyć pokrywą na ok.
FanTastic-Vent-IO-16s.book Seite 192 Freitag, 5. Mai 2017 11:41 11 Czyszczenie urządzenia FanTastic Vent ➤ Włożyć nowy bezpiecznik tego samego typu (bezpieczniki topikowy 4 A). ➤ Ponownie przykręcić nakładkę. 11.2 Wyczyścić łopatki Wykonać następujące czynności (rys. f, strona 11, rys. g, strona 12): ➤ Całkowicie otworzyć pokrywę. ➤ Usunąć bezpiecznik. ➤ Usunąć pierścień kratkowy, w tym celu pociągnąć jedną ręką za uchwyt w dół.
FanTastic-Vent-IO-16s.book Seite 193 Freitag, 5. Mai 2017 11:41 11 FanTastic Vent 11.3 Czyszczenie urządzenia Odłączanie przyklejonej pokrywy W przypadku wysokich temperatur uszczelka może wyschnąć, powodując przyklejenie się do niej pokrywy. ➤ Całkowicie otworzyć pokrywę. ➤ Wymienić uszkodzoną uszczelkę. ➤ Oczyścić dolną część pokrywy i uszczelkę denaturatem lub benzyną ekstrakcyjną. ➤ Ewentualnie nanieść środek ochronny na bazie wody (np. 303 Protectant). ➤ Odczekać, aż środek ochronny wyschnie.
FanTastic-Vent-IO-16s.book Seite 194 Freitag, 5. Mai 2017 11:41 11 Gwarancja 12 FanTastic Vent Gwarancja Obowiązuje ustawowy okres gwarancji. Jeśli produkt jest uszkodzony, należy zgłosić się do partnera serwisowego w danym kraju (adresy dostępne na odwrocie instrukcji). Nasi specjaliści służą chętnie pomocą i omówią z Państwem dalszy przebieg gwarancji. 13 Utylizacja ➤ Opakowanie należy wyrzucić do odpowiedniego pojemnika na śmieci do recyklingu.
FanTastic-Vent-IO-16s.book Seite 195 Freitag, 5. Mai 2017 11:41 11 FanTastic Vent Pred montážou a uvedením do prevádzky si prosim pozorne prečítajte tento návod a odložte si ho. V prípade odovzdania výrobku ďalšiemu používateľovi mu odovzdajte aj tento návod. Obsah 1 Vysvetlenie symbolov . . . . . . . . . . . . . . . . . . . . . . . . . . . . . . . . . . . . . . . . . .196 2 Bezpečnostné a montážne pokyny . . . . . . . . . . . . . . . . . . . . . . . . . . . . . . .196 3 Rozsah dodávky . . . . . . .
FanTastic-Vent-IO-16s.book Seite 196 Freitag, 5. Mai 2017 11:41 11 Vysvetlenie symbolov 1 ! ! A 2 FanTastic Vent Vysvetlenie symbolov VÝSTRAHA! Bezpečnostný pokyn: Nerešpektovanie môže viest’ k smrti alebo k t’ažkému zraneniu. UPOZORNENIE! Bezpečnostný pokyn: Nerešpektovanie môže viest’ k zraneniam. POZOR! Nerešpektovanie môže viest’ k materiálnym škodám a môže ovplyvnit’ funkciu zariadenia.
FanTastic-Vent-IO-16s.book Seite 197 Freitag, 5. Mai 2017 11:41 11 FanTastic Vent Rozsah dodávky • Skôr než sa pohnete s vozidlom zatvorte poklop strešného okna. • Pri zatvorenom poklope odporúča výrobca výslovne neprekračovať maximálny jazdnú rýchlosť 150 km/h.
FanTastic-Vent-IO-16s.book Seite 198 Freitag, 5. Mai 2017 11:41 11 Technický opis 5 Technický opis 5.1 Súčasti Č. na obr. 1, strane 3 Popis 1 Poklop 2 Horný kruh mreže 3 Lopatky ventilátora 4 Skrutka lopatiek ventilátora 5 Podstavec ventilátora 6 Modul mreže 7 Modul motora zdvihu 8 Spodný kruh mreže 6 FanTastic Vent Upozornenia pred montážou ➤ Pred montážou preverte hrúbku strechy vozidla. V prípade otázok sa obráťte na výrobcu vozidla.
FanTastic-Vent-IO-16s.book Seite 199 Freitag, 5. Mai 2017 11:41 11 FanTastic Vent 6.1 Montáž prístroja Opracovanie otvoru Pozri obr. 2, strane 4 6.2 Použitie vystužovacích líšt Postupujte nasledovne (obr. 3, strane 4): ➤ Pred montážou si overte, či sa otvor v streche nemusí spevniť. ➤ Odstráňte vypenenie podľa šírky zosilňovacích líšt (nie sú súčasťou dodávky) (A). ➤ Vsaďte vystužovacie lišty (B).
FanTastic-Vent-IO-16s.book Seite 200 Freitag, 5. Mai 2017 11:41 11 Používanie prístroja (7350, 7300) FanTastic Vent ➤ Ak je strecha tenšia než 25 mm, použite dištančný držiak (v príslušenstve). ➤ Nainštalujte vnútorný rám (obr. b, strane 8). ➤ Po montáži znova skontrolujte funkciu ventilátora. ➤ V prípade potreby dajte zaznamenať zmenu výšky vozidla a zmenu hmotnosti do technického preukazu vozidla. 7.
FanTastic-Vent-IO-16s.book Seite 201 Freitag, 5. Mai 2017 11:41 11 FanTastic Vent Používanie prístroja (7350, 7300) Dvojité pípnutie oznamuje, že príkaz nie je povolený. Diaľkové ovládanie prejde po 30 sekundách od posledného zadania povelu do pohotovostného režimu, aby šetrilo batériu. Diaľkové ovládanie aktivujete stlačením ľubovoľného tlačidla na diaľkovom ovládaní. Zobrazí sa posledné nastavenie teploty alebo otáčok spred pohotovostného režimu.
FanTastic-Vent-IO-16s.book Seite 202 Freitag, 5. Mai 2017 11:41 11 Používanie prístroja (7350, 7300) 8.5 FanTastic Vent Nastavenie rýchlosti ventilátora Ventilátor sa dá používať v 13 rýchlostných stupňoch. Rýchlosť ventilátora zobrazuje svietiaca LED na diaľkovom ovládaní v rozmedzí od 10 % (nízka rýchlosť) do 100 % (vysoká rýchlosť). LED svieti vedľa percentuálnej hodnoty rýchlosti ventilátora. Ak svietia dve LED, rýchlosť ventilátora je uprostred medzi dvomi svietiacimi percentuálnymi hodnotami.
FanTastic-Vent-IO-16s.book Seite 203 Freitag, 5. Mai 2017 11:41 11 FanTastic Vent 8.8 Používanie prístroja (3300, 3350) Výmena batérií Diaľkové ovládanie sa používa s dvomi batériami typu AA (sú v rozsahu dodávky). Pri výmene batérií postupujte nasledovne (obr. e, strane 11): ➤ Otvorte kryt priečinku na batérie na zadnej strane diaľkového ovládania. ➤ Staré batérie vymeňte za dve nové batérie typu AA.
FanTastic-Vent-IO-16s.book Seite 204 Freitag, 5. Mai 2017 11:41 11 Používanie prístroja (3300, 3350) 9.3 FanTastic Vent Zapnutie a vypnutie ventilátora ➤ Otvorte okno na tej strane obytného automobilu, ktorá je v tieni. ➤ Nastavte požadovanú rýchlosť ventilátora. ➤ Stlačte časť UP. ➤ Ventilátor poprípade nastavte na prívod (IN) alebo odvod vzduchu (OUT). ➤ Vypínač nastavte v prípade potreby do polohy ON. 9.
FanTastic-Vent-IO-16s.book Seite 205 Freitag, 5. Mai 2017 11:41 11 FanTastic Vent Používanie prístroja (2250) 10 Používanie prístroja (2250) 10.1 Otváranie a zatváranie poklopu ➤ Otvorte poklop na cca. 10 cm alebo viac. ✓ Bezpečnostný vypínač vo ventilátore ho spustí až vtedy, keď bude poklop sčasti otvorený. ➤ Regulátor otáčok nastavte na požadovaný výkonový stupeň. – 0: Vyp.
FanTastic-Vent-IO-16s.book Seite 206 Freitag, 5. Mai 2017 11:41 11 Ošetrovanie a čistenie prístroja 11.2 FanTastic Vent Čistenie lopatky ventilátora Postupujte nasledovne (obr. f, strane 11, obr. g, strane 12): ➤ Poklop úplne otvorte. ➤ Vyberte poistku. ➤ Vyberte kruh mreže tak, že s jednou rukou chyťte západku a potiahnite ho rovno nadol. S druhou rukou podopierajte modul mreže, aby ste kruh mreže chránili pred zlomením.
FanTastic-Vent-IO-16s.book Seite 207 Freitag, 5. Mai 2017 11:41 11 FanTastic Vent 11.3 Ošetrovanie a čistenie prístroja Uvoľnenie prilepeného poklopu Pri vyšších teplotách sa môže stať, že tesnenie vyschne a poklop sa naň prilepí. ➤ Poklop úplne otvorte. ➤ Ak je tesnenie poškodené, vymeňte ho. ➤ Spodnú stranu poklopu a tesnenie vyčistite s denaturovaným liehom alebo čistiacim benzínom. ➤ Ak máte ochranný prostriedok na báze vody, naneste ho (napr. 303 Protectant).
FanTastic-Vent-IO-16s.book Seite 208 Freitag, 5. Mai 2017 11:41 11 Záruka 12 FanTastic Vent Záruka Platí zákonom stanovená záručná lehota. Ak by bol výrobok chybný, obrát’te sa na servisného partnera vo vašej krajine (adresy pozri na zadnej strane návodu). Naši špecialisti vám radi pomôžu a dohodnú s vami ďalší priebeh záruky. 13 Likvidácia ➤ Obalový materiál podľa možnosti odovzdajte do príslušného odpadu na recykláciu.
FanTastic-Vent-IO-16s.book Seite 209 Freitag, 5. Mai 2017 11:41 11 FanTastic Vent Před zahájením instalace a uvedením do provozu si pečlivě přečtěte tento návod a uschovejte jej. V případě dalšího prodeje výrobku předejte návod novému uživateli. Obsah 1 Vysvětlení symbolů . . . . . . . . . . . . . . . . . . . . . . . . . . . . . . . . . . . . . . . . . . . .210 2 Bezpečnostní pokyny a pokyny k instalaci . . . . . . . . . . . . . . . . . . . . . . . . . .210 3 Obsah dodávky. . . . . . . . . . . . . .
FanTastic-Vent-IO-16s.book Seite 210 Freitag, 5. Mai 2017 11:41 11 Vysvětlení symbolů 1 ! ! A 2 FanTastic Vent Vysvětlení symbolů VÝSTRAHA! Bezpečnostní pokyny: Následkem nedodržení pokynů mohou být smrtelná nebo vážná zranění. UPOZORNĚNÍ! Bezpečnostní pokyny: Následkem nedodržení mohou být úrazy. POZOR! Nedodržení pokynů může mít za následek hmotné škody a narušení funkce výrobku.
FanTastic-Vent-IO-16s.book Seite 211 Freitag, 5. Mai 2017 11:41 11 FanTastic Vent Obsah dodávky • Před jízdou vozidla zavřete poklop. • Při zavřeném poklopu výrobce výslovně doporučuje nepřekročit maximální cestovní rychlost 150 km/h.
FanTastic-Vent-IO-16s.book Seite 212 Freitag, 5. Mai 2017 11:41 11 Technický popis 5 Technický popis 5.1 Součásti Č. na obr. 1, strana 3 Popis 1 Poklop 2 Horní kroužek mřížky 3 Lopatka ventilátoru 4 Šroub lopatky ventilátoru 5 Podstavec ventilátoru 6 Konstrukční celek mřížky 7 Konstrukční celek motoru zdvihu 8 Dolní kroužek mřížky 6 FanTastic Vent Pokyny před montáží ➤ Před zahájením montáže zkontrolujte tloušťku střechy vozidla.
FanTastic-Vent-IO-16s.book Seite 213 Freitag, 5. Mai 2017 11:41 11 FanTastic Vent 6.1 Montáž přístroje Provedení výřezu Viz obr. 2, strana 4 6.2 Použití výztužných lišt Postupujte takto (obr. 3, strana 4): ➤ Před instalací zjistěte, zda musí být provedeno zesílení otvoru ve střeše. ➤ Odstraňte pěnovou výplň v závislosti na šířce výztužných lišt (nejsou obsahem dodávky) (A). ➤ Upravte tvar výztužných lišt (B).
FanTastic-Vent-IO-16s.book Seite 214 Freitag, 5. Mai 2017 11:41 11 Použití přístroje (7350, 7300) FanTastic Vent ➤ Je-li střecha tenčí než 25 mm, použijte rozpěrky (příslušenství). ➤ Namontujte vnitřní rám (obr. b, strana 8). ➤ Po provedení montáže opět zkontrolujte funkci ventilátoru. ➤ Nechejte zapsat do dokumentace vozidla změnu výšky a hmotnosti, pokud je to nutné. 7.1 Montáž držáku dálkového ovladače (7350, 7300) ➤ Držák dálkového ovladače upevněte dvěma šrouby ke stěně (obr. c, strana 9).
FanTastic-Vent-IO-16s.book Seite 215 Freitag, 5. Mai 2017 11:41 11 FanTastic Vent Použití přístroje (7350, 7300) Dálkový ovladač přejde asi 30 sekund po posledním zadání příkazu do pohotovostního režimu, aby se šetřila baterie. K aktivaci dálkového ovladače stiskněte libovolné tlačítko na dálkovém ovladači. Zobrazí se poslední nastavená teplota nebo otáčky před pohotovostním režimem. Pokud se dálkový ovladač vypne ručně tlačítkem , všechna nastavení se resetují. 8.
FanTastic-Vent-IO-16s.book Seite 216 Freitag, 5. Mai 2017 11:41 11 Použití přístroje (7350, 7300) 8.5 FanTastic Vent Nastavení otáček ventilátoru Ventilátor lze provozovat ve 13 stupních otáček. Otáčky ventilátoru jsou signalizovány svícením LED na dálkovém ovladači 10 % (nízké otáčky) až 100 % (vysoké otáčky). LED svítí vedle hodnoty otáček ventilátoru v procentech. Pokud svítí dvě LED diody, otáčky ventilátoru leží uprostřed mezi osvětlenými hodnotami v procentech.
FanTastic-Vent-IO-16s.book Seite 217 Freitag, 5. Mai 2017 11:41 11 FanTastic Vent 8.8 Použití přístroje (3300, 3350) Výměna baterií Dálkový ovladač funguje na dvě baterie AA (v obsahu dodávky). Při výměně baterií postupujte takto (obr. e, strana 11): ➤ Otevřete kryt přihrádky na baterie na zadní straně dálkového ovladače. ➤ Vyměňte staré baterie za dvě nové baterie AA. Ujistěte se, že kladný a záporný pól baterií odpovídají značkám plus a minus v přihrádce na baterie.
FanTastic-Vent-IO-16s.book Seite 218 Freitag, 5. Mai 2017 11:41 11 Použití přístroje (3300, 3350) 9.3 FanTastic Vent Zapnutí a vypnutí ventilátoru ➤ Otevřete okno na stinné straně obytného přívěsu. ➤ Nastavte požadované otáčky na ventilátoru. ➤ Stiskněte UP. ➤ Případně nastavte ventilátor na přívodní vzduch (IN) nebo odpadní vzduch (OUT). ➤ Případně nastavte vypínač na ON. 9.4 Přepnutí přívodního/odpadního vzduchu (jen 3350) ➤ Reverzační přepínač nastavte na OFF (střední poloha).
FanTastic-Vent-IO-16s.book Seite 219 Freitag, 5. Mai 2017 11:41 11 FanTastic Vent 9.6 Použití přístroje (2250) Dešťový snímač Přijde-li dešťový snímač do styku s vlhkostí, poklop se zavře a motor ventilátoru se vypne. ➤ Stisknutím tlačítka UP poklop opět otevřete. ✓ Ventilátor se opět uvede do provozu s předchozími nastaveními. ✓ Dešťový snímač se opět aktivuje po jeho vysušení. 10 Použití přístroje (2250) 10.1 Otevření a zavření poklopu ➤ Otevřete poklop cca na 10 cm nebo více.
FanTastic-Vent-IO-16s.book Seite 220 Freitag, 5. Mai 2017 11:41 11 Čištění a péče o přístroj FanTastic Vent ➤ V případě potřeby vyjměte pojistku z poklopu. ➤ Vložte novou pojistku stejného typu (tavná pojistka 4 A). ➤ Poklop opět utáhněte. 11.2 Čištění lopatky ventilátoru Postupujte takto (obr. f, strana 11, obr. g, strana 12): ➤ Zcela otevřete poklop. ➤ Odstraňte pojistku. ➤ Odstraňte kroužek mřížky tak, že uchopíte lamelu jednou rukou a vytáhnete rovně dolů.
FanTastic-Vent-IO-16s.book Seite 221 Freitag, 5. Mai 2017 11:41 11 FanTastic Vent 11.3 Čištění a péče o přístroj Uvolnění přilepeného poklopu Při vyšších teplotách je možné, že těsnění vyschne a poklop se k němu přilepí. ➤ Zcela otevřete poklop. ➤ Pokud je těsnění poškozené, vyměňte je. ➤ Vyčistěte spodní stranu poklopu a těsnění denaturovaným lihem nebo ředidlem. ➤ Je-li k dispozici, naneste ochranný prostředek na vodní bázi (např. 303 Protectant). ➤ Ochranný prostředek nechejte vyschnout.
FanTastic-Vent-IO-16s.book Seite 222 Freitag, 5. Mai 2017 11:41 11 Záruka 12 FanTastic Vent Záruka Na výrobek je poskytována záruka v souladu s platnými zákony. Pokud je výrobek vadný, kontaktujte servisního partnera ve vaší zemi (adresy viz zadní strana tohoto návodu). Naši odborníci vám rádi pomohou a projednají s vámi další průběh záruky. 13 Likvidace ➤ Obalový materiál likvidujte v odpadu určeném k recyklaci.
FanTastic-Vent-IO-16s.book Seite 223 Freitag, 5. Mai 2017 11:41 11 FanTastic Vent Beépítés és üzembe vétel előtt gondosan olvassa el és őrizze meg ezt a használati útmutatót. Ha a terméket továbbadja, mellékelje hozzá a használati útmutatót is. Tartalomjegyzék 1 Szimbólumok magyarázata . . . . . . . . . . . . . . . . . . . . . . . . . . . . . . . . . . . . 224 2 Biztonsági és beszerelési útmutatások. . . . . . . . . . . . . . . . . . . . . . . . . . . . 224 3 A csomag tartalma . . . . . . . . . . . .
FanTastic-Vent-IO-16s.book Seite 224 Freitag, 5. Mai 2017 11:41 11 Szimbólumok magyarázata 1 ! ! A 2 FanTastic Vent Szimbólumok magyarázata FIGYELMEZTETÉS! Biztonsági tudnivaló: Az utasítás figyelmen kívül hagyása halált vagy súlyos sérülést okozhat. VIGYÁZAT! Biztonsági tudnivaló: Az utasítás figyelmen kívül hagyása sérüléseket okozhat. FIGYELEM! Ha nem veszi figyelembe az információt, az anyagkárosodást eredményezhet, és káros kihatással lehet a termék működésére.
FanTastic-Vent-IO-16s.book Seite 225 Freitag, 5. Mai 2017 11:41 11 FanTastic Vent A csomag tartalma • Mielőtt elindul a járművel, zárja be a tetőablak fedőkupoláját. • A gyártó nyomatékosan felhívja a figyelmet arra, hogy zárt fedőkupolával sem javasolt túllépni a 150 km/órás maximális utazósebességet.
FanTastic-Vent-IO-16s.book Seite 226 Freitag, 5. Mai 2017 11:41 11 Műszaki leírás FanTastic Vent 5 Műszaki leírás 5.1 Alkotórészek Szám 1. ábra, 3. oldal 6 Leírás 1 Fedőkupola 2 Felső rácsos gyűrű 3 Ventilátor lapátkerék 4 Ventilátor lapátkerék csavarja 5 Ventilátor aljzat 6 Rács komponens 7 Emelőmotor komponens 8 Alsó rácsos gyűrű Beszerelés előtti megjegyzések ➤ A szerelés előtt ellenőrizze járműve tetővastagságát. Ha kérdései vannak, forduljon a járműgyártóhoz.
FanTastic-Vent-IO-16s.book Seite 227 Freitag, 5. Mai 2017 11:41 11 FanTastic Vent 6.1 A készülék felszerelése A kivágás kiszélesítése Lásd: 2. ábra, 4. oldal 6.2 Merevítőlécek használata Ehhez a következő módon járjon el (3. ábra, 4. oldal): ➤ Tisztázza a beépítés előtt, hogy a tetőkivágást meg kell-e erősíteni. ➤ A merevítőlécek (a csomag nem tartalmazza) szélességének megfelelően távolítsa el a habanyagot (A). ➤ Illessze be a merevítőléceket (B).
FanTastic-Vent-IO-16s.book Seite 228 Freitag, 5. Mai 2017 11:41 11 A készülék használata (7350, 7300) FanTastic Vent ➤ Tömítse a tetőablakot (a. ábra, 8. oldal). ➤ Tömítse a csavarfejeket (a. ábra, 8. oldal). ➤ Ha a tető 25 mm-nél vékonyabb, akkor alkalmazzon távtartókat (tartozék). ➤ Szerelje be a belső keretet (b. ábra, 8. oldal). ➤ A szerelés után ismét ellenőrizze a ventilátor működését. ➤ Amennyiben szükséges, jegyeztesse be a jármű forgalmi engedélyébe a módosult járműmagasságot és -tömeget. 7.
FanTastic-Vent-IO-16s.book Seite 229 Freitag, 5. Mai 2017 11:41 11 FanTastic Vent A készülék használata (7350, 7300) A ventilátor vezérlése egy sípolással igazolja vissza a távirányító parancsbeviteleit. Ha nem hallatszik egy sípolás sem, akkor a készülék nem kapta meg a parancsot. A dupla sípolás azt jelenti, hogy a parancs nem engedélyezett. A távirányító az elem kímélése érdekében a legutolsó parancsbevitelt követően 30 másodperc elteltével készenléti üzemmódba kapcsol.
FanTastic-Vent-IO-16s.book Seite 230 Freitag, 5. Mai 2017 11:41 11 A készülék használata (7350, 7300) FanTastic Vent ✓ Világít az „Auto” LED. ➤ A kívánt hőmérséklet növeléséhez nyomja meg a gombot. ➤ A kívánt hőmérséklet csökkentéséhez nyomja meg a 8.5 gombot. A ventilátor sebességének beállítása A ventilátor 13 sebességfokozatban üzemeltethető. A ventilátor sebességét a távirányítón lévő világító LED jelzi 10 % (kis sebesség) és 100 % (nagy sebesség) között.
FanTastic-Vent-IO-16s.book Seite 231 Freitag, 5. Mai 2017 11:41 11 FanTastic Vent 8.8 A készülék használata (3300, 3350) Elemcsere A távirányító két AA típusú elemmel üzemel (a csomag tartalmazza). Az elemek cseréjekor a következő módon járjon el (e. ábra, 11. oldal): ➤ Nyissa ki a távirányító hátoldalán lévő elemrekesz fedelet. ➤ Cserélje ki újakra a két AA típusú elemet.
FanTastic-Vent-IO-16s.book Seite 232 Freitag, 5. Mai 2017 11:41 11 A készülék használata (3300, 3350) 9.3 FanTastic Vent A ventilátor be- és kikapcsolása ➤ Nyissa ki a lakókocsi árnyékos oldalán az egyik ablakot. ➤ Állítsa be a ventilátoron a kívánt sebességet. ➤ Nyomja meg az UP gombot. ➤ Szükség esetén állítsa a ventilátort beáramló (IN), vagy kiáramló (OUT) levegő állásba. ➤ Szükség esetén állítsa a be/ki kapcsolót ON állásba. 9.
FanTastic-Vent-IO-16s.book Seite 233 Freitag, 5. Mai 2017 11:41 11 FanTastic Vent A készülék használata (2250) ✓ A ventilátor a korábbi beállítás megtartásával üzemelni kezd. ✓ Az esőérzékelő csak akkor aktiválódik ismét, amikor megszáradt. 10 A készülék használata (2250) 10.1 A fedőkupola nyitása és zárása ➤ Nyissa ki kb. 10 cm-re, vagy ennél jobban a fedőkupolát. ✓ A ventilátorban lévő biztonsági kapcsoló csak akkor indítja el a berendezést, ha a fedőkupola részben nyitva van.
FanTastic-Vent-IO-16s.book Seite 234 Freitag, 5. Mai 2017 11:41 11 A készülék karbantartása és tisztítása 11.2 FanTastic Vent A ventilátor lapátkerekének megtisztítása Ehhez a következő módon járjon el (f. ábra, 11. oldal, g. ábra, 12. oldal): ➤ Nyissa ki teljesen a fedőkupolát. ➤ Távolítsa el a biztosítékot. ➤ Egy kézzel fogja meg a nyelvet és húzza egyenesen lefelé, majd távolítsa el a rácsos gyűrűt. Másik kezével támassza meg a rács komponenst, ezáltal megvédi a rácsos gyűrűt a töréstől.
FanTastic-Vent-IO-16s.book Seite 235 Freitag, 5. Mai 2017 11:41 11 FanTastic Vent 11.3 A készülék karbantartása és tisztítása A beragadt fedőkupola kioldása Magas hőmérsékleten előfordulhat, hogy a tömítés kiszárad és a fedőkupola hozzátapad. ➤ Nyissa ki teljesen a fedőkupolát. ➤ Ha a tömítés megsérül, cserélje ki a tömítést. ➤ Denaturált szesszel, vagy tisztítóbenzinnel tisztítsa meg a fedőkupola alsó részét és a tömítést. ➤ Ha rendelkezésre áll ilyen, vigyen fel rá vízbázisú védőanyagot (pl.
FanTastic-Vent-IO-16s.book Seite 236 Freitag, 5. Mai 2017 11:41 11 Szavatosság 12 FanTastic Vent Szavatosság A termékre a törvény szerinti szavatossági időszak érvényes. A termék meghibásodása esetén forduljon az illetékes szervizpartnerhez (a címeket lásd jelen útmutató hátoldalán). Szakembereink szívesen nyújtanak segítséget és felvilágosítást adnak a szavatosságra vonatkozó további tudnivalókról. 13 Ártalmatlanítás ➤ A csomagolóanyagot lehetőleg a megfelelő újrahasznosítható hulladék közé tegye.
FanTastic-Vent-IO-16s.book Seite 237 Freitag, 5.
FanTastic-Vent-IO-16s.book Seite 238 Freitag, 5.
FanTastic-Vent-IO-16s.book Seite 239 Freitag, 5.
YOUR LOCAL DISTRIBUTOR DOMETIC.COM/SALES-OFFICES 4445101504 02/2019 DOMETIC GROUP AB Hemvärnsgatan 15 SE-17154 Solna Sweden dometic.