SKL101-I-AUS.book Seite 1 Donnerstag, 18.
SKL101-I-AUS.book Seite 3 Donnerstag, 18. Oktober 2018 10:50 10 SKL101, SKS101 Explanation of symbols Please read this instruction manual carefully before installation and first use, and store it in a safe place. If you pass on the product to another person, hand over this instruction manual along with it. Table of contents 1 Explanation of symbols . . . . . . . . . . . . . . . . . . . . . . . . . . . . . . . . . . . . . . . . . . .3 2 Safety and installation instructions . . . . . . . . . . . . . .
SKL101-I-AUS.book Seite 4 Donnerstag, 18. Oktober 2018 10:50 10 Safety and installation instructions 2 SKL101, SKS101 Safety and installation instructions Please observe the prescribed safety instructions and stipulations from the vehicle manufacturer and service workshops.
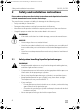
SKL101-I-AUS.book Seite 5 Donnerstag, 18. Oktober 2018 10:50 10 SKL101, SKS101 3 Scope of delivery Scope of delivery 1 6 5 1 2 3 4 No. in fig.
SKL101-I-AUS.book Seite 6 Donnerstag, 18. Oktober 2018 10:50 10 Intended use 4 SKL101, SKS101 Intended use The slide out kitchen for the outside area is intended for installation in trailers and mobile homes. It is solely for the preparation of food in the outside area of the trailer or mobile home. The slide out kitchen has to be connected to gas via an external gas bottle or a quick connector on the external wall of the vehicle.
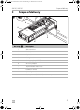
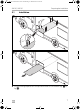
SKL101-I-AUS.book Seite 7 Donnerstag, 18. Oktober 2018 10:50 10 SKL101, SKS101 5.1 Preparing the installation Installation 2 8x 3 ➤ Create a drilling template to mark-up and drill holes to suit M8 bolts (fig. 2 to fig. 3).
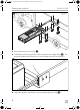
SKL101-I-AUS.book Seite 8 Donnerstag, 18. Oktober 2018 10:50 10 Preparing the installation SKL101, SKS101 4 ➤ Mount the device as shown (fig. 4). ➤ Fit M8 bolts with locking washers from underneath (not supplied) (fig. 4). The length of the bolts should be at least 30 mm longer than the floor thickness. 5 1 ➤ Adjust the height as needed by using the height adjustment (fig. 5 1).
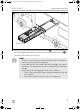
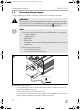
SKL101-I-AUS.book Seite 9 Donnerstag, 18. Oktober 2018 10:50 10 SKL101, SKS101 Preparing the installation 6 5x 1 ➤ Verify the smooth sliding of the slide out kitchen (fig. 6). Ensure that slider locks are fully engaged when kitchen is extended and locking release tabs (fig. 6 1) are releasing the slider locks correctly. I EN NOTE • Slider locks are working correctly if the kitchen does not slide back into cavity when you give it a light push.
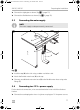
SKL101-I-AUS.book Seite 10 Donnerstag, 18. Oktober 2018 10:50 10 Preparing the installation 5.2 SKL101, SKS101 Connecting the gas supply The gas supply may only be installed by a tested and certified gas plumber. ! I WARNING! The female gas connection provided can only be connected to a rigid connection. For use with a flexible hose, install a copper pipe to the base plate of the slide out kitchen and fix it rigidly (fig. 7, page 10).
SKL101-I-AUS.book Seite 11 Donnerstag, 18. Oktober 2018 10:50 10 SKL101, SKS101 Preparing the installation ➤ Connect the rigid pipe as shown (fig. 7 1, page 10). ➤ Connect the flexible hose as shown (fig. 7 2, page 10). 5.3 I Connecting the water supply NOTE The water supply can be permanently connected. 8 4 3 1 2 fig. 8 ➤ Install the tap (4) to the sink using a rubber seal either side. ➤ Attach the flexible water hose (3) to the tap.
SKL101-I-AUS.book Seite 12 Donnerstag, 18. Oktober 2018 10:50 10 Technical data 6 SKL101, SKS101 Technical data Ref. no.: SKL101 SKS101 9600006441 9600019015 Nominal gas consumption: Gas category: Connection pressure: 16 MJ/h Category l3, universal LPG AT, DE, EE, LT, LV, MT, PL: 30 mbar BE, CH, ES, FR, GB, GR, IE, IT, LU: 28 – 30/37 mbar CY, CZ, DK, FI, HU, IS, NL, NO, SE, SI, SK: 28 – 30 mbar AUS, NZ: 27.5 mbar Number of burners: 3 Burner output in total: 16.9 MJ/h Burner 1: 3.
SKL101-I-AUS.book Seite 13 Donnerstag, 18. Oktober 2018 10:50 10 SKL101, SKS101 Technical data Dimensions SKL101 9 B C 3 A 2 1 No. in fig.
SKL101-I-AUS.book Seite 14 Donnerstag, 18. Oktober 2018 10:50 10 Technical data SKL101, SKS101 SKS101 0 B C 3 A 2 1 No. in fig.