RUA8408X-I-AU.book Seite 1 Donnerstag, 12.
RUA8408X-I-AU.book Seite 3 Donnerstag, 12. April 2018 12:16 12 RUA6408X, RUA8408X Explanation of symbols Please read this instruction manual carefully before installation and first use, and store it in a safe place. If you pass on the product to another person, hand over this instruction manual along with it. I NOTE You can find details on the operation in the operation manual. Table of contents 1 Explanation of symbols . . . . . . . . . . . . . . . . . . . . . . . . . . . . . . . . . . . . . . . . .
RUA8408X-I-AU.book Seite 4 Donnerstag, 12.
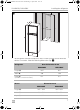
RUA8408X-I-AU.book Seite 5 Donnerstag, 12. April 2018 12:16 12 RUA6408X, RUA8408X 3 Scope of delivery • Make sure that the refrigerator circuit is not damaged during transportation. The refrigerant in the refrigerator circuit is highly flammable. In the event of any damage to the refrigerator circuit (smell of ammonia): – Switch off the refrigerator if applicable. – Avoid naked flames and sparks. – Air the room well.
RUA8408X-I-AU.book Seite 6 Donnerstag, 12. April 2018 12:16 12 Accessories 4 RUA6408X, RUA8408X Accessories Available as accessories (not included in the scope of delivery): Description LS300 ventilation grille 3776 gas exhaust vent All the accessories are available from specialist dealers. If you have any questions, please contact the dealer or your service partner directly. 5 Intended use The refrigerators are designed for installation in caravans or motorhomes.
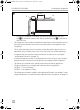
RUA8408X-I-AU.book Seite 7 Donnerstag, 12. April 2018 12:16 12 RUA6408X, RUA8408X Installing the refrigerator 1 C W A H D B • The refrigerator must be installed in a recess so that it stands secure when the vehicle is in motion. Note the following dimensions (fig.
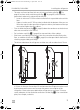
RUA8408X-I-AU.book Seite 8 Donnerstag, 12. April 2018 12:16 12 Installing the refrigerator RUA6408X, RUA8408X Installation with two side vents 2 3b 6 1 5 4 2 3a Pos. in Description fig.
RUA8408X-I-AU.book Seite 9 Donnerstag, 12. April 2018 12:16 12 RUA6408X, RUA8408X Installing the refrigerator • The outer wall must be fitted with one air inlet ventilation grille (fig. 2 3a, page 8) and one outlet ventilation grille (fig. 2 3b, page 8) so that the heat generated can be easily released to the outside: – Lower air inlet vent LS300 must be installed as flush as possible to the vehicle floor.
RUA8408X-I-AU.book Seite 10 Donnerstag, 12. April 2018 12:16 12 Installing the refrigerator RUA6408X, RUA8408X Installation with one lower side vent and one roof vent 4 6 1 5 4 2 3 Pos. in Description fig.
RUA8408X-I-AU.book Seite 11 Donnerstag, 12. April 2018 12:16 12 RUA6408X, RUA8408X Installing the refrigerator ≥ 300 5 1 2 – If a roof air conditioner is installed, the distance between the roof vent (fig. 5 1) and the air outlet of the roof air conditioner (fig. 5 2) must be at least 300 mm. • The refrigerator must not be installed at the side of the air inlet and outlet vents as this leads to poor performance and increases the power consumption of the refrigerator.
RUA8408X-I-AU.book Seite 12 Donnerstag, 12. April 2018 12:16 12 Installing the refrigerator 6.2 RUA6408X, RUA8408X Installing the refrigerator in a sealed location separate to the living space Gas-powered refrigerators in caravans or motorhomes must be installed in a sealed location. This means that the combustion air can not be extracted from the interior and exhaust fumes are prevented from directly entering the living space.
RUA8408X-I-AU.book Seite 13 Donnerstag, 12. April 2018 12:16 12 RUA6408X, RUA8408X Installing the refrigerator OPTIONAL: ➤ If the refrigerator stands on a platform, install the bottom trim piece in order to seal the space between the refrigerator and the platform. 7 1 – Apply a sealing strip (fig. 7 1) to the lower surface of the bottom trim piece. 8 1 2 – Push the bottom trim piece with the four plugs (fig. 8 1) into the holes on the front frame of the refrigerator. – Snap the three catches (fig.
RUA8408X-I-AU.book Seite 14 Donnerstag, 12. April 2018 12:16 12 Installing the refrigerator 6.3 I RUA6408X, RUA8408X Making air inlet and outlet vents NOTE At high ambient temperatures, the refrigerator can only provide its maximum cooling capacity if the optimum ventilation has been provided. ➤ Make a cut out in the wall to fit an appropriate upper and lower vent system, choose LS300 check the dimensions required for the vent. See chapter “Preparing the installation” on page 6.
RUA8408X-I-AU.book Seite 15 Donnerstag, 12. April 2018 12:16 12 RUA6408X, RUA8408X 6.4 Installing the refrigerator Installing the drain water hose ➤ To avoid damage on the drain water hose, position the hole for the drain water hose in a way, that the hose does not touch the boiler casing. ➤ Drill a hole through the floor at the rear of the refrigerator. ➤ Install the drain water hose through the drilled hole.
RUA8408X-I-AU.book Seite 16 Donnerstag, 12. April 2018 12:16 12 Installing the refrigerator RUA6408X, RUA8408X a b ➤ Ensure the installation frame is water resistant (fig. a). ➤ Insert the installation frame and screw it down tightly (fig. b). Use all the fixing holes for this. c 3. 2. 1. ➤ Fit the ventilation grille (1. and 2. in fig. c). ➤ Insert the slider and lock the ventilation grille with it (3. in fig. c).
RUA8408X-I-AU.book Seite 17 Donnerstag, 12. April 2018 12:16 12 RUA6408X, RUA8408X 6.6 Installing the refrigerator Install the roof vent d e 1 2 No. in fig. d Description 1 Hood 2 Installation frame ➤ Ensure the installation frame is water resistant (fig. e).
RUA8408X-I-AU.book Seite 18 Donnerstag, 12. April 2018 12:16 12 Installing the refrigerator f RUA6408X, RUA8408X g ➤ Insert the installation frame and screw it down tightly (fig. f). Use all the fixing holes for this. ➤ Insert the hood and screw it down tightly (fig. g).
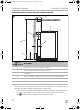
RUA8408X-I-AU.book Seite 19 Donnerstag, 12. April 2018 12:16 12 RUA6408X, RUA8408X 6.7 Installing the refrigerator Installing the flue duct h 1 2 3 10 4 5 9 6 7 6 8 I EN NOTE • Install the Dometic gas flue kit 3776. Contact the customer service (see back page). • Do not install an additional flue stack, as this leads to poor performance and increases the power consumption of the refrigerator. • Mount the flue duct under the upper ventilation grille (fig. h 1).
RUA8408X-I-AU.book Seite 20 Donnerstag, 12. April 2018 12:16 12 Installing the refrigerator RUA6408X, RUA8408X Install the flue duct as follows: i j 1. 1. 3. 2. min. 15 mm 2. ➤ Make a rectangular opening in the outer wall of the vehicle (fig. i). – The opening must be as wide as the flue pipe (fig. h 3, page 19). – The opening must be high enough that the flue pipe fits through at a 45° angle. ➤ Insert the coil (fig. h 7, page 19) in the flue pipe (fig. h 8, page 19) of the refrigerator.
RUA8408X-I-AU.book Seite 21 Donnerstag, 12. April 2018 12:16 12 RUA6408X, RUA8408X Installing the refrigerator k ➤ Attach the cover for the flue stack outside on the vehicle (fig. k).
RUA8408X-I-AU.book Seite 22 Donnerstag, 12. April 2018 12:16 12 Installing the refrigerator 6.8 ! I RUA6408X, RUA8408X Securing the refrigerator CAUTION! Only screw through the bushes built into the refrigerator, otherwise foamed components, including electrical wiring, can be damaged. NOTE Ensure that the screws are tight, even when under increased loads (while driving). ➤ Push the refrigerator firmly into its final location with the front flange sitting hard against the recess front.
RUA8408X-I-AU.book Seite 23 Donnerstag, 12. April 2018 12:16 12 RUA6408X, RUA8408X Connecting the refrigerator 7 Connecting the refrigerator 7.1 Connecting to the gas supply A I EN NOTICE! • This refrigerator may only be connected to the gas supply by a specialist in accordance with the applicable guidelines and standards. • Only use cylinders of universal LPG gas fitted with an approved gas pressure regulator.
RUA8408X-I-AU.book Seite 24 Donnerstag, 12. April 2018 12:16 12 Connecting the refrigerator RUA6408X, RUA8408X It must be possible to shut off the refrigerator from the gas line separately by means of a shut-off device. The shut-off device must be easily accessible. m 1 ➤ Connect the refrigerator securely to the gas supply (fig. m). Always use a back up wrench when loosening and tightening connections.
RUA8408X-I-AU.book Seite 25 Donnerstag, 12. April 2018 12:16 12 RUA6408X, RUA8408X 7.2 Connecting the refrigerator Connecting the device to electrical power supply n A I EN NOTICE! • The electrical installation and repairs may only be performed by a specialist in accordance with the applicable regulations and standards. • The device can be connected to 12 V DC and 230 – 240 V AC power supply.
RUA8408X-I-AU.book Seite 26 Donnerstag, 12.
RUA8408X-I-AU.book Seite 27 Donnerstag, 12.
RUA8408X-I-AU.book Seite 28 Donnerstag, 12. April 2018 12:16 12 Connecting the refrigerator RUA6408X, RUA8408X AC power ➤ Connect the refrigerator with the mains plug to an AC socket. DC power Please note the following cable sizes: – – – – 12 V DC vehicle battery connection: ≥ 10 mm2 12 V DC house battery connection: ≥ 1 mm2 Connection D+: ≥ 0.5 mm2 Total cable length: max. 8 m ➤ Protect the DC power supply for the 12 V DC heater with 30 A fuse. ➤ Protect the DC power supply for controls with 3 A fuse.
RUA8408X-I-AU.book Seite 29 Donnerstag, 12. April 2018 12:16 12 RUA6408X, RUA8408X 7.3 Connecting the refrigerator Alternative connection methods for DC power supply p Refrigerator DC connections D+ D Control C + B - Element DC E + F - House Battery Anderson Plug Anderson cables must be the recommended size. Connection to suit motor home or caravan with the D+ wire connected to the vehicle alternator or ignition switch. No house battery recharging from the vehicle.
RUA8408X-I-AU.book Seite 30 Donnerstag, 12. April 2018 12:16 12 Connecting the refrigerator RUA6408X, RUA8408X r Refrigerator DC connections D+ D Control C + Element DC B E - + F - Fridge Switch House Battery Anderson Plug Vehicle Anderson plug must be controlled by ignition relay. Anderson cables must be the recommended size. Using a fridge movement switch to add 12 Vg to the D+ connection wire, only when the vehicle is moving. No house battery recharging from the vehicle.
RUA8408X-I-AU.book Seite 31 Donnerstag, 12. April 2018 12:16 12 RUA6408X, RUA8408X Connecting the refrigerator t Refrigerator DC connections D+ D Control C + B - Element DC E + F - House Battery Anderson Plug Vehicle Anderson plug must be controlled by ignition relay. Anderson cables must be the recommended size. Anderson plug recharging the house battery via a power diode. The D+ wire can only get a 12 V signal when the battery is being charged. House battery recharged by vehicle.