
Operation Manual

9
PRODUCT CARE
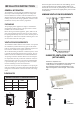
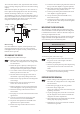
DEFROSTING
Shut off the refrigerator by turning the knob A to 1.
“OFF” position.
2.
Leave the cabinet and freezer doors open. Filling 3.
the ice tray with hot water and placing it on the
freezer shelf can reduce defrosting time.
Defrost water
-
cle at the rear of the refrigerator where it nor-
mally evaporates. With a lot of defrost water as a
remove the drip tray and turn it around. Replace
the drip tray with the outlet on the right side of the
drip tray and put a bowl under the outlet.
When the ice has melted, dry the interior of the 4.
refrigerator with a clean cloth.
Replace the drip tray to its original position and 5.
connect the draining tube.
Replace all food and set the thermostat to “MAX” 6.
for a few hours. Then reset the thermostat to the
desired setting, usually at mid-setting.
CLEANING THE REFRIGERATOR
Always keep the refrigerator clean. Cleaning the refrigera-
tor is usually done after it is defrosted or put into storage.
To clean the interior liner of the refrigerator, use lukewarm
evaporator, gasket, ice tray and shelves.
Note
parts, as the protective surfaces will be damaged.
It is important to keep the area at the back of the refrigerator
clean. Check the lower vent, upper vent and area between
these openings for any obstructions such as bird/insect nests,
spider webs, etc. Clean the coils on the back of the refrigera-
tor. Use a soft bristled brush to dust off the coils. Keep the
refrigerator area free from combustible material, gasoline and
CAUTION
Donotuse:
Aknifeoranicepick,orothersharptools•
toremovefrostfromthefreezershelves.It
cancreatealeakintheammoniasystem.
Ahotairblower.Permanentdamagecould•
resultfromwarpingthemetalorplastic
parts.
MAINTENANCE & SERVICE
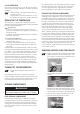
REPLACING THE HEATER
The refrigerator is equipped with two electrical heaters, one
To replace the heater proceed as follows:
Unplug the refrigerator power cord from the 230-1.
to the refrigerator.
Remove the refrigerator from the enclosure. 2.
-3.
erator.
With a pair of pliers, unfold the lug holding the lid 4.
of the boiler casing and open the lid.
Remove some insulation wool so that the heater is 5.
accessible.
Turn and lift the heater out of its pocket. 6.
Fit the new heater into the pocket.7.
Reconnect the heater leads at the top.8.
Put back the insulation and close the lid of the 9.
boiler.
Reinstall the refrigerator in the enclosure.10.
Check all connections for gas leaks.11.
A qualified gas fitter should be employed12.
13.
PERIODIC MAINTENANCE
CHECKING THE CONNECTIONS
Check all connections in the ULP gas system (at the back of
the refrigerator) for gas leaks. The ULP gas supply must be
turned on. Apply a non-corrosive bubble solution to all ULP
gas connections. The appearance of bubbles indicates a leak
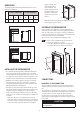
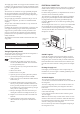
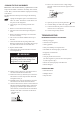
CHECKING THE ULP GAS PRESSURE
The ULP gas pressure should be checked and the main regula-
tor readjusted if pressure is incorrect. The correct operating
pressure is 2,7 kPa. The correct place to measure the ULP gas
pressure is at the test port just ahead of the burner jet.
NUT
PRESSURE TEST PORT
BURNER JET
BURNER MOUNTING SCREW
SPARK ELECTRODE
BURNER TUBE
THERMOCOUPLE
Service and maintenance must be done on a regular schedule to
14.
gas fitter
This work should be made by a qualified service man.
electrical
or gas technician.