
Operation Manual

6
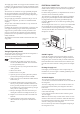
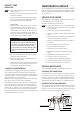
Battery
Refrigerator
Switch key
Relay
Breaker
point
Ignition
coil
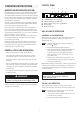
Before leaving
Once the installation is complete, test the operation of the
refrigerator and instruct the user on its correct operation.
If the appliance fails to operate correctly, contact your local
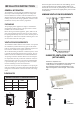
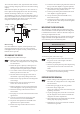
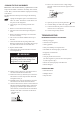
RE-HINGING THE DOOR
To re-hinge the door, follow these steps:
Before working on the refrigerator, make sure the 1.
are disconnected.
2.
seal strips. Remove the panel and place it aside.
Use a socket wrench to loosen the upper hinge pin. 3.
Remove pin and save for later use.
Lift door off the lower hinge pin. Place door on 4.
soft material to prevent any damage to the door.
Remove lower hinge pin and insert into hinge hole 5.
on new hinge.
Remove lower hinge by unscrewing the three 6.
screws. Save screws for later use.
Remove plugs that cover the screw holes located 7.
on the side opposite of the present hinge location.
Fasten the new hinge with the three screws re-8.
moved earlier.
Insert plugs to cover the unused screw holes on the 9.
opposite side.
Unscrew screws and remove upper hinge and 10.
travel catch. Save screws for reinstallation.
Flip travel catch upside down and install on the 11.
opposite side of its present location.
Install a new hinge. Fasten with the screws re-12.
moved earlier.
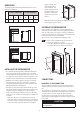
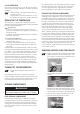
MOUNTING THE DOOR PANEL
The refrigerator is normally delivered without door panel
and it is advisable to mount the panel before the refrigerator
is installed in the enclosure. The lower decoration strip and
parts bag are taped inside the door.
Before starting the mounting work, read this instruction thor-
oughly and check that the panel dimensions are in compli-
ance with those given in the following table:
PANEL DIMENSIONS
Max thickness 5/32 (4 mm)
Height Width
max min max min
mm 667 665 498 496
To mount the panel, follow these steps:
Slide the panel from the bottom of the door into 1.
the grooves on the vertical edges of the door .
Push the panel upwards. 2.
Take the two plastic panel stops from the parts bag 3.
and put them in the two holes at the lower door
frame.
Put the decoration strip across the door and fasten 4.
it with three screws from the parts bag.
REFRIGERATOR REMOVAL
Before working on the refrigerator, make sure the 1.
are disconnected.
Shut off the gas supply at the ULP gas bottle 2.
3.
Always use a back up wrench when loosening and
tightening connections.
Cap the gas supply line, loosen the screws anchor-4.
ing the refrigerator to the enclosure and slide the
refrigerator out of the compartment.
When replacing the refrigerator make sure that the 5.
sealing strips are properly positioned.
Replacement is the reverse of removal. Check all 6.
connections for gas leaks.
The connections must be clean, tight and free from corrosion.
If not, a resulting voltage drop will cause a decreased cooling
capacity.
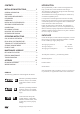
Note! -
element can discharge a battery in a very short time.
relay to be installed on the tow vehicle or in the caravan. The
refrigerator when the ignition is turned off.
Locate the door. Remove plug and latch retainer on 13.
the top of the door. Replace in opposite positions.
Place door on lower hinge pin. Mount upper hinge 14.
pin and fasten it using a socket wrench.
Locate top decoration panel and detach the travel 15.
catch. Replace in opposite position.
Fit top decoration panel and reinstall screws, 16.
knobs and seal strips.
Check the travel catch to make sure it works prop-17.
erly, that the door closes easily and that the gasket
seals well on all sides.