
Manual


EN
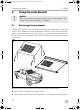
Using the solar blanket PSB150
12
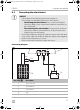
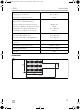
Connecting the solar charge controller
➤ Connect the red lead of the battery cable (grey Anderson connector) to the
positive (+) battery terminal on the solar charge controller.
➤ Connect the black lead of the battery cable (grey Anderson connector) to the
negative (–) battery terminal on the solar charge controller.
➤ Connect the red lead of the solar blanket cable (black Anderson connector) to
the positive (+) solar blanket terminal of the solar charge controller.
➤ Connect the black lead of the solar blanket cable (black Anderson connector) to
the negative (–) solar blanket terminal of the solar charge controller.
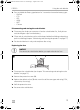
Connecting to a battery
➤ Connect the Alligator clips to the battery terminals. Connect the red lead with
red clamp to the positive (+) battery terminal. Connect the black lead with black
clamp to the negative (–) battery terminal. Ensure that the connection is secure
and tight.
➤ Connect the grey Anderson plug to the grey Anderson socket of the extension
cable.
➤ Connect the grey Anderson plug of the extension cable to the grey Anderson
socket of the battery cable of the solar charge controller.
✓ The solar charge controller powers on.
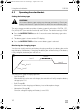
The solar charge controller performs a self-test, a software version test, a rated
voltage and current test and an external battery temperature test.
Connecting the temperature sensor
➤ Connect the temperature sensor wires to the solar charge controller and attach
ring terminal to the battery.
Connecting the solar blanket
➤ Connect the black Anderson plug to the Anderson socket of the solar blanket.
✓ The battery is loading according to the charging status (see chapter “Monitoring
the charging stages” on page 14).
✓ The symbol indicates that the solar blanket is connected.
PSB150W-IO-AUS.book Seite 12 Donnerstag, 2. August 2018 9:15 09