
Installation Guide


EN
Installation Dometic Harrier Inverter
14
I
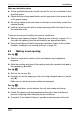
➤ Clip the transition duct (3) in place over the duct insert (1).
I
➤ Raise the ceiling plate (5) into position and clip the transition duct into
place.
➤ The 4 bolts (4) are used to clamp the rooftop unit and ceiling plate into
place. Use the supplied washers with the bolts.
A
➤ Tighten the bolts using a torque spanner and a fastening torque of
4.0 Nm.
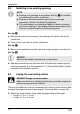
Electrical connection
The complete circuit diagram can be found in fig. e.
See fig. b
240 Vw cable
➤ Connect the roof air conditioner with the 240 Vw voltage supply.
Connect the cables (1) to a cable connector (2).
Connecting the circuit board
➤ Connect to the ADB ceiling plate:
– the white 13-pin connector from the ADB cover (3)
– the black 4-pin connector from the rooftop unit (4)
NOTE
For the thicker roof seal refer to the instructions included with the
seal kit.
NOTE
Ensure the transition duct or seal is located correctly over the duct
insert, otherwise the performance of the unit may be affected.
NOTICE! Risk of damage
Tighten to the specified torque.
Ensure all 4 bolts are tightened by the same amount. Uneven
tightening can cause distortion of the roof air conditioner and
result in possible damage.