
Installation Guide


EN
Dometic Harrier Inverter Installation
13
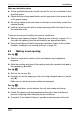
See fig. 9
➤ Make an opening on one side in order to feed through the electrical power
supply cable.
➤ Feed the 240 Vw cable through the opening into the vehicle interior.
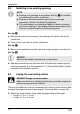
8.5 Installing the roof air conditioner ADB
A
Attaching the roof air conditioner
See fig. a
➤ Fit the roof frame (2) onto the roof of the vehicle over the opening.
I
so
➤ Seal it with flexible, non-hardening butyl sealing compound.
➤ Position the duct insert (1) into the roof frame (2).
➤ Lift the roof air conditioner onto the roof of the vehicle.
➤ Position the roof air conditioner over the installation opening.
Observe the direction of travel.
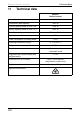
➤ Choose the suitable duct seal in accordance with the following table:
NOTICE! Risk of damage
Observe the structural strength of the roof of the vehicle. The roof
of the vehicle must be able to bear the weight of the roof air con-
ditioner. The roof must not be indented or deformed by the weight
of the unit, even over a longer period of time.
NOTE
Ensure the roof frame is oriented correctly based on opening size
otherwise this will cause problems with installation later (refer to
markings on the plate).
Roof thickness Seal type
30 – 60 mm transition duct
60 – 100 mm seal – thicker roof
(transition duct not required)