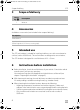
S7P-IO-16s.book Seite 1 Donnerstag, 23. Februar 2017 9:17 21 4 S7P 1 1 1 – 2,5 mm 5 0 1/- A mm A+ B +1/-0 mm 2 6 m 0m B 8 R= 1. 80 mm 2. Ø 160 mm 7 3 A W 1. 2. ≥ 22 mm 02/2017 MO1132I01 B Dometic WAECO International GmbH Hollefeldstrasse 63 D-48282 Emsdetten 4445101861 L 80 mm ≤ 2 Nm dometic.
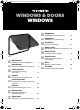
S7P-IO-16s.book Seite 1 Donnerstag, 23. Februar 2017 9:13 21 WINDOWS & DOORS WINDOWS SV Väggfönster Monterings- och bruksanvisning . . . . . . . . 63 NO Veggvindu Monterings- og bruksanvisning . . . . . . . . . 70 S7P EN FI Sivuikkuna RU Окно в стену PL Okno ścienne SK Stenové okno CS Okno Wall window Installation and Operating Manual. . . . . . . . 2 DE Wandfenster Montage- und Bedienungsanleitung . . . . . .
S7P-IO-16s.book Seite 2 Donnerstag, 23. Februar 2017 9:13 21 Explanation of symbols S7P Please read this instruction manual carefully before installation and first use, and store it in a safe place. If you pass on the product to another person, hand over this instruction manual along with it. Table of contents 1 Explanation of symbols . . . . . . . . . . . . . . . . . . . . . . . . . . . . . . . . . . . . . . . . . . .2 2 Safety and installation instructions . . . . . . . . . . . . . . . . . . . . .
S7P-IO-16s.book Seite 3 Donnerstag, 23. Februar 2017 9:13 21 S7P 2 Safety and installation instructions Safety and installation instructions Please observe the prescribed safety instructions and stipulations from the vehicle manufacturer and service workshops.
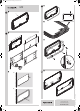
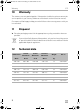
S7P-IO-16s.book Seite 4 Donnerstag, 23. Februar 2017 9:13 21 Scope of delivery 3 Scope of delivery No. in fig. 1 Description 1 4 S7P Window Accessories Available as accessories (not included in the scope of delivery): Description Pleated blind Installation kit (Fastening bolts 3.5 x 12 mm, securing clips) 5 Intended use The S7P wall window is suitable for installing in delivery vans with curved exterior surfaces (radius of 5000 mm). The wall windows are designed as vent windows.
S7P-IO-16s.book Seite 5 Donnerstag, 23. Februar 2017 9:13 21 S7P Installing windows 6.1 Pressing out the hole See fig. 2 6.2 Preparing the installation Supplementary to fig. 3 ➤ Measure wall thickness W (A) If the wall thickness is less than 22 mm, then you must add to the wall section with a suitable mounting frame (B) ➤ Determine the type of clip by referring to the following table: 7 Wall thickness W Clip type Ref. no.
S7P-IO-16s.book Seite 6 Donnerstag, 23. Februar 2017 9:13 21 Installing windows S7P See fig. 5 A NOTICE! Observe the sealant manufacturer's instructions. ➤ Seal the window frame with a flexible non-hardening sealing compound (e.g. SikaLastomer-710).
S7P-IO-16s.book Seite 7 Donnerstag, 23. Februar 2017 9:13 21 S7P Using the window ➤ Fasten the window using the fastening bolts and the appropriate securing clips. Firstly fasten the clips on the left and right at the bottom. I NOTE If a window frame guide rail does not fit evenly against the vehicle wall, then you must use more clips, where required, than are specified in the table. ➤ Remove the protective film from both sides of the window glass.
S7P-IO-16s.book Seite 8 Donnerstag, 23. Februar 2017 9:13 21 Warranty 10 S7P Warranty The statutory warranty period applies. If the product is defective, please contact the service partner in your country (addresses on the back on the instruction manual). Our experts will be happy to help you and will discuss the warranty process with you in more detail. 11 Disposal ➤ Place the packaging material in the appropriate recycling waste bins wherever possible.