5 S4 B A 4 mm 1 2 1 h W 2 h W 3 1 3 6 4 2 B A B+4 mm H+3 mm B H 7 C D m 12 mm 12 m 3 Ø 24 mm A 8 B 1. 2.
9 b 2. 1. 1 0 c 2. 1. 1. 3. d a 1. 2. 2. www.dometic-waeco.com 2 4445100593 F Dometic WAECO International GmbH Hollefeldstrasse 63 D-48282 Emsdetten M01102B 04/2016 1.
EN DE FR ES IT NL DA SV NO FI PT RU Wall window Installation and Operating Manual . . . 3 Wandfenster Montage- und Bedienungsanleitung 12 Fenêtre murale Instructions de montage et de service . . . . . . . . . . . . . . . . . . 21 Ventana Instrucciones de montaje y de uso . 30 Finestra Istruzioni di montaggio e d’uso . . . . 39 Wandvenster Montagehandleiding en gebruiksaanwijzing . . . . . . . . . . . . . 48 Vægvindue S4 Monterings- og betjeningsvejledning . . . . . . . . . . . .
S4 Notes on using the instruction manual Please read this instruction manual carefully before installation and first use, and store it in a safe place. If you pass on the product to another person, hand over this instruction manual along with it. Table of contents 1 Notes on using the instruction manual. . . . . . . . . . . . . . . . . . . . . . . . 3 2 Safety and installation instructions. . . . . . . . . . . . . . . . . . . . . . . . . . . 4 3 Scope of delivery . . . . . . . . . . . . . . . . . .
Safety and installation instructions 2 S4 Safety and installation instructions Please observe the prescribed safety instructions and stipulations from the vehicle manufacturer and service workshops.
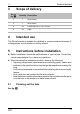
S4 Scope of delivery 3 Scope of delivery No. in fig. 1 4 Quantity Description 1 1 Outer frame 2 1 Inner frame 3 26 Fastening bolt ∅ 3.9 x 25 mm 4 26 Caps Intended use The S4 wall window is suitable for installing in caravans and motorhomes. It is designed as a vent window or sliding window. 5 Instructions before installation ➤ Before installation, check the wall thickness of your vehicle. Consult the vehicle manufacturer if you have any questions.
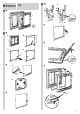
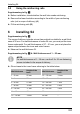
Installing S4 5.2 S4 Using the reinforcing rails Supplementary to fig. 3 ➤ Before installation, check whether the wall hole needs reinforcing. ➤ Remove the foam/insulation according to the width of your reinforcing rails (not in scope of delivery) (A). ➤ Fit the reinforcing rails (B). 6 Installing S4 Supplementary to fig. 4 The scope of delivery includes a inner frame which is suitable for a wall thickness of 26 mm. For wall thicknesses of under 26 mm, you must put the inner frame underneath.
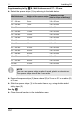
S4 Installing S4 Supplementary to fig. 5 B: Wall thicknesses of 27 – 53 mm: ➤ Select the spacer strips (1) by referring to the table below. Wall thickness Height of the spacer strips Fastening screws (Not in scope of delivery) 27 – 28 mm 5 mm 3.9 x 30 mm 29 – 30 mm 7 mm 3.9 x 30 mm 31 – 32 mm 9 mm 3.9 x 30 mm 33 – 34 mm 11 mm 3.9 x 30 mm 35 – 36 mm 13 mm 3.9 x 30 mm 37 – 38 mm 15 mm 3.9 x 40 mm 39 – 40 mm 17 mm 3.9 x 40 mm 41 – 42 mm 19 mm 3.9 x 40 mm 43 – 44 mm 21 mm 3.
Installing S4 S4 See fig. 7 A NOTICE! Observe the sealant manufacturer's instructions. ➤ Seal the outer frame with a flexible non-hardening sealing compound (e.g. SikaLastomer-710). See fig. 8 ➤ Place the outer frame in the middle of the wall section. ➤ Press the outer frame slightly onto the wall so that the packing compound spreads out. ➤ Place the inner frame into the support strips on the outer frame and attach it with the appropriate fastening screws (1). Only fasten the screws slightly by hand.
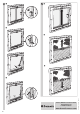
S4 Using S4 7 Using S4 7.1 Using the sliding window (fig. 9) Opening the sliding window ➤ Loosen the safety bolts (1) first, if necessary. ➤ Press the locking pivot on the handle and push the window into the required position. Closing the sliding window ➤ Close the window until you hear the lock click. 7.2 Using the vent window (fig. 0) Opening the vent window ➤ Press the locking button on all the rotary bolts and turn by 90°.
Maintaining and cleaning S4 S4 7.3 Opening and closing roller blinds A NOTICE! Risk of damage due to a build-up of heat between the roller blind and the window. In strong sunlight, only close the blackout roller blind two thirds of the way. ➤ Hold the blackout roller blind at the grip and pull it to the flyscreen (fig. b). ➤ Click the blackout roller blind onto the flyscreen. ➤ Select the required position by moving the two latched-roller blinds at the same time and allow to latch into place (fig. c).
S4 9 Warranty Warranty The statutory warranty period applies. If the product is defective, please contact the service partner in your country (addresses on the back on the instruction manual). Our experts will be happy to help you and will discuss the warranty process with you in more detail. 10 Disposal ➤ Place the packaging material in the appropriate recycling waste bins wherever possible.