
User manual


- 3 -
INTRODUCTION
Thank you for choosing the Dometic Wine Cellar.
Please read the following instructions carefully be-
fore installing your new wine cellar. We trust you
will be completely satised with your purchase.
The wine cellar must be installed and used accord-
ing to these instructions in order for it to operate
correctly and economically.
TRANSIT DAMAGE
Inspect the wine cellar for transit damage. You
must report any damage the company responsible
for the delivery within the legal or stated time for
this type of product. If there is no such established
report time, the damage must be reported within
seven days of delivery.
ACCESSORIES
Please check that the following accessories are
supplied with the unit:
Handle
Screws
Drip tray
Keys
CD
Instruction manual
Necessary additional tools not included:
Screwdriver (star quad)
Adjustable spanner or xed spanner (21 mm)
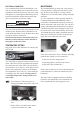
DATA PLATE
Check the data plate, inside the wine cellar at the
top left, to ensure you have received the right
model.
The data plate shows details
that you will need to quote if
you have to contact service
personnel.
It is a good idea to make a note of them here:
Model designation . . . . . . . . . . . . . . . . . . . . . . . .
Product number . . . . . . . . . . . . . . . . . . . . . . . . . .
Serial number . . . . . . . . . . . . . . . . . . . . . . . . . . .
Voltage . . . . . . . . . . . . . . . . . . . . . . . . . . . . . . . .
•
•
•
•
•
•
•
•
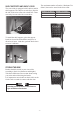
INSTALLATION
Please follow these installation instructions:
For best performance, air needs to circulate freely
over the cooling unit behind the wine cellar.
The free-standing design of the cellar means that
it should stand at least 25 mm from the rear and
side walls.
Allow a clearance of at least 100 mm above the
wine cellar.
Remove the transport pallet on which your
wine cellar rests.
Adjust the feet of the wine cellar. Make
sure it stands in a vertical position in both
directions. Use a spirit level if necessary.
Adjust the feet to allow a 30 mm clear
-
ance under the wine cellar.
For optimum performance, please place
your wine cellar far away from any source
of heat (radiator, cooker or intense sun-
light).
Check that the charcoal lter is in place at
the top left corner inside the wine cellar.
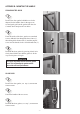
Fit the door handle to the door, see
“Appendix B”.
Attach the drip tray on the back. The
screws are already attached at the back.
•
•
•
1.
2.
3.
4.
5.
6.
2
1
3