
Manual

EN
CRX Installing and connecting the refrigerator
21
Observe the following installation dimensions:
• Keep objects clear of openings in the housing or installation structure (such as
ventilation slots, etc.).
• Condensate is produced when the refrigerator is operating normally. You can
either wipe up the condensate on the floor of the refrigerator in regular intervals,
or drain it through a water drain outlet in the floor of the refrigerator (see chapter
“Mounting the water drain outlet (optional)” on page 21).
7.3 Mounting the water drain outlet (optional)
➤ Connect a hose with an inside diameter of 10 mm (0.4 inch) (not included) to the
water drain outlet.
➤ Lay the refrigerator on its side in order to access the bottom side.
➤ Mount the water drain outlet (fig. 9 2, page 7) aligned to the front or to the
back according to the desired direction.
➤ Remove the water drain plug (fig. 9 1, page 7) inside the refrigerator.
7.4 Installing the refrigerator
Proceed as follows to install the refrigerator:
➤ If you wish to drain the condensate through a hose:
Mount the water drain port (see chapter “Mounting the water drain outlet
(optional)” on page 21)
➤ Undo the transport lock (chapter “Releasing the lock” on page 27).
➤ Open the refrigerator door.
➤ Remove the blanking plugs (fig. 0 2, page 7).
➤ Push the refrigerator into the recess.
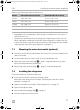
Model Dimensions W x H x D (mm) Dimensions W x H x D (inch)
CRX50 390 x 544 x 550 15.35 x 21.42 x 21.65
CRX65 458 x 535 x 595 18.03 x 21.06 x 23.43
CRX80 485 x 650 x 578 19.09 x 25.59 x 22.76
CRX110 530 x 755 x 608 20.87 x 29.72 x 23.94
CRX140 550 x 825 x 670 21.65 x 32.48 x 26.38
CRX50-65-80-110-140-IO-US.book Seite 21 Montag, 22. Oktober 2018 11:01 11