OPERATING INSTRUCTIONS BLUETOOTH® CAPACITIVE TOUCH THERMOSTAT 3316420.XXX MODEL COOL/FURNACE COOL/FURNACE/HEAT STRIP COOL/FURNACE/HEAT PUMP Read these instructions carefully. These instructions MUST stay with this product. REVISION B USA Form No. 3316468.000 10/16 SERVICE OFFICE (French 3316469.
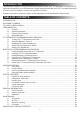
INTRODUCTION This Bluetooth® Capacitive Touch thermostat (hereinafter referred to as “CT thermostat” or “product”) is designed and intended for use in a Recreational Vehicle (hereinafter referred to as "RV"). Use these instructions to ensure correct installation, function, and operation of product. Dometic Corporation reserves the right to modify appearances and specifications without notice. TABLE OF CONTENTS INTRODUCTION....................................................................................
DOCUMENT SYMBOLS Indicates additional information that is NOT related to physical injury. FCC AND IC REGULATIONS This device complies with Part 15 of the FCC Rules. Operation is subject to the following two conditions: (1) this device may not cause harmful interference, and (2) this device must accept any interference received, including interference that may cause undesired operation of the device.
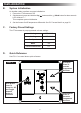
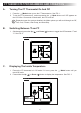
FAMILIARIZATION B. System Initialization An installer needs to perform a system initialization. C. 1. Ensure the CT thermostat is Off. 2. Simultaneously press and hold the Up ( LCD will show “- -”. This completes system initialization. 3. Set the furnace On/Off temperature differential. See "B. Furnace Mode" on page 22. ) button and the / Mode button for three seconds. Factory Preset Settings The CT thermostat is pre-programmed to these settings: D.
CT THERMOSTAT PROGRAMMING AND OPERATION A. Turning The CT Thermostat On And Off / Mode button to turn the CT thermostat on. See FIG. 1. 1. Press the 2. To turn the CT thermostat off, continue pressing the / Mode button until “Off” appears on the LCD. After 15 seconds of illumination, the LCD turns off. Dependent upon the systems installed, the Mode options you will scroll through are Off, Fan, Cool, Furnace, Heat Pump, and Heat Strip. B. Switching Between ºF and ºC 1.
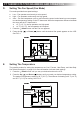
CT THERMOSTAT PROGRAMMING AND OPERATION D. Setting The Fan Speed (Fan Mode) Fan mode provides three speed settings: ●● Low – Fan operates continuously at a low speed. ●● High – Fan operates continuously at a high speed. ●● Auto – Fan and compressor cycle on and off and the speed varies based on room temperature and temperature setting on the CT thermostat. When the temperature difference between the room and the CT thermostat is: ●● >5 °F (-15 °C), the fan operates at a high speed ●● <4 °F (-15.
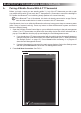
BLUETOOTH® PROGRAMMING AND OPERATION A. Pairing A Mobile Device With A CT Thermostat Before you begin, ensure you are standing within 3’ (1 m) of the CT thermostat you wish to pair your mobile device with. Do not touch the CT thermostat for 15 seconds to ensure the backlight is off. Confirm the Bluetooth® icon is blinking slowly (flashes at 2 second intervals). If the Bluetooth® icon is illuminated, this device is already connected to an app.
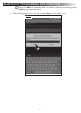
BLUETOOTH® PROGRAMMING AND OPERATION 3. Select one of the available CT thermostat devices on the list that displays on the screen. The app will attempt to connect to the CT thermostat and turn the display backlight on to confirm the app is communicating with the correct CT thermostat. When the CT thermostat backlight is lit, it is communicating with the mobile device. To start pairing with the selected CT thermostat, press Pair With Selected Thermostat. See FIG. 7.
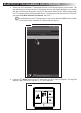
BLUETOOTH® PROGRAMMING AND OPERATION Steps 5-6 MUST be completed within 15 seconds. Otherwise, the pairing process MUST be repeated from step 2. 5. Enter this 2-digit code twice in the app and press Enter. FIG. 9 shows "2121". FIG.
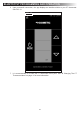
BLUETOOTH® PROGRAMMING AND OPERATION 6. Upon successful connection, the app displays an interface similar to your CT thermostat. See FIG. 10. FIG. 10 7. It is recommended to re-name the CT thermostat at this point. See "B. Changing The CT Thermostat Name" on page 11 for more information.
BLUETOOTH® PROGRAMMING AND OPERATION B. Changing The CT Thermostat Name You can either change the name of the CT thermostat while connected (from the Main screen) or while disconnected (from the Pair Management screen). Renaming a device from the Main screen: 1. Select the Settings menu (upper left) and press Change Name. See FIG. 11. 2. Enter any name which makes it easy for you to identify the system controlled by the CT thermostat. For example “Bed Room” or “Living Room”. See FIG. 12. 3.
BLUETOOTH® PROGRAMMING AND OPERATION Renaming a device from the Pair Management screen: 1. Touch the line for the CT thermostat you wish to re-name. 2. Press Change Name. See FIG. 13. FIG.
BLUETOOTH® PROGRAMMING AND OPERATION 3. Enter any name which makes it easy for you to identify the system controlled by the CT thermostat. For example “Bed Room” or “Living Room”. Press Update to save the new name. See FIG. 14. FIG.
BLUETOOTH® PROGRAMMING AND OPERATION 4. The new name appears on the screen. See FIG. 15. FIG.
BLUETOOTH® PROGRAMMING AND OPERATION C. Setting/Unsetting The Default Device Assuming at least one paired device exists, the app normally reconnects to the last connected CT thermostat when the app launches. If you wish to override this behavior you can set a default device. The default device is the only CT thermostat that the app will try to connect to automatically regardless of the last connected CT thermostat. Only one default CT thermostat can be set per mobile device. To set the default device: 1.
BLUETOOTH® PROGRAMMING AND OPERATION 4. A snowflake icon will appear beside the name of the CT thermostat in the Paired Management screen to show that it is now selected as the default. See FIG. 17. FIG.
BLUETOOTH® PROGRAMMING AND OPERATION To unset a default device: 1. Disconnect from the CT thermostat to display the Pair Management screen. 2. Choose the CT thermostat with the snowflake icon. 3. From the pop-up menu press Unset as Default. See FIG. 18. FIG. 18 4. The snowflake icon disappears from the CT thermostat.
BLUETOOTH® PROGRAMMING AND OPERATION D. Connecting To A Different CT Thermostat 1. To connect to a different CT thermostat (up to four maximum), select the top-left corner of the app to access the Settings menu. See FIG. 19. 2. Press Disconnect to disconnect from the currently-connected CT thermostat. See FIG. 19. FIG.
BLUETOOTH® PROGRAMMING AND OPERATION 3. Either press Connect to choose an already configured CT thermostat (See FIG. 20) or follow the steps in "A. Pairing A Mobile Device With A CT Thermostat" on page 7 to add a new connection. FIG.
BLUETOOTH® PROGRAMMING AND OPERATION E. Switching From Fahrenheit to Celsius Display units can only be changed while a CT thermostat is connected. The displayed temperature units will only be changed on the mobile device, and NOT on the CT thermostat device itself. To change the CT thermostat device display see instructions for changing the display units on the CT thermostat. 1. Select the top-left corner of the app to access the Settings menu. See FIG. 21. 2. Choose Change to Celsius/Fahrenheit.
BLUETOOTH® PROGRAMMING AND OPERATION F. Removing A Paired CT Thermostat From The App 1. Disconnect from the CT thermostat to display the Pair Management screen. 2. Choose the CT thermostat you wish to remove from the app and press Remove Pairing to remove the CT thermostat from the app. See FIG. 22. FIG. 22 G.
MODE DESCRIPTION A. Cool Mode In Cool Mode, the system cycles the compressor On and Off based on room air temperature and temperature set-point on the CT thermostat. The fan turns on first, followed by the compressor approximately 2 minutes later. There are three fan speeds in Cool Mode: ●● “Low”: Fan operates continuously at low speed. The compressor cycles On and Off. ●● “High”: Fan operates continuously at high speed. The compressor cycles On and Off.
MODE DESCRIPTION D. Heat Strip Mode (Select Models) In Heat Strip Mode, the system cycles the heat strip On and Off based on room air temperature and temperature set-point on the CT thermostat. There are three fan speeds in Heat Strip Mode: ●● “Low”: Fan operates continuously at low speed. Heat strip cycles On and Off. ●● “High”: Fan operates continuously at high speed. Heat strip cycles On and Off. ●● “Auto”: Fan operates in low speed and will cycle On and Off with the CT thermostat. SPECIAL FEATURES A.
SPECIAL FEATURES E. Power Interruption In the event power to the air conditioner or control is interrupted, the system will restart with the previous set-points once power is restored. F. LCD Error Code When the system determines one of the faults listed has occurred, an error code displays on the LCD. Error Code: E1 Loss of communication between CT thermostat and module board. LCD will cycle between E1 and previous mode setting. System will shut down.
GENERAL INFORMATION B. Reduce Heat Gain The ability of this air conditioner to maintain the desired inside temperature depends on the heat gain of the RV. Some preventative measures taken by the occupants of the RV can reduce the heat gain and improve the performance of the air conditioner.
MAINTENANCE C. Return Air Housing 1. D. Clean housing with a soft cloth dampened with water and a mild detergent. NEVER use furniture polish, solvents, scouring pads or powders. Fan Motor 1. The blower motor is factory lubricated and requires no service. SERVICE-UNIT DOES NOT OPERATE In the unlikely event the unit fails to operate or operates improperly, check the following before calling your service center.