
Manual
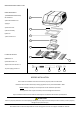


4. POSITION CORMORANT ON ROOF
- Remove the air conditioner from the
carton.
- Position the unit over the gasket so that
the corners of the square hole in the
caravan roof line up with the corners of
the square hole underneath the
CORMORANT (Fig 6).
TIP: Have one person inside the vehicle
looking through the hole while the other
is on the roof adjusting the position of the
unit
The unit weights appro
xi
mate
l
y
45kg. Ensure a two person lift or
use a mechanical hoist to avo
i
d
the risk of
i
n
j
ury
.
- DO NOT slide the unit on the roof, this
may damage the gasket and result in
leaks
- Four M8 mounting holes on the chassis
underneath the air conditioner will line
up with the corners of the square roof
hole (Fig 7).
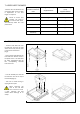
Fig 6: Position the CORMORANT over the roof gasket and set it down
ge
n
t
l
y
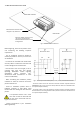
Fig 7: Shows the view from under the roof
Position the CORMORANT so the 4 mounting holes (circled) line up with the corners
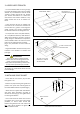
5. ATTACH SPIGOT TO UN
I
T
- Screw spigot onto underside of unit
with the 4 screws provided
(this step can also be done before the unit
is positioned on the roof but take care not
to damage while fitting)
- The spigot will only fit one way, be
careful to ensure spigot is positioned
correctly (Fig 8) and avoid affixing back to
front
Fig 8: Shows positioning of Spigot to be attached to underside of unit. Ensure spigot is
mounted the correct way, screw holes will not line up if attached back to front
6. CONNECT ELECTRICAL SUPPL
Y
- This unit MUST be installed in accordance
with State and National Wiring regulations and
in particular AS3001 – 2008
- Connect power supply to lead from unit
- Note: Brown – Active,
Blue – Neutral Yellow/Green - Earth
W
AR
N
I
NG
Ensure that power is properly disconnected at the supply (mains and
/
or
battery). Failure to do so may result in damage to the unit and persona
l
injury or death
.