
Manual

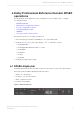
Table Of Contents
- Contents
- 1 Introduction to the Dolby Professional Reference Decoder DP580 documentation
- 2 Overview of the Dolby Professional Reference Decoder DP580
- 3 Getting started
- 4 Dolby Professional Reference Decoder DP580 operations
- 5 Dolby Professional Reference Decoder DP580 administration
- 6 Event and system logs
- Glossary

3 Getting started
The installation procedures let you prepare the DP580 unit for usage.
•
Installation sequence
•
Installing the hardware
•
Network configuration
•
Starting up or rebooting the system
•
Upgrading the system software
•
Configuring NTP
•
Setting the system clock
3.1 Installation sequence
Installing the DP580 requires that you complete these tasks.
1. Mount the DP580 in a rack to secure it in place.
2. Connect the power cable.
3. Connect the signal cables to inputs and outputs to ensure bitstream transmission.
4. Connect the network cables.
5. Start up the system.
6. Configure the network ports.
3.2 Installing the hardware
Install the DP580 unit using the components included with it, plus any other equipment you
require for your intended use.
Procedure
1. Mount the DP580 unit in a rack that is at least 400 mm (16 in) deep.
Caution: To ensure proper ventilation, do not block the front-panel ventilation area on
the top surface at the front of the machine.
2. Connect the provided power cable to the AC connector.
3. Connect your audio and video inputs and outputs.
4. Connect an Ethernet cable from your network to the Command port.
3.3 Network configuration
You can set either a static IP address or use an automatic IP assignment using the Dynamic Host
Configuration Protocol (DHCP) server.
3.3.1 Configuring the command port
The Command port connects the DP580 to a Gigabit Ethernet network.
Getting started
Dolby Professional Reference Decoder DP580 v2.0 user's guide
16 January 2018 15