Dolby Media Meter 2 User’s Manual ® Issue 3 Part Number 9110860
Dolby Laboratories, Inc. Corporate Headquarters Dolby Laboratories, Inc. 100 Potrero Avenue San Francisco, CA 94103‐4813 USA Telephone 415‐558‐0200 Fax 415‐863‐1373 www.dolby.com European Headquarters Dolby Laboratories, Inc. Wootton Bassett Wiltshire SN4 8QJ England Telephone 44‐1793‐842100 Fax 44‐1793‐842101 DISCLAIMER OF WARRANTIES: EQUIPMENT MANUFACTURED BY DOLBY LABORATORIES IS WARRANTED AGAINST DEFECTS IN MATERIALS AND WORKMANSHIP FOR A PERIOD OF ONE YEAR FROM THE DATE OF PURCHASE.
Table of Contents Chapter 1 Dolby Media Meter Overview ......................................................................................1 Chapter 2 Installing Dolby Media Meter 2.1 Installing Dolby Media Meter 2 on a Mac............................................................................3 2.2 Installing Dolby Media Meter on a PC ................................................................................3 2.3 Using the Dolby Media Producer iLok .............................................
List of Figures Figure 1-1 Figure 3-1 Figure 3-2 Figure 3-3 Figure 3-4 Figure 3-5 Figure 3-6 Figure 4-1 Figure 4-2 Figure 4-3 Figure 5-1 Figure 5-2 Figure 5-3 Stand-Alone Meter Measuring a Set of Source Files ............................................................ 1 Measurement Algorithm Choices in the Settings Window..................................................... 5 Measurement Pane Showing Tenths ....................................................................................
Chapter 1 Dolby Media Meter Overview Welcome to the Dolby® Media Meter 2. Dolby Media Meter 2 is a software tool for measuring loudness in programming. It’s an ideal tool for program creation and quality control, and perfect for optimizing broadcast and disc media. Dolby Media Meter 2 runs as an Apple® Macintosh® or Microsoft® Windows® stand‐alone application and as Avid® Pro Tools® AudioSuite, Real‐Time AudioSuite (RTAS®), Steinberg Virtual Studio Technology (VST), and Apple Audio Unit (AU) plug‐ins.
Dolby Media Meter Overview Questions or Feedback If you have questions or comments about this document, please contact technical publications. If you have technical questions about this product/technology, please contact technical support.
Chapter 2 Installing Dolby Media Meter The process of installing Dolby® Media Meter 2 consists of two required steps: 2.1 1. Installing the Dolby Media Meter 2 software 2. Activating the iLok™ Installing Dolby Media Meter 2 on a Mac To install Dolby Media Meter 2 on a Mac®: 1. Insert the CD into the optical drive. The CD opens automatically. 2. Read the introduction, then click Continue. 3. Read the license agreement. You may choose to print and save it for your records.
Installing Dolby Media Meter 2.3 Using the Dolby Media Producer iLok One iLok USB smart key containing a unique license is packaged along with your Dolby Media Meter CD. The license stored on the iLok smart key authorizes your system to use the application. Insert the iLok into an available USB port before opening the application. The iLok key must remain in the USB port while the software is in use. Caution: Do not lose your iLok.
Chapter 3 Measuring Loudness 3.1 Measuring Equivalent Loudness Differences in audio levels between programs and channels or between programs and commercials are a major annoyance to TV viewers. While obvious to the viewer, these loudness differences have proven difficult to measure with conventional methods and equipment. For years, the audio industry has quantified the level of its programming using peak program meters (PPM) and volume unit (VU) meters.
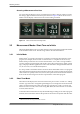
Measuring Loudness Choosing a Measurement Precision You can change the display to show measurements in tenths or integers (units). To make this change, right‐click the measurement pane shown in Figure 3‐2, then choose Units or Tenths from the display context menu. The current setting is marked. Figure 3‐2 Figure 3-2 3.
Measuring with the Stand-Alone Product provided by Infinite mode measurement for the same content. (Highly processed channels and programming will most likely not exhibit this type of behavior.) The benefit of measuring in Short‐Term mode is that the operator can see short‐term variations in loudness level (or short‐term variations in dialogue level when Dialogue Intelligence is enabled) within a program.
Measuring Loudness Figure 3‐4 Figure 3-4 Stand-Alone Meter Measuring an Encoded File To measure the loudness of an encoded file or a source file set: 1. Click to choose either Source files or an Encoded file. 2. Identify the input file or files, either by browsing the network, or by typing a file name and location into the name field. As in other Dolby Media Producer applications, the file selector is intelligent.
Measuring with the Plug-Ins Unless a range is specified here, Dolby Media Meter 2 measures the entire file. If timecode is embedded in the files, the meter will default to timecode; if timecode is not present, the the meter will default to real time. Highlight either or both the beginning and end fields, and type new values to change them. Dolby Media Meter 2 supports all common video frame rates, as well as frames, seconds, and samples, in addition to real‐time measurement. 5.
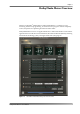
Measuring with the Plug-Ins Figure 3‐6 Figure 3-6 Dolby Media Meter 2 RTAS Plug-In Window Dolby® Media Meter 2 User’s Manual 10
Measuring with the AudioSuite Plug-In Dolby Media Meter 2 RTAS or VST plug‐in insertion is performed on a channel‐by‐channel basis on input channels. On output buses, the meter may be inserted on mono, stereo, or multichannel buses. The number of instances is not limited. Note: Pro Tools always inserts both RTAS and AudioSuite plug‐ins as prefader. Measurements will not correctly match the final mixed output if the meter is inserted on the input section of Pro Tools when mix automation is present.
Measuring Loudness To measure faster than real time in the AudioSuite plug‐in: Note: 3.6 Remember that Pro Tools always inserts both RTAS and AudioSuite plug‐ins as prefader. Measurements will not correctly match the final mixed output if the meter is inserted on the input section of Pro Tools when mix automation is present. 1. Click Reset to restart the measurements. 2. Click Log File to generate and save a log of Dolby Media Meter 2 activity.
File-Naming Conventions That Ensure Automatic File Selection • ExampleTwo_C.wav • ExampleTwo_LFE.wav • ExampleTwo_Ls.wav • ExampleTwo_Rs.wav Example 3 In this file set, the channel ID is not the last element in the file name. The file set uses a period as the separator. • ExampleThree.L.ENG.wav • ExampleThree.R.ENG.wav • ExampleThree.C.ENG.wav • ExampleThree.LF.ENG.wav • ExampleThree.LS.ENG.wav • ExampleThree.RS.ENG.
Chapter 4 Configuring the Meter Dolby® Media Meter 2 offers you a wide range of choice about what and how you measure. This chapter explains the choices. To configure Dolby Media Meter 2, click the settings icon, which shows three sliders. In the stand‐alone application, it appears in the far bottom left corner, as shown in Figure 4‐1. In the plug‐ins, it is at the left underneath the Dolby logo, as shown in Figure 4‐2.
Configuring the Meter Figure 4‐3 Figure 4-3 16 Settings Window Dolby® Media Meter 2 User’s Manual
Measurement Algorithm 4.1 Measurement Algorithm Choose Leq(A), ITU‐R BS.1770‐1, or ITU‐R BS.1770‐2 by clicking a radio button at the top of the settings window. 4.2 Short-Term Window Choose a length for standards that allow this option (three seconds or ten seconds). 4.3 Peak Measurement Type You can choose between the default peak measurement type, Sample Peak, and True Peak, which includes peaks that occur in between samples. Note: 4.4 Determining true peaks is calculation intensive.
Configuring the Meter • Print the graph display. When printing the graph, the printed version will be only what is currently displayed in the graph. No reading outside the display will be printed. Resizing the Graph The graph is the only part of the Dolby Media Meter 2 display that can be resized. To resize it horizontally, drag the bottom right corner of the windowto the right. When unlatched from the plug‐ins, the graph can be resized up to full screen. 4.
Chapter 5 Understanding the Log and the Graph Dolby® Media Meter 2 lets you view and save both a graph and log file for each measurement you make. 5.1 Reading the Log When it processes source or encoded files, Dolby Media Meter 2 creates a log file containing a record of its measurements. The log is created as a comma‐separated values (.csv) file, allowing you to open and save it in TextEdit, Microsoft® Excel®, or any other spreadsheet editor.
Understanding the Log and the Graph In between, the log lists several attributes for each second of real time: • Timecode: Indicates the section of the file measured • Date: Indicates the calendar date on which the measurement was made • Time of day: Indicates the time of day the measurement was made • Dialogue present: Indicates the channels that contained dialogue or no dialogue • The measurements you chose • The warnings you chose • Peak (dBFS): Indicates the largest peak value measured in
Appendix A Dolby Loudness Product Comparison Dolby Media Meter 2 comes with both real‐time and non‐real‐time applications. If you have used either the Dolby LM100 Broadcast Loudness Meter or the DP600, the following information will assist you in understanding how the Dolby Media Meter 2 can be used. Table A-1 Loudness Product Comparisons Dolby Media Meter (Stand Alone) Dolby Media Meter (AudioSuite) Dolby Media Meter (RTAS/VST) Non real time ITU‐R BS.1770‐1 ITU‐R BS.
A.2 Measuring a Stereo Program LM100 The LM100 can be set to measure a stereo program from either an AES pair, Dolby E, or Dolby Digital two‐channel program. Dolby Media Meter 2 Dolby Media Meter 2 provides several measurement methods comparable to that of the LM100: A.3 • In the Dolby Media Meter 2 RTAS plug‐in, the plug‐in can be inserted on the stereo output bus of Pro Tools.
Measuring a 5.1 Program • In the AudioSuite plug‐in, the plug‐in can be inserted on a set of multichannel input files in the Pro Tools edit section. Note: • When measuring multichannel input channels, be sure to select the channel routing in the setting window that matches your session. In the Dolby Media Meter 2 stand‐alone application, the 5.1 source channel files, or a 5.1‐channel encoded file, can be selected.
24 Dolby® Media Meter 2 User’s Manual