Thank you for purchasing DVBS2 800CA Digital Satellite Receiver. This manual will help you to install, use and maintain the receiver. Please read this manual carefully before operating your unit and keep it for future reference. Warning & Note In this manual, pay special attention to the following marks that indicate hazardous situations. Warning: Alert user to the operation which could result in device damage or data loss, and the presence of a hazardous situation which could result in serious injury.
User’s Manual Safety Instruction Read following items carefully before operating your new VAST receiver. Installation This receiver should be installed horizontally. Unbalanced installation may cause damage.
User’s Manual Contents 1. Before Using the Receiver .................................................................................................. 4 1.1 Main Features ............................................................................................................... 4 1.2 Front Panel ................................................................................................................... 5 1.3 Conditional Access (CA) ................................................................
User’s Manual 9.2 AV Setting.................................................................................................................... 27 9.3 Factory Default ............................................................................................................ 28 9.4 Modify System Password ............................................................................................ 28 9.5 Parental Control .......................................................................................
User’s Manual 1. Before Using the Receiver 1.
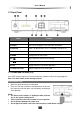
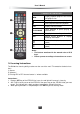
User’s Manual 1.2 Front Panel Name Function 1. STANDBY Switch between operation and standby modes 2. RESET Press the reset button in the event the unit freezes 3. DISPLAY Clock is displayed when unit is in Standby, CH# when on 4. IR Infrared remote sensor 5. MENU Display/exit from main menu 6/9. Adjust volume or move cursor left/right 7/8. Change channels or move cursor up/down 10. OK Display channel list or confirm operation 11.
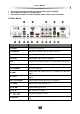
User’s Manual • • • Use a dry soft cloth too clean the surface of the smart card gently. Do not place into liquid or cleaning agent. If the smart card does not work properly, please contact your local dealer. 1.4 Rear Panel Name Function 1. LNB IN Connect to satellite dish 2. LOOP OUT Loop out the satellite signal to another receiver 3. D-AUDIO Output digital audio signal to amplifier 4. S/P DIF Output digital audio signal to amplifier 5.
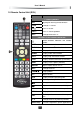
User’s Manual 1.5 Remote Control Unit (RCU) Name Function 1. Learning buttons SET To program learning remote function TV/AV Change TV source TV Turn TV On/Off VOL+/- Turn TV volume up/down CH+/- Change channel on TV 2.
User’s Manual 3.
User’s Manual 2. Installation Connect TV and other devices, then you can power on the receiver and search channels. 2.1 Connect TV Please choose one of following 5 ways to connect TV. 1. Connect TV Using HDMI Cable 1. Connect LNB IN port on the receiver to satellite dish with an RF cable. 2. Connect HDMI port on the receiver to HDMI port on TV.
User’s Manual 2. Connect TV Using YpbPr Cable (Component) 1. Connect LNB IN port on the receiver to satellite dish with an RF cable. 2. Connect Y (green)/Pb (blue)/Pr (red) ports on the receiver to Y/Pb/Pr ports on TV. 3. Connect R-AUDIO (red) L-AUDIO (white) ports on the receiver to corresponding ports on TV with an RCA cable.
User’s Manual 3. Connect TV Using RCA Cable (included in package) 1. Connect LNB IN port on the receiver to satellite dish with an RF cable. 2. Connect VIDEO (yellow) port on the receiver to corresponding port on TV. 3. Connect R-AUDIO (red)/L-AUDIO (white) ports on the receiver to corresponding ports on TV.
User’s Manual 4. Connect TV Using RF Cable (For use with older TV’s or Commercial use) There are 2 ways to connect TV using RF cable. 1. Connect LNB IN port on the receiver to satellite dish with an RF cable. 2. Connect RF OUT port on the receiver to corresponding port on TV. 3. Tune your TV to channel 38 (default) you can do this by either entering manual tuning on your TV or selecting to auto tune function on your TV.
User’s Manual 2.2 Connect Optional IR Target Connect Optional IR Target to IR port and then you can place the receiver out of sight. 2.3 Connect other Device For connection of other devices, please refer to following details: nd Connect LOOP OUT port on the receiver to LNB IN port on 2 receiver with an RF cable.
User’s Manual Note: If you encounter any problem during the connections, please contact your local Dealer. 2.4 Power on 1. Connect one end of power adapter to power input port on the receiver. 2. Connect the other end of power adapter to the mains power socket. 3. Turn on the power switch on power socket, the receiver will boot up and you will see the receiver go through the scanning process Note: Please turn on your TV and switch it to corresponding AV mode according to actual connection.
User’s Manual 3. Basic Operation This section describes operations such as channel change, volume control and other basic operations when playing program. 3.1 Channel Change You can change channels using following methods: 1. Select Next/Previous Channel Press or CH+/- keys to select next/previous channel. 2. Select Channel by Channel Number 1. Press number keys to input a channel number. 2. Press OK key or wait for 3 to 5 seconds to display in full screen. 3.
User’s Manual 7. 8. 9. 10. Standard/high definition mode icon Resolution Current time Signal strength and quality 3.4 Channel List Channel list is available for you to browse channels easily and quickly. Press OK key to display channel list of current service mode. 1. Press TV/RADIO key to switch between TV and radio modes. 2. Press keys to switch among different channel lists. 3. Press PAGE/ keys to page up/down. 4. Press keys to select a channel. 5. Press OK key to play it in full screen. 3.
User’s Manual 3.9 PVR Hotkey Menu This menu provides some hotkey PVR functions. Press PVR key to display hotkey key menu. Notes: • Time shift can be started in this menu. • For more details about PVR functions, please refer to 4. Personal Video Recording (PVR). 4. Personal Video Recording (PVR) You can record programs on USB device for later playback. This receiver provides PVR functions, such as quick recording, schedule recording, time shift, etc.
User’s Manual Divide Record by EPG Event You can record programs in several files according to EPG events, such as news, weather report, etc. Select “OFF” to record programs in one file, or select “ON” to record programs in several files according to EPG events. PVR Icon Time out Set on screen duration of PVR icon. Press keys to select Always, 5 Sec, 10 Sec (default), 30 Sec or 60 Sec. If “Always” is selected, PVR icon is displayed on screen all through the recording.
User’s Manual Schedule Type: Press keys to select Rec or Play. Schedule Start Time: Press OK key to display calendar window. Set schedule start date and time according to screen information. Schedule End Time: Press number keys to input end time. Schedule Mode: Press keys to select Once, Daily or Weekly. If “Weekly” is selected, press OK key to pop up weekly window. Select one or more days with keys and press OK key to confirm, then highlight “OK” and press OK key to save and exit.
User’s Manual Channel Name: Display channel name. File Name: You can rename the file if needed. Press OK key to pop up a keyboard. For detailed operations, please refer to 4.7.3 Rename Recorded File. Valid Record Time: Display valid recording time. Past Time: Display past time. Duration: Press keys to select a recording duration. System will record according to the modified duration. Select “Pause” and press OK key to pause recording. Select “Resume” and press OK key to resume valid recording.
User’s Manual 1. TV icon 2. File name 3. File group name 4. Decoding standard 5. Standard/high definition mode icon 6. Watching point time (hh:mm:ss)/total time (hh:mm:ss) 7. Playback progress 8. Operation help information 4. Jump backward/forward 1. Press INFO key to display playback progress bar. 2. Press REW/FF keys to jump backward/forward, or press keys to jump to previous/next chapter. 3. Press PLAY/PAUSE key to play at normal speed. 5. View Recorded File Information 1.
User’s Manual 2. Group Recorded File 1. Press keys to select a file. 2. Press Green key to pop up group edit window. 3. Select a group and press OK key to add the selected file to this group. 4. Press EXIT key to save and exit. In addition, you can add, delete and rename groups. Add Group Press Green key to pop up a keyboard. For detailed operations, please refer to 4.7.3 Rename Recorded File. 1. 2. 3. Delete Group Press keys to select a group.
User’s Manual 4.8 Time Shift Press PLAY/PAUSE key in non-menu mode, or highlight “Start Time Shift” in PVR hotkey menu and press OK key, the receiver records current program on USB device in the background temporarily. You can playback it as if playback a recorded file. 1. Time Shift Operation You can perform pause/play, fast backward/forward, etc. For detailed operations, please refer to 4.6 Playback Recorded File. You can also press INFO key to display time shift progress bar.
User’s Manual 5.2 Digital Photo Select Main Menu → Multimedia → Digital photo and press OK key to display photo list. 1. Press Green key to switch between file list and icon view modes. 2. Press keys to select a JPG file. 3. Press OK key to display it in full screen, or press Blue key for slide show. 4. Press EXIT key to exit. 6. HDD Management 6.1 Clean up USB device You can view free space of USB device and delete recorded files if necessary.
User’s Manual 1. Current date and time 2. Detailed information of the selected program 3. Channel list 4. Time slice bar 5. Program list 6. Operation help information keys: Select channel keys: Select program OK key: Play current program in full screen or schedule future program Red/Green keys: Switch to next/previous day 7.2 Schedule Program 1. Press keys to select a future program. 2. Press REC key to pop up EPG schedule window. 3. Set schedule type and mode.
User’s Manual the next menu. 2. Press keys to set latitude and longitude of local, and press OK key to enter select LNB window. (Approximate is fine) 3. Press keys to select LNB type according to your LNB and set LNB frequency according to your LNB type (default is 10700 LNB also known as 10.7). The details are on the sticker on the LNB. 4. After setting, press OK key to enter signal detection window. You can adjust satellite dish manually according to calculation result displayed on screen. 5.
User’s Manual 2. Modify TP 1. Press Yellow key to move cursor to parameter list. 2. Press or number keys to set proper values. 3. Press EXIT key to save the new TP. 3. TP Search Search channels according to the selected TP. 1. Press Yellow key to move cursor to TP list. 2. Press keys to select one TP. 3. Press Red key to search channels. 9. Settings 9.1 Common Setting Select Main Menu → Settings → Common Settings and press OK key to enter. 1.
User’s Manual 2. Press EXIT key to save and exit. 9.3 Factory Default Warning: This function will restore system settings to factory defaults and erase all channels. Select Main Menu → Settings → Advance Settings → Factory Default and press OK key, a warning box pops up for confirmation. Select “OK” and press OK key to confirm or select “EXIT” and press OK key to cancel the operation. System will reboot after restoring. 9.
User’s Manual 10. USB Upgrade Warning: Don’t turn off the receiver during Software upgrade. Notes: • Before operation, please download new version software to root directory of the USB device. • USB device should be connected to USB port on rear panel before operation. You can transfer data by USB port. 1. Select Main Menu → Settings → Advance Settings → USB Upgrade and press OK key to display a message box. 2.
User’s Manual 12.3 Loader Status This window displays information about loader, including Irdeto access loader status and manufacturer loader status in chip ID. Select Main Menu → Settings → Information → Loader Status and press OK key to enter. 12.4 Mail Information All mails received from VAST or SatKing are displayed in mail information window. Select Main Menu → Messages and press OK key to enter.
User’s Manual Card/Service Activation 1. If this is the first start up of a new system/installation you need to activate your card but don’t this until you can receive and view channel 800 (info channel). Activating your card prior to being able to watch channel 800 means that the card won’t receive the “hit” and once you have signal you will need to manually “hit” the card. Card activation can be done online at www.mysattv.com.au.
User’s Manual Time Shift Doesn’t Operate 1. The speed of USB device is not fast enough to support timeshift function. 2. The capacity of USB device is less than 2GB. No Playback 1. To playback the recorded files of scrambled channels, the VAST card must be inserted. 2. The satellite signal became weak during in recording. 3. Not enough free space on USB device. No picture 1. Video cable is disconnected or incorrectly connected. Connect video cable correctly, ie yellow to yellow. 2.
User’s Manual 13.2 Specifications Tuner Frequency 950 ~ 2150MHz Symbol Rates 2~45,000 (DVB-S) 2~45,000 (DVB-S2) Level -65 ~ -25dBm Impedance 75Ω Connector IEC 169-24 Female LNB Supply 13V/18V/OFF, 400mA max. LNB Switch 22KHz DiSEqC 1.0,1.1,1.2, USALS Compatible Channel Decoding Standard DVB-S EN300421 DVB-S2 EN302307 Demodulation QPSK, 8PSK FEC Mode QPSK-1/2,2/3,3/4,5/6,7/8. 8PSK 1/2,2/3,3/4,3/5,4/5,5/6,8/9.
User’s Manual Data Output IP Data EN-301 192-7 Supported Via RJ-45 Low Speed Data Supported Via RS-232 Conditional Access System Irdeto Secure Silicon 3.11 HL CAS Version 3 USB Version USB 2.0 Supply 5Volts, 500mA Max Power Adaptor Input Voltage 100-240V~ 50/60Hz Output Voltage 12V Output Current 2.0A Receiver Power Requirements Input Voltage 12VDC Input Current 2.0A via 2.
User’s Manual 14. Acronym CC CVBS DVBS-2 DVB-S EPG FTA HDD HDMI HDTV STB RCU LNB TV OSD OTA USB PVR IR RCA RF SDTV S/P DIF DiSEqC UHF REC FF Rew Closed Caption (Subtitles) Composite Video Broadcast Signal Digital Video Broadcasting Satellite MPEG4 H.