bed_anl_DVB13 CIP_englisch_q5.qxd 08.09.03 11:14 Seite 1 Operating Manual DIGITALSatellite-Receiver Features integrated decoding system plus PCMCIA interface to accommodate a CI module. For reception of free-to-air and encrypted (e.g. VIACCESS, IRDETO, SECA etc. ) satellite programmes. DiSEqC 1.
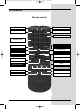
bed_anl_DVB13 CIP_englisch_q5.qxd 08.09.03 11:14 Seite 2 1 Index 1 Contents . . . . . . . . . . . . . . . . .2, 5, 6 2 Illustrations . . . . . . . . . . . . . . . . . . .3 Introduction . . . . . . . . . . . . . . . . . . .7 3 Please read this first - . . . . . . . . . .8 Safety precautions! . . . . . . . . . . . .9 4 4.1 4.2 4.3 4.4 4.5 4.6 Connections . . . . . . . . . . . . . . . . .10 Mains power connection . . . . . . . . . . . . . .11 External unit . . . . . . . . . . . . . . . . . . . . .
bed_anl_DVB13 CIP_englisch_q5.qxd 08.09.03 11:14 7.4 7.5 7.5.1 7.6 7.7 7.8 7.9 7.10 7.11 7.12 7.13 Volume control . . . . . . . . . . . . . . . . . . . . . .28 Selecting another language . . . . . . . . . . . .29 Dolby Digital (AC3 mode) . . . . . . . . . . . . .29 TV/radio switching . . . . . . . . . . . . . . . . . . .29 Return to last programme selected. . . . . .30 Display time and programme info . . . . . . .30 Additional programme information . . . . . . .30 Transponder information . . . . . . . .
bed_anl_DVB13 CIP_englisch_q5.qxd * Only with devices with this 08.09.03 11:14 Seite 4 8.3.4 8.3.5 8.4 8.4.1 8.4.2 8.4.3 8.4.4 8.4.5 8.5 8.6 Manual search . . . . . . . . . . . . . . . . . . . . . .48 After the search . . . . . . . . . . . . . . . . . . . . .48 Service settings . . . . . . . . . . . . . . . . . . . . .49 Activating default (factory) settings . . . . . .49 Deleting all programmes . . . . . . . . . . . . . .49 SFI channel . . . . . . . . . . . . . . . . . . . . . . . .
bed_anl_DVB13 CIP_englisch_q5.qxd 08.09.
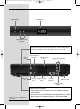
bed_anl_DVB13 CIP_englisch_q5.qxd 08.09.03 11:14 Seite 6 LED display* On/Standby Programme select up/down Card reader for Smartcard:* > Insert the Smartcard (gold chip face down, and in the direction of insertion) carefully into the card reader, as far as it will go.
bed_anl_DVB13 CIP_englisch_q5.qxd 08.09.03 11:14 Seite 7 Dear customer, congratulations on your decision to select this digital receiver . This operating manual will help you to fully utilise the comprehensive functions of your new digital receiver. We have made the operating instructions as easy to understand and as brief as possible. This is a digital receiver of the new generation.
bed_anl_DVB13 CIP_englisch_q5.qxd 08.09.03 11:14 Seite 8 3 Please read this first > > > > > > > > > > Before you set up your unit for operation, please first check that the package contains all the components that should be there. The following are supplied as standard: 1 digital receiver, 1 mains power cable, 1 remote control unit, 1 operating manual, 1 guarantee card, 2 batteries (1,5V AAA size). Insert the batteries provided in the battery compartment of the remote control unit.
bed_anl_DVB13 CIP_englisch_q5.qxd 08.09.03 11:14 Seite 9 The descriptions of keys and terms that appear in the OSD menu are printed in bold type in this operating manual. Help function: Where available in the menu, pressing the blue function key will cause a help text to be displayed, pressing again will return to normal operation. Note on disposal The packaging of your unit consists entirely of recyclable material.
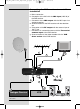
bed_anl_DVB13 CIP_englisch_q5.qxd 08.09.03 11:14 Seite 10 Connecting the DVB receiver to a satellite installation a. Mains connection b. Connection of the LNC with the LNC input (LNC IN) of the DVB receiver. c. Connection of the LNC output with the LNC input of an analogue receiver. d. Scart connection of the DVB receiver with the television set. e.* Connection of the RF output with the antenna input of the TV set. f.
bed_anl_DVB13 CIP_englisch_q5.qxd 08.09.03 11:14 Seite 11 4 Connections The references a b c etc. mentioned below refer to the illustration on page 10. 4.1 Mains power connection The digital receiver should only be connected to the mains power supply after it has been completely connected with all other components in the system. This serves to avoid the digital receiver or other components being damaged or destroyed.
bed_anl_DVB13 CIP_englisch_q5.qxd 08.09.03 11:14 Seite 12 Proceed as follows: d Connect the receiver (SCART socket TV) and the television set (SCART socket) by means of a SCART cable. If your television set is appropriately equipped, this will be switched automatically to AV, and thus to satellite reception, when the digital receiver is switched on. 4.3.
bed_anl_DVB13 CIP_englisch_q5.qxd 08.09.03 11:14 Seite 13 4.5 Hi-fi amplifier 4.5.1 Analogue To enjoy the best possible sound quality, you can connect the digital receiver to a hi-fi amplifier. Use a suitable cable to connect the cinch sockets Audio R and Audio L of the digital receiver to an input of the hi-fi amplifier (e.g. CD or AUX; please note that the Phono input is not suitable!). 4.5.
bed_anl_DVB13 CIP_englisch_q5.qxd 08.09.03 11:14 Seite 14 The initial installation procedure described hereinserves only as an example. The exact initial installation procedure will depend on the settings you wish to make. Please follow closely any instructions that appear on the screen. (Fig. 5-2) (Fig. 5-3) (Fig. 5-4) (Fig. 5-5) (Fig. 5-6) Menu/OSD language: > Press OK to display the selection window for the Menu/OSD language. (Fig.
bed_anl_DVB13 CIP_englisch_q5.qxd 08.09.03 11:14 Seite 15 Position A/Option A > Use the Up/down arrow keys to select the satellite you wish to receive at the DiSEqC setting Position A/Option A, and confirm by pressing OK. (Fig. 5-7) Position B/Option A > Use the Up/down arrow keys to select the satellite you wish to receive at the DiSEqC setting Position B/Option A, and confirm by pressing OK. (Fig. 5-8) (Fig.
bed_anl_DVB13 CIP_englisch_q5.qxd (Fig. 5-12) (Fig. 5-13) 08.09.03 11:14 Seite 16 on the screen. After the Search When the programme search has been completed, the number of transponders, programmes and new programmes found will be displayed. In addition, you will be asked (Fig. 514), whether you want to accept the programmes found automatically in the TV or Radio list.
bed_anl_DVB13 CIP_englisch_q5.qxd 08.09.03 11:14 Seite 17 6 Settings Now that you have completed connecting your new digital receiver, and have commenced operation, you can, if you wish, further optimize the settings of the digital receiver for your personal preferences. 6.1 Menu language Under this menu item you have the option of setting the menu language according to your personal preference. To alter the OSD language proceed as follows: > Press the Menu key to call up the Main Menu. (Fig.
bed_anl_DVB13 CIP_englisch_q5.qxd > 08.09.03 11:14 Seite 18 In this line you can use the arrow keys right/left to set the parental control mode to Always or Auto. Always When the setting Always is selected, the Main Menu as well as the programmes selected in terms of Points 8.1.6 and 8.2 are permanently blocked, regardless of the programme being broadcast. Auto When the setting Auto is selected, access to the Main Menu is not blocked.
bed_anl_DVB13 CIP_englisch_q5.qxd > > 08.09.03 11:14 Seite 19 Confirm by pressing OK. The menu Audio/Video Settings will be displayed. (Fig. 6-5) You can use the arrow keys up/down to move the marker around within the menu, and change the individual settings as indicated. When selecting a menu item please also note any messages displayed on screen. The following settings can be adjusted: 6.3.1 Picture format TV set (Fig.
bed_anl_DVB13 CIP_englisch_q5.qxd 08.09.03 11:14 Seite 20 To enjoy this feature, you must simply connect the Audio Out Digital output (see Point 4.5.2) of your DVB receivers with the digital input of your Dolby Digital 5.1 channel amplifier. Where a programme is broadcast in Dolby Digital sound, this will be indicated by the Dolby logo being displayed in the information window when the programme is selected.
bed_anl_DVB13 CIP_englisch_q5.qxd 08.09.03 11:14 Seite 21 Confirm by pressing OK. The menu Settings will be displayed. (Fig. 6-7) > Now use the arrow keys up/down to select the line Antenna Configuration. > Confirm by pressing OK. The menu Antenna Configuration will be displayed. (Fig. 6-8) The following settings may be made in this sub-menu: > 6.4.
bed_anl_DVB13 CIP_englisch_q5.qxd 08.09.03 11:14 Seite 22 Continue to work through the menu Antenna Settings, until the entries in this menu comply with those of your receiving installation. In the case of switching criteria which you do not require, set the entry to No Satellite. 6.4.3 Additional Settings/LNC properties (Fig.
bed_anl_DVB13 CIP_englisch_q5.qxd 08.09.03 11:14 Seite 23 LOF low band LOF (Local oscillator frequency) is the frequency an LNC utlizes to convert the frequency received into the so-called 1. intermediate frequency, which can, in turn, be received and interpreted by the digital receiver. So-called Universal LNCs are equipped with 2 LOFs, to cover the entire receiving range from 10.7 to 11,8 GHz (low-band) and from 11,7 to 12,75 GHz (high-band).
bed_anl_DVB13 CIP_englisch_q5.qxd 08.09.03 11:14 Seite 24 7.2 Programme selection 7.2.1 Using the Programme up/down keys > You can move through the list one slot at a time, up or down, by using the Programme keys up/down either on the receiver or on the remote control. 7.2.2 Using the numeric keys > Use the numeric keys to enter the programme number you wish to view.
bed_anl_DVB13 CIP_englisch_q5.qxd > > > > > 08.09.03 11:14 Seite 25 Now use the red function key to open a window showing the types of programme list available (Favourites List, Providers and Complete list). The active programme list type will be highlighted. (Fig. 7-2) Use the arrow keys up/down to select, e.g. the programme list type Complete list. Confirm by pressing OK. The alphabetically sorted Complete list, which includes all programmes, will be displayed. (Fig.
bed_anl_DVB13 CIP_englisch_q5.qxd 08.09.03 11:14 Seite 26 7.3 Reception of encrypted programmes* Your receiver is equipped with an integrated decoding system* as well as with a Common Interface*. This allows you to receive and view encrypted programmes.
bed_anl_DVB13 CIP_englisch_q5.qxd 08.09.03 11:14 Seite 27 7.3.1.1 Multifeed options* Some programmes provide a facility for multifeed options. This function allows you, for instance, to select your own preferred camera angle in the case of coverage of sports events (Formula 1), or to switch to various sports venues (National League soccer). Where a programme provides multifeed options, this is indicated on screen (Fig. 7-6). > Press the Option key to select one of the options available.
bed_anl_DVB13 CIP_englisch_q5.qxd 08.09.03 11:14 Seite 28 7.3.1.3 Smartcard PIN-Code* (Fig. 7-10) Your digital receiver is equipped with a parental control function that allows you to block individual programmes as well as access to the main menu (see Points 6.2.1 and 8.1.6). In addition programmes not suitable for viewing by children are pre-blocked by means of an age group code. This parental control for programmes is permanently active, and cannot be de-activated as described in Point 8.1.6.
bed_anl_DVB13 CIP_englisch_q5.qxd 08.09.03 11:14 Seite 29 7.5 Selecting a different language If a programme is broadcast in several languages, or with various soundtracks ( in the information box), proceed as follows to select a different language or sound channel: > Press the Language Select key. A list of languages currently broadcast will be displayed on screen (Fig. 7-11). > Use the arrow keys up/down to select the desired language. > Confirm by pressing OK.
bed_anl_DVB13 CIP_englisch_q5.qxd 08.09.03 11:14 Seite 30 7.7 Return to last programme selected > > Press Back on the remote control to return to the last programme viewed previously. Press the key again to return to the programme viewed previously. 7.8 Display time and programme information (Fig. 7-12) This function allows you to view programme information related to the current programme. > Press the blue function key to display the information related to the current programme (Fig. 7-12).
bed_anl_DVB13 CIP_englisch_q5.qxd 08.09.03 11:14 Seite 31 7.12 Teletext 7.12.1 Using the teletext decoder of your television set Where broadcast by the provider, teletext will be transferred to your television set. To operate the teletext function, use the remote control of your television set. Should you experience problems with your television set, such as an overlap of teletext and picture content, you should set your digital receiver to CVBS mode (Point 6.3.4). 7.12.
bed_anl_DVB13 CIP_englisch_q5.qxd 08.09.03 11:14 Seite 32 7.13 Sub-titles Where sub-titles are available, this will be indicated by the symbol in the information window. If you have enabled the function Sub-titles (in accordance with Point 6.3), these will automatically be displayed, provided they are available in the language selected. If the sub-titles are only available in other languages, or are broadcast via teletext, you can enable these manually as follows.
bed_anl_DVB13 CIP_englisch_q5.qxd 08.09.03 11:14 Seite 33 You can also initiate a manual download procedure immediately after switching the receiver off (while the display* shows “oooo”) by pressing the SFI key. During the download procedure the message SFLd will appear briefly in the display, followed by an indication of the percentage of SFI data already transferred, e.g.038P for 38%). The duration of the download procedure will depend on the number of programmes that need to be updated.
bed_anl_DVB13 CIP_englisch_q5.qxd 08.09.03 11:14 Seite 34 7.14.5 Next > > or > or > (Fig. 7-17) Use the arrow key right to display the table "Next" (following programmes) (Fig. 7-17). The SFI functions (Point 7.14.3) are available. Press the arrow key right to move to the SFI table “More” (Point 7.14.6) Press Back to return to the previous SFI table “Now” Press the TV/Radio key to return to normal operation. 7.14.6 More > > (Fig.
bed_anl_DVB13 CIP_englisch_q5.qxd > > 08.09.03 11:14 Seite 35 Press the SFI key to display the information. Lengthy text passages can be scrolled one line at a time by using the arrow keys up/down or use the green or red function keys to move backward or forward one page at a time. Press Back to return to the previous table. 7.14.7.2 Marking a programme > > > Use the arrow keys or the function keys to mark/pre-select the desired . Confirm by pressing OK.
bed_anl_DVB13 CIP_englisch_q5.qxd 08.09.03 11:14 Seite 36 Aborting timer operation If you wish to delete a timer event programmed by means of the SFI, proceed as described in Point 7.15. To abort an active timer, switch the digital receiver off by pressing the On/Standby key. Then press this key again to switch the receiver on, and proceed to operate it normally. 7.14.7.4 SFI Programme overview (Fig 7-19) (Fig.
bed_anl_DVB13 CIP_englisch_q5.qxd > > > > > 08.09.03 11:14 Seite 37 Use the green function key Genres to open a window showing the programme genres available. (Fig. 721) Use the arrow keys to select the desired programme category, and confirm by pressing OK. An overview of the day’s programmes conforming to this category will be displayed. (Fig. 7-22) Use the arrow keys up/down to move the marker to any specific programme.
bed_anl_DVB13 CIP_englisch_q5.qxd > > 08.09.03 11:14 Seite 38 Use the arrow keys up/down to move the marker around the list one line at a time. Use the arrow keys right/left to move the marker backward or forward in the list one page at a time. Date > Use the arrow keys to mark the column Date. > Use the numeric keys to enter the date on which you wish to record a programme. Start > Use the arrow key right to mark the column Start.
bed_anl_DVB13 CIP_englisch_q5.qxd 08.09.03 11:14 Seite 39 2. Reminder If your receiver is in normal operational mode, it will switch to the pre-selected programme slot at the preset time. In contrast to the VCR setting, the controls remain fully functional, and the receiver will not be switched off at the end of the programme. Transferring data into memory > When you have completed programming, press the yellow function key Transfer to transfer the data into memory.
bed_anl_DVB13 CIP_englisch_q5.qxd 08.09.03 11:14 Seite 40 8 Changing the basic programming 8.1 Configuring the Favourites list This chapter describes how you can change the pre-programming of your digital receiver as well as the Favourites programme list according to your preferences. This function is also required to sort newly found programmes into the list after a search has been carried out.
bed_anl_DVB13 CIP_englisch_q5.qxd 08.09.03 11:14 Seite 41 Now use the arrow keys up/down to mark the selection criterion according to which the Complete list is to be sorted. Select e.g. All Programmes, to indicate all available programmes in the Complete list or All new, to indicate only the newly found programmes of the last programme search or All English, to indicate only English-language programmes. > Confirm by pressing OK.
bed_anl_DVB13 CIP_englisch_q5.qxd 08.09.03 11:14 Seite 42 Press the blue function key Functions. A selection window indicating the Navigator functions will be displayed. (Fig. 8-5) > Use the arrow keys up/down to mark the line Remove and confirm by pressing OK. > Use the arrow keys up/down to mark a programme that you wish to remove from the list. > Press the yellow function key Remove. The following message will be displayed: “Remove programme(s) from the list?”.
bed_anl_DVB13 CIP_englisch_q5.qxd > > > > > > 08.09.03 11:14 Seite 43 Press the yellow function key Sort to save the programme at the new position. To sort several programmes simultaneously, mark these as described in 8.1.2 ( Marking blocks of programmes). Now press the yellow function key Sort. A double arrow will be displayed next to the block of programmes selected. You can now use either the arrow keys up/down or the Numeric keys to move the block of programmes to the desired list position.
bed_anl_DVB13 CIP_englisch_q5.qxd 08.09.03 11:14 Seite 44 You can now initiate the updating procedure manually: > Use the On/Standby key to switch off the receiver (Standby). > Now, while the display* shows “oooo”, press the key SFI. The receiver will now perform an update. This will be indicated by the message SFLd appearing briefly in the display*, followed by a progressive indication of the percentage of SFI data already downloaded.
bed_anl_DVB13 CIP_englisch_q5.qxd 08.09.03 11:14 Seite 45 8.2 Changing the receiver PIN code The receiver PIN code is set at the factory to 0000. To change the receiver PIN code proceed as follows: > Use the Menu key to call up the Main Menu. > Use the arrow keys up/down to mark the line Settings. > Confirm by pressing OK. The sub-menu Settings will be displayed. > Use the arrow keys up/down to mark the line Change Receiver PIN. > Confirm by pressing OK.
bed_anl_DVB13 CIP_englisch_q5.qxd > > > > (Fig. 8-9) (Fig. 8-10) 08.09.03 11:14 Seite 46 To perform a programme search, call up the Main Menu. (Fig. 8-8) Use the arrow keys up/down to mark the line Channel searching. Confirm by pressing OK. The sub-menu Search will be displayed. (Fig. 8-9) Now use the arrow keys up/down to select the type of search you wish to perform. Confirm by pressing OK. 8.3.
bed_anl_DVB13 CIP_englisch_q5.qxd 08.09.03 11:14 Seite 47 8.3.3 Searching on a transponder You can search a specific transponder (see Point 10: Technical Terms) for available programmes. To do this, you will have to enter the appropriate transponder data (Fig. 812). Satellite In this line you must select the satellite on which the desired transponder is located. > Use the arrow keys up/down to select the line Satellite. > Press OK to display a table listing the active satellites.
bed_anl_DVB13 CIP_englisch_q5.qxd > 08.09.03 11:15 Seite 48 The search procedure can be terminated by pressing the red function key. 8.3.4 Manual Search (Fig. 8-13) If a particular programme is not found by means of the automatic or transponder search procedures, it may be necessary to enter the unique PID number for this specific programme. These numbers can be found in the Internet, or must be obtained from the appropriate programme provider. The menu (Fig.
bed_anl_DVB13 CIP_englisch_q5.qxd > 08.09.03 11:15 Seite 49 Independently of whether you have added the newly found programmes to the Favourites list automatically, these can still be added to the Favourites list manually at any time as described in Chapter 8.1. 8.4 Service settings You can revert to the factory default settings at any time.
bed_anl_DVB13 CIP_englisch_q5.qxd 08.09.03 11:15 Seite 50 8.4.3 SFI Channel (Fig. 8-18) Your receiver has the facility to receive a data channel via the ASTRA satellite systems (19° East) carrying additional SFI data. These facilitate a SFI (programme guide) preview for up to a week in advance. > Press OK to call up the sub-menu SFI Channel (Fig. 8-18). > To receive the data channel, mark the line SFI Update. > Press OK to select On.
bed_anl_DVB13 CIP_englisch_q5.qxd 08.09.03 11:15 Seite 51 Note: This function should not be performed if you have made changes in the menues Basic Settings and LNC Configuration, as these changes would revert to the default settings when this function is activated, and would have to be re-programmed. For the new software version to be downloaded automatically, the digital receiver must be in standby mode. The downloading procedure is indicated by SAtL in the display.
bed_anl_DVB13 CIP_englisch_q5.qxd 08.09.03 11:15 Seite 52 8.6 Conditional Access* Use this menu item to access the sub-menues relating to the Smartcard being used, as well as to the CI module. Use the arrow keys to move to the lines Smartcard* or CI slot*, and confirm by pressing OK to view information on the Smartcard or the CI module used. 9 Operation in conjunction with a rotating antenna (DiSEqC 1.2) (Fig.
bed_anl_DVB13 CIP_englisch_q5.qxd > > > > > 08.09.03 11:15 Seite 53 Press the yellow function key Actions, to open an additional window. (Fig. 9-5) Now use the arrow keys up/down to mark the line Delete limits. Confirm by pressing OK, to transfer the action selected to the green function key. To delete the limits, press the green function key Delete lim.. Confirm the message displayed by pressing OK. (Fig. 9-6) (Fig. 9-5) (Fig. 9-6) 9.1.
bed_anl_DVB13 CIP_englisch_q5.qxd 08.09.03 Seite 54 Use the arrow keys to mark the field Geo.Pos. Confirm by pressing OK. A menu allowing you to enter the coordinates of your location will be displayed. (Fig. 9-9) > Press the OK key to switch the geo-positioning function On or Off. > Use the arrow keys to select the field used to enter geographic longitude. > Use the numeric keys to enter the geographic longitude. > Now press the arrow key left.
bed_anl_DVB13 CIP_englisch_q5.qxd 08.09.03 11:15 Seite 55 9.3 Setting the satellite position Proceed by sytematically working through Points 9.3.1 to 9.3.3 for each satellite position that is to be set. When programming the satellite positions, we recommend that you begin with the satellite in the most easterly position. Then add each additional satellite in geographic order, working in a westerly direction, until you have reached the most westerly position.
bed_anl_DVB13 CIP_englisch_q5.qxd 08.09.03 11:15 Seite 56 > When you have set up the test transponder, press Back, to return to the menu for setting up the motorized rotating antenna. The field used to enter the orbital position will be active. > Use the numeric keys to enter the orbital position of the user satellite and confirm by pressing OK. > Now press the OK key to indicate whether it is a westerly (W) or an easterly (E) orbital position. If the Geo-positioning function is set to On (Point 9.
bed_anl_DVB13 CIP_englisch_q5.qxd > 08.09.03 11:15 Seite 57 Now use the arrow key right (field East will be marked) resp. left (field West will be marked) to rotate the antenna to the desired position. Keep the appropriate key depressed until the desired position is reached. 9.3.2.3 Automatic detail adjustment (Autofocus) Before storing the satellite position in memory you should perform an automatic focussing procedure. This will set the antenna to optimum reception in terms of measurable parameters.
bed_anl_DVB13 CIP_englisch_q5.qxd 08.09.03 11:15 Seite 58 9.4 Current satellite list The satellite positions stored in memory are shown in the satellite list. Any positions not yet stored in memory are marked with an “*”. > To adjust the antenna dish to a position on the satellite list, use the arrow keys to select the field Current Satellite list. > Confirm by pressing OK. > Use the arrow keys up/down to select the desired position. > Confirm by pressing OK.
bed_anl_DVB13 CIP_englisch_q5.qxd 08.09.03 11:15 Seite 59 10 Technical Terms Antenna cable: Cable used to connect the modulator of the satellite receiver to the antenna input socket of the television set.
bed_anl_DVB13 CIP_englisch_q5.qxd 08.09.03 11:15 Seite 60 Coaxial cable: Cable used to connect the LNC to the satellite receiver, used to transmit the signal received as well as to provide power to the LNC. LNB/LNC (Low Noise Block Converter): Receiving unit located at the focus of the parabolic dish antenna, converts the frequency range of the satellite to the intermediate frequency of the digital receiver.
bed_anl_DVB13 CIP_englisch_q5.qxd 08.09.03 11:15 Seite 61 These new services are constantly being developed and improved by the providers. To utilize the services, it may occasionally be necessary to update the software of the digital receiver. Transponder: Located on the satellite, serves to process one or several programmes. It receives the signal from the ground station, amplifies it, and broadcasts the signal back to earth.
bed_anl_DVB13 CIP_englisch_q5.qxd 08.09.
bed_anl_DVB13 CIP_englisch_q5.qxd 08.09.03 11:15 Seite 63 Serial interface RS 232: Type RS 232, bidirectional Bitrate 115,2 kBit/s max. Connector D-SUB socket, 9 pin Function Update for operating software and pre-programming LNC Power supply: LNC power 400 mA max.; short-circuit proof LNB voltage vertical <14,0V no load, > 11,5 V at 400 mA LNB voltage horizontal < 20 V no load, > 17,3 V at 400 mA LNC switched off in standby mode 22 kHz modulation: 22 kHz, Amplitude 0.6 V +/- 0.
bed_anl_DVB13 CIP_englisch_q5.qxd 08.09.03 11:15 Seite 64 12 Trouble-shooting guide Problem Possible cause Solution Various programmes not shown in programme list Wrong programme list selected Select another programme list (see Point 7.2.3.
bed_anl_DVB13 CIP_englisch_q5.qxd Problem 08.09.03 11:15 Possible cause Seite 65 Solution Time not displayed* while in stand- Time not downloaded by mode Switch to e.g. ZDF for 30 seconds Receiver cannot be switched on, or Receiver blocked cannot be operated Perform Flash reset: Caution! All personal settings will be lost. > Disconnect mains plug. > Press standby and programme up keys on receiver simultaneously, and keep them depressed.
bed_anl_DVB13 CIP_englisch_q5.qxd 08.09.03 11:15 Seite 66 For daily use Switching on and off > > > Switch on the digital receiver by pressing the On/Standby key, either on the receiver or on the remote control. Press this key again to switch the receiver off. The receiver is now in standby mode, the display* on the receiver shows the time.