--~ DOLBY SURROUND PRO LOGIC 5 CD MINI HI FI SYSTEM PRO MINI-CHATNE HAUTE FIDELITE LOGIC DOLBY, AMBIOPHONIQUE, A CHANGEUR POUR 5 DC SISTEMA MINI HI FI CON 5 CD DOLBY SURROUND PRO LOGIC D() I DOLBY SURROUND I PRO.
~ To reduce the risk of fire or electric shock, do not expose this appliance to rain or moisture. WARNING SYSTEM PRECAUTION PARTS EXPLANATION IDENTIFICATIONS CONNECTIONS OF GRAPHICAL SYMBOLS.
Follow the advice below for safe and appropriate operation. ON PLACEMENT .Do not use the unit in places which are extremely hot, cold, dusty, or humid. .Place the unit on a flat and even surface. .Do not restrict the air flow through the ventilation slots by placing the unit on soft furnishings, by covering the unit with a cloth or by placing the unit on a carpet. ON CONDENSATION .When left in a heated room where it is warm and damp, water droplets or condensation may from inside the CD player. .
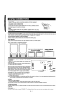
IMPORTANT Switch off the power before connecting SPEAKER CORD speakers and other equipment. CONNECTION Connect the wires with the printed white lines to the red (+) terminals and the plain-black wires to the black (-) terminals. NOTE: Connecting speakers other than the speakers supplied with the unit, may damage the unit. Main Speakers (Left and Right) Speakers should be placed beside the audio system left and right side several feet apart.
Speaker Connections 1. Connect Main Speaker wires (Left & Right) from the Main Speaker to the amplifier's 'MAIN' speake terminals. 2. Connect Surround (Rear) Speakers wires (Left & Right) from the Surround (Rear) Speaker to the amplifiel\ Surround (Rear) speaker terminals. 3. Connect Centre Speaker wires from the Centre Speaker to the amplifier's centre terminal.
1 2 ,25 ~- 3 ~11- ..=~ 4 24 5 6 7 8 9 10 -6Q~ - 6) 7) 8) 9) 10) 11) 12) 13) 14) 19 .17 16 It:>--- 14 1) 2) 3) 4) 5) ,r 18 11 12 13 0'. .23 22 21 .
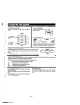
~ 2 21 3 4 5 6 7 8 9 10 11 12 13 14 18 17 16 15 1. 2. 3. 4. TRACK and CHANNEL indicators. FUNCTION indicators. SLEEP indicator. TIMER indicator. 13. RANDOM indicator. 14. Indicators to show which disc holder of the disc tray is occupi~ If a certain dlsc holder is empty, the corresponding numbe indicator will be off. 5. 6. 7. 8. ON/OFFindicators. AM/PMindicators. X-Bassindicator. Band (FM/MW(AM)indicators. 15. 16. 17. 18. 9. Playback Indicator. 10 STEREO indicator. 11 .P . nd .
TO ADJUST THE SOUND BALANCE Press the LEFT button to increase the volume level of the left main speaker. Press the RIGHT button to increase the volume level of the right main speaker. Press the RESET button to resume the volume level of the main speakers. TO ADJUST THE SOUND QUALITY Press the PRESET EQUAliZER button to select an equalization mode (POP. ROCK, JAZZ. CLASSIC). Press the button repeatedly until the desired equalisation indicator is illuminated.
DOLBY SURROUND PRO LOGIC mode: Choose this feature when playing Dolby Pro Logic encoded movies and music (especially laser disc, video tapes and TV broadcasts with Dolby Surround sound). Most currently released video cassetles and many TV broadcasts include this feature. Dolby Pro Logic will not only give improved sound, it will give a clear perception of the position and direction of the original sound track.
=,,~- To set the timer off {time to turn off) NOTE: 1) Press the. STOP button to view the local time, time to turn on and time to turn off step by step, the previous display will be retrieved after 8 seconds. 2) The timer will work if the TIMER key is pressed So that "TIMER' lights up in the display. Cancel the timer by pressing the key so that "TIMER' goes out. 3) Suddenly OFF when playing, the TIMER OFF function are activated.
~ 1. Press the SLEEP button while the power is on. "SLEEP 90"'ights in the display. NOTE: SLEEPcan only be adjusted in TUNER, TAPE and AUX modes. 2. Press and hold the SLEEP button to select the length of remaining time until the unit turns off. It changes the indicator in the following way: SLEEP 90 -+- t SLEEP 10 SLEEP 80 ... -+- SLEEP 20 SLEEP .., The Sleep Timer is set and the SLEEP indicator lights in the display. Let go when required sleep time (in minutes) is shown.
1. Press the FUNCTION button to TUNER. FUNCTION "===} , TO SEARCH FOR A STATION OUICKL y Hold the TUNING UP or DOWN button and station searching starts automatically. When a station is found, searching stops automatically. However, it may not stop if the signal is weak. In this case, search for the station manually. E-11 c:,,--"'-4;.".cc;,c,".;-,"- ~ -0, ,'c, <" ...'..~.'--~"-~~-.;;C~,",.-""";e~.",.-.
1. Press the FUNCTION button to l 2. Select a band. 3. TUNER. Press the preset number. PRESET buttons I TO RECEIVE THE FM BROADCAST IN STEREO Set the MODE selector to FM STEREO. When the FM stereo broadcast is received, STEREO indicator lights up. ~=~~-<-;~~~"-""""~~~~...,...:.,"""'~..o.:=- FM IFTHE FM STEREO BROADCAST SIGNAL IS WEJ Set the MODE selector to FM MONO. Background noise will be reduced but the si~ reproduced will be mono. i ~ ~ ~ E-12 ",2~"' "",,0~..' -;,~~",.",.
~ I. Press Ihe FUNCTION button 2. 10 CD Press the OPEN/CLOSE disc tray. button to open the FUNCTION -. ---' IEAK ugnal 3. 4. Place the first disc onto the disc holder. with the label side up. CAUTION: This unit can play 5. (12cm) disc only Press the DISC SKIP button to revolve the tray clockwise. Place other disc(s) on the disc holder(s). DISC SKIP I \ "5 ~ 5. Press the OPEN/CLOSE button to close the tray. It takes a short while for your player to check the discs 6.
~"' Notes: ,. During playback, disc tray can be opened to change/add disc, but DISC SKIP button will become ini and the current disc playback will not be interrupted. 2. The ~ / ...SKIP buttons can only be used to choose a track of the current disc. To choose a trad another disc, DISC SKIP button should be pressed to get to the desired disc first. LOCATING A PARTICULAR POINT IN A TRACK j l To Locate a Particular Point In a Track , .
::t3~.J\'1'=l!L'~~11 .~IE--:~~ SHUFFLE PLAY -PLAYING IN STOP MODE ~,.r!.~I:~~~[13:~ IN A RANDOM ~1~[.J~II~::!;[:].~I~ ~~j ORDER - ~",F"":""~"~-0:';;,;;",;,:;",;- Notes:1. The random function shuffles all the tracks {maximum 48 tracks) of all discs in the disc tray and randomly selects one track to play each time. 2. The player will skip to a new randomly selected track and start playing if ...SKIP button is pressed during random playback. IN PLAYBACK MODE TO CANCEL RANDOM PLAYBACK 1.
~=.--',c,..",.".-""'-c, ~ REPEAT DURING PLAYBACK PLAYBACK MODE To Repeat the Current Track .Press the REPEAT button until REPEAT () appears on the display and the currently pla~ track will be played repeatedly until the STI button is pressed. .SKIP and SEARCH can still be used during function. SKIP will go to the start of the next tr Reverse Skip will go to the start of the pre track, on the second press it will then go to start of the previous track. SEARCH will sea through the tracks normally.
~~~.Jil'l:::l.!.'[~11 ,IJI ~-:~~ 1~';.[.J~C:::lr.!.lh'll'l~)~ ~.~¥.I:;r.!.,~~~~ A program of up to 32 tracks from all the available discs in the disc tray can be played in a preset order. 1. Press the ClOCK 2. Press the DISC SKIP button to select the desired disc (the disc symbol moves). I MEMORY button (in stop mode). NE ClOCKI MEMORY ing OP DISC SKIP his I:k, ent the rch tks NE ISc Illy 3. UP Press the 1441~ desired track.
):..
tm --- Usable tapes. use only normal (type I) tapes for playback. You can playback only the front sides of the tapes in Decks A and B. TO STOP PLAYBACK Press the STOP/EJECT WHEN THE TAPE REACHES ITS END During fast wind or regular play, the tape will stop automatically when its end is reached. button. TO INTERRUPT PLAYBACK Press the PAUSE button. To resume play, press the PAUSE button again. WHEN BOTH DECK A AND DECK B ARE IN THE PLAYBACK MODE Deck B will playback no sound will come from deck A.
~.;.;;,;---,c-,-0"c::,-."'- Jse only normal {t)'~tal>es 1. Press the FUNCTION for recording and pla~b~~ 2. switch Insert the recorded tape 3. into ,Q"",V,,","""' .--~ Set ,~ MODE 1 BEAT FM STEREO... -- FUNCTION the selectorj according to the desiredJ dubbing speed: NORMAL or' HIGH. Deck B and the blank tape into Deck A. to TAPE. CUT lCOOI NORM 2 I«)NO HIGH DUBBING 4. Press the PAUSE 5. button Press the RECORD which also engages button. button 6.
RECORDING FROM THE CD PLAYER i t ~;I ;1 ~ ~ . :t: TO STOP RECORDING Press the STOP/EJECT TO ERASE A RECORDED TAPE 1) Press the FUNCTION button to TAPE. 2) Insert a tape with the side you want to erase facing button of Deck A. TO INTERRUPT RECORDING Press the PAUSE button of Deck A. To resume recording; press the PAUSE button again. 3) you. Press the RECORD "i ~ button to start erasing. I I REMOTE CONTROL 1) SPEAKERS RESET button 2) 3) 4) 5) SLEEPbutton BALANCE UR, SPEAKER '+'1'.
I GENERAL SYMPTOM N;;'-~::d~ I No sound .volume. from one channel or unbalanced right I Reversed len and rtgnt sound: Lack 01 bass sound or apparently 01 musIcal Severe huminstruments. or noise.I RADIO lelt and imprecise physlcallocalion . RECEPTION- - i"he FM STEREO indicator Severe hum or noise. I Th~-~te~FM p;~~ llashes.- I : cannot be received in stereo. c-; Set the MODE swiki1 to FM MijNO~ the FM S-,:EREO 1i!1-" will QOout.
ng TUNER SECTION Frequency range FM 87.5-108 MHz AM530-1710kHz FM. Antenna Pig Tail AM: loop antenna Antenna Id ~) tt AMPLIFIER Iy Intermediate distortion Power Bandwidth S, ..