65799-Confer-Model7200USr4.ps 3/23/09 2:46 PM Page 1 SAVE THESE INSTRUCTIONS DEALER/INSTALLER: GIVE TO HOMEOWNER MODEL #7200 PATENTS PENDING “ROLL-GUARD” A-FRAME LADDER FOR RIGID-FRAMED POOLS ONLY ASSEMBLY AND INSTALLATION MANUAL Proudly Made in U.S.A.
65799-Confer-Model7200USr4.ps 3/23/09 2:46 PM Page 2 Model #7200 “ROLL-GUARD” A-FRAME LADDER For Rigid-Framed Above Ground Pools ASSEMBLY INSTRUCTIONS - PLEASE READ BEFORE ATTEMPTING ASSEMBLY Handrails Deck Roll-guard Right Bridge Left Bridge Adjustable Brace Treads Outside Right Rail (OR) Inside Right Rail (IR) Outside Left Rail (OL) Inside Left Rail (IL) If missing parts call - Toll free U.S./Canada - 866-396-2968 or www.conferladders.
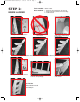
65799-Confer-Model7200USr4.ps 3/23/09 2:46 PM STEP 1: Page 3 Tools needed: rubber mallet Parts needed: 1- Inside left rail (marked “IL” at the top) 1- Inside right rail (marked “IR” at the top) 4- Ladder treads INSIDE LADDER #1: Lay “IL” rail on flat surface. Incorrect, do not block track. #2: Correct, tap down until seated, note track is not blocked.. #3-5: Install 3 more treads, for a total of 4, see above pictures. #6: Lay “IR” rail on flat surface.
65799-Confer-Model7200USr4.ps 3/23/09 2:46 PM Page 4 STEP 2: Tools needed: rubber mallet Parts needed: 1- Outside left rail (marked “OL” at the top) 1- Outside right rail (marked “OR” at the top) 5- Ladder treads OUTSIDE LADDER #1: Lay “OL” rail on flat surface. Incorrect, do not block track. #2: Correct, tap down until seated, note track is not blocked.. #3-5: Install 3 more treads, for a total of 4, see above pictures. #6: Lay “OR” rail on flat surface.
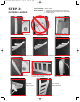
65799-Confer-Model7200USr4.ps 3/23/09 2:46 PM Page 5 STEP 3: Tools needed: rubber mallet, cordless drill w/Phillips driver Parts needed: 1- Deck 4112- HANDRAILS/DECK Handrails Left bridge with lock assembly Right bridge #10 x 1-1/4” self tapping screws #1-3: Push handrails up through bottom of deck leaving about 3” exposed. #4: Align the inside/outside rails with deck/handrail. #5-6: Partially slide deck down locking handrails onto ladder sections. #7-8: Install right and left ladder bridges.
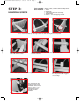
5799-Confer-Model7200USr4.ps 3/23/09 2:46 PM Page 6 STEP 4: Tools needed: rubber mallet Parts needed: 1- Roll-guard INSTALLING ROLL-GUARD 1- Ladder tread #1: With the ladder laying on it’s side, slide the roll-guard into track, grab handle first. #2-6: Slide roll-guard around to other side of ladder. #4 #5 #6 #7-8: Install bottom tread. IMPORTANT: this bottom tread MUST be installed to block the track, roll-guard must not come in contact with pool liner.
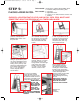
65799-Confer-Model7200USr4.ps 3/23/09 2:46 PM Page 7 STEP 5: Tools needed: garden hose, cordless drill w/Phillips driver PLACING LADDER IN POOL 1/4” drill bit, Phillips screwdriver, pliers Parts needed: 4- cap plugs 2- adjustable braces 2- 1/4-20 x 3-1/2” bolts, washers and hex nuts 1- Padlock CHOOSE A LOCATION THAT IS LEVEL AND IN FULL VIEW. POOL MUST HAVE COMPETENT ADULT SUPERVISION AT ALL TIMES WHEN IN USE.
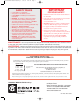
65799-Confer-Model7200USr4.ps 3/23/09 2:46 PM Page 8 IMPORTANT SAFETY RULES * * * * * * * * * * * * Locate ladder on a solid base. One person on the ladder at a time. Ladder MUST be installed per manufacturer’s instructions. DANGER: No Jumping or Diving from ladder. Face ladder when entering and leaving pool. To prevent entrapment or drowning — DO NOT swim through, behind or around ladder. Ladder to be used as a swimming pool ladder only.