
Installation Guide


c. Attach the hanger board to the wall
i. Drive the long screws into the hanger board.
1. If using a drill and 1/16” drill bit (recommended): first pre-drill holes in the marks you made
on the hanger board, and then partially drive the screws into those holes.
2. Or if using a Phillips screwdriver: partially drive the long screws directly into the marks you
made on the hanger board.
ii. After the long screws are partially driven into the hanger board, hold the hanger board up to
the wall aligned with the marks you previously made. Drive the long screws completely into
the studs, until the head of each long screw is flush with the surface of the hanger board.
d. Attach corbels to the mantel shelf (NOTE: skip step if your mantel has no corbels)
i. On a soft surface, turn the mantel shelf upside down (so the side with predrilled holes is
facing down).
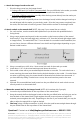
ii. Using a tape measure and a pencil, make two marks on the bottom surface of the mantel
shelf exactly 5” from the back edge and a minimum of 6” from the left and right edges (refer
to image below). The marks MUST be 5” from the back for successful corbel installation, but
you are free to choose a different distance from the left and right edges depending on your
desired corbel location.
iii. Using a screwdriver or drill, drive 1 short screw into each of the marks you made.
iv. Leave about 1/16” of the screw heads exposed above the surface.
v. Each corbel comes with a pre-attached keyhole bracket on one side. Fit each corbel over a
screw, ensuring the screw head slides into the keyhole bracket on the corbel. If a corbel does
not seem to be fitting snug, the screw should be inserted a little further into the mantel. If
you have difficulty sliding a corbel onto a screw, the screw head may need to be more
exposed.
vi. Optional: Drive one additional small screw into the pre-drilled hole in each corbel to more
securely attach it to the mantel shelf.
e. Mount the mantel shelf to the hanger board (NOTE: this is easiest with 2 people)
i. Locate the 4 pre-drilled holes on the top surface of the mantel shelf.
ii. Hang the mantel shelf on the hanger board so that the pre-drilled holes are facing up, and so
that the back of the mantel shelf is tight against the wall (a second person is helpful to
maintain pressure against the wall). Depending on the size of your mantel shelf, you may be
able to adjust the mantel left or right as desired.
iii. Final step: using a Phillips screwdriver (or drill), drive the small screws straight down through
the pre-drilled holes in the top surface of the mantel shelf.
WARNING: This product can expose you to Formaldehyde (gas), Carbon Black (airborne, unbound
particles of respirable size), N- methylpyrrolidine, Cumene, Ethylene glycol (ingested), and Toluene,
which is known to the State of California to cause cancer, birth defects, or other reproductive harm.
For more information, go to: www.p65warnings.ca.gov.
Questions? Contact us at info@dogberrycollections.com or 888-801-3393.
Questions? Contact us at info@dogberrycollections.com or 888-801-3393.
WARNING: This product can expose you to Formaldehyde (gas), Carbon Black (airborne, unbound
particles of respirable size), N- methylpyrrolidine, Cumene, Ethylene glycol (ingested), and Toluene,
which is known to the State of California to cause cancer, birth defects, or other reproductive harm.
For more information, go to: www.p65warnings.ca.gov.